To Travel Hopefully is Taking the Day Off: Happy New Year to our readers

Dear Reader,

To Travel Hopefully is taking the day off, but don’t worry, we’ll be back with fresh new content soon.  Here’s wishing you a very happy new year!

In the meantime, please take a look at the helpful travel photography tips and inspiring images in our archived posts.  Just select a category (Destinations, Gear, Techniques, Travel, etc.) from the right nav bar, or choose a month under Archives, and browse to your heart’s content.

While you’re here, take a moment to tell your friends and family about us.  Anyone who enjoys travel and wants to improve their photography will find great daily content here, including inspiring images from around the world and tips and tricks for making the best possible photos.  You can email any post or share it via social media with the click of one of the buttons at the end of each post.  And if you enjoy To Travel Hopefully, please click in the right nav bar to subscribe via email or RSS feed, so you won’t miss a single post.

And finally, please consider supporting this site by purchasing some of my photos, browsing for some great gear via the Amazon links, or clicking on some of the ads that interest you.

Thank you for visiting To Travel Hopefully!  Without your support, this project cannot continue providing you with daily content including inspiring travel photos and tips and tricks for making great images.

Warm regards,

Kyle Adler


Architecture in Ireland and Scotland [Encore Publication]: From Neolithic to today, Ireland has remarkable buildings; here’s how to capture them

During our recent travels in Dublin, hiking across southwestern Ireland, and visiting Edinburgh, we encountered fascinating architecture at every turn.  From ruined farmhouses to stately manor houses, and from Neolithic-era “beehive huts” made of stone to modern fishing shacks, there is a wealth of diversity in the buildings in this region.  Here I present some images of the architecture we saw during our rambles, along with a few words about each.

Dublin’s Trinity College is one of the oldest universities in the world.  Famous as the home of the ancient Book of Kells, the college also boasts the Long Room, quite possibly the grandest study hall in the world.  This image was made with a wide-angle lens using only available light.  I used a relatively high ISO setting so that I could choose a small aperture for greater depth-of-field while still using a fast enough shutter speed to handhold the camera.  Buy this photo

Another perspective on the Long Room, this image captures only the upper gallery, emphasizing the repeating patterns of the ladders, arches, and shelves.  During post-processing I decided to render the photo in black-and-white to bring out the texture and pattern.  Buy this photo

An architectural photo doesn’t have to isolate the building from its surroundings.  I combined a shot of Dublin’s famous Olympia Theatre with a street scene by framing the theater and waiting for an interesting cast of characters to walk by.  Buy this photo

Dublin Castle was built during the Anglo-Norman period and has witnessed nearly the entire history of the city.  It is an austere but not particularly pretty building.  To capture this image I shot with a wide-angle lens and a polarizing filter to bring out the texture of the stonework and to attempt to enhance a rather undramatic grey sky.  Buy this photo

The interior of Dublin Castle is prettier than its exterior.  This shot was handheld, as tripods are not allowed inside.  I used a fast normal lens, but even with a high ISO setting the light was sufficiently low that I had to use a large aperture, resulting in a shallow depth-of-field.  Although the foreground objects are not in sharp focus, I think this scene works rather well to capture a sense of the place.  Buy this photo

In the remote and beautiful Gougane Barra Forest Park lie the ruins of a Sixth Century abbey founded by St. Finbarr.  To make this image, I shot from inside one of the cells where the monks lived, looking outward toward the ruins of the abbey walls and altar.  From this perspective the viewer gets a sense of what it would have been like to live a mostly solitary and austere life here many centuries ago.  Buy this photo

On the same tiny island where the ruined abbey is located on Gougane Barra, there is a more modern but quite lovely church.  We spent some time getting to know the American bride and groom who were celebrating their wedding here, and I shot them in front of the little chapel looking across the lake from the mainland.  Including people in the context of the building makes architectural photography more relatable and compelling.  Buy this photo

Hiking along the remote Sheep’s Head Way, we came across this old farmhouse.  I framed the image with an extreme wide-angle lens to lend it an interesting perspective, and I used a circular polarizing filter to saturate the colors of the building and to enhance the sky and lawn.  Buy this photo

The stately Bantry House lies at the end of the Sheep’s Head Way and has been owned by the same family since 1750.  This photo was made from the top of the hundred steps leading through the gardens and up a hill behind the house.  It’s a lovely vantage point from which to photograph the mansion, its gardens, and the gorgeous harbor and mountains in the background.  A polarizing filter was used to add drama to the sky and to saturate the colors of the water and gardens.  Buy this photo

This old farmhouse is now an interpretive center and shop open to the public to give a sense of what rural Irish life was like a century ago.  The front of the house is especially charming when framed to include the rustic surroundings.  Buy this photo

We started our walk in Killarney National Park at the lovely Derrycunnihy Church.  I framed this scene from a low angle looking slightly upward at the church and using a wide-angle lens.  The perspective gives a sense of the stark isolation of the church in this very remote wilderness setting.  As always when shooting upward with a wide-angle lens, one must take care not to distort the lines of the image too severely.  Buy this photo

Along the Gap of Dunloe we hiked past this bucolic scene around a ruined farmhouse.  I framed the image to include the horse carts and the rutted pathway.  Buy this photo

The Wild Atlantic Way showcases some of the most scenic views in all of Ireland as it winds through rolling hills toward the remote Blasket Islands.  Along the way the observant hiker will see dozens of strangely shaped stone enclosures called beehive huts, some of which date back to the Neolithic Period.  This image was shot with a telephoto lens to highlight the beehive huts and to compress the distance between the huts and the Blasket Islands dotting the coast of the Atlantic Ocean.  Buy this photo

The quaint seaside village of Dingle is chock full of charming stone houses with brightly painted doors and windows.  Because it was pouring rain all day and I was recovering from an illness, I brought only my phone’s camera.  Even so, I was able to make some nice images of the houses by using the Manual app to take control of the phone’s camera.  Buy this photo

Edinburgh, Scotland has a tremendous variety of architecture, which could be the subject of a separate post.  For today, I’ll close with this image of the ruins of the ancient abbey at Holyroodhouse at the end of the Royal Mile.  I shot with a wide-angle lens using a small aperture to maximize the depth-of-field and taking care to keep the horizon level so as not to distort the lines of the archways any more than necessary.  Buy this photo

For a refresher on architecture photography, check out this post: Post on Architecture Photography.

What are your favorite destinations for architecture?  Please share your thoughts in the comment box.

Focus on Edinburgh [Encore Publication]: Ancient and modern, Scotland’s capital city offers great architecture, museums, and more

At the end of our two-week hiking adventure in Ireland, we added a stop in Edinburgh for a family visit.  Ancient and modern at the same time, Scotland’s capital offers a wide range of experiences for the traveler, and a wide array of subjects for the travel photographer.  From architecture to museums, castles to palaces, glorious views and creative contemporary cuisine, this city has become a world-class destination.  Here is a brief photo essay capturing some of our experiences there.

The main attraction, dominating the city from its high central vantage point, is the ancient Edinburgh Castle.  It’s an easy walk from the center of town up the hill to tour the castle.  On the way up, a variety of interesting views of the castle unfold.  Try different lenses and compositions to take advantage of the many moods of this place.

Edinburgh Castle towers above the city center and offers a variety of different perspectives for the photographer.  Here I’ve shot from halfway up the hill using a telephoto lens and polarizing filter to isolate this one portion of the edifice and to enhance the stonework and the sky.  Buy this photo

Edinburgh’s Royal Mile stretches from the Castle down to the Palace at Holyrood House.  It’s easy to see this street as a shopping mall jammed with tourists, but it would be a shame to overlook the stately old architecture and the little closes (alleyways) off the main street.

To make this image along the Royal Mile, I chose an unusual perspective and used a medium telephoto lens to align the different colors, textures, and angles of the statue with the cathedral.  Buy this photo

Edinburgh is changing.  During several visits over the decades, I’ve heard many a bagpiper playing in the center of the city, but this is the first time I’ve met a female piper.  She was happy to pose for a portrait.  Buy this photo

Brightly painted façades lend a splash of color to the old stone architecture in this lovely neighborhood.  Buy this photo

Scottish food has also evolved a great deal in recent years, with several restaurants serving contemporary takes on traditional Scottish dishes.  Nowhere is the ambiance nicer than at the Witchery by the Castle, along the Royal Mile.

To capture the lovely interior of the Witchery, I used a fast normal lens and a high ISO setting.  This scene was lit entirely by candlelight and a few sconce lights in the ceiling.  Buy this photo

Revisiting Edinburgh Castle on our second day, I wanted to shoot it from a different perspective at a different time of day.  During post-processing I decided that a black-and-white rendering of the image would highlight the austere tone of the castle.  Buy this photo

Edinburgh has a proud literary tradition, from Burns to Scott to Stevenson.  The city’s literature museum, while small, is worth a visit.

I couldn’t resist capturing this display sign in the Writers’ Museum highlighting the Stevenson quote that graces the name of this website.  For more on the importance of this quote to the development of my passion for travel and photography, please see this page: About To Travel Hopefully.

At the other end of the Royal Mile from the Castle lies the Palace of Holyroodhouse.  This is the Queen’s official residence when she’s in Scotland, and its tour is first-rate.  While photography is not allowed inside the lovely palace, it is okay to photograph the stately and much older abbey adjacent to the palace.

Again here, I tried to seek out an unusual perspective in this shot of the abbey at Holyroodhouse.  I shot upward with a wide-angle lens, using spot metering to expose for the stonework and a small aperture to provide broader depth-of-field.  Buy this photo

I made this portrait of our daughter with two of her friends from university by stepping back and framing them using a medium portrait lens.  I chose a medium aperture to ensure sharp focus on the subjects while also keeping the façade of the abbey reasonably sharp.  Buy this photo

Behind Holyroodhouse is a hill towering above the city.  A short but fairly strenuous hike leads to Arthur’s Seat at the summit.  From the summit there are glorious views over the whole of the Edinburgh area.  This image of the Palace at Holyroodhouse was shot from partway up the hill.

A view of Holyroodhouse from partway up the hike to Arthur’s Seat.  A polarizer helped bring out the drama in the sky and the saturated green of the lawns.  Buy this photo

On our final evening in Edinburgh, we dined on exquisite contemporary Scottish cuisine at the Tower Restaurant.  Sitting atop the Scottish National Museum, this spot has marvelous views over the city to the castle.  The view shown in this image was just as marvelous.

To photograph the beautifully plated trio of smoked Scottish salmon accompanied by a glass of old single malt whisky, I shot from above using a touch of off-camera flash to balance the ambient light of the restaurant.  I used a diffuser on the flash and bounced the flash off the wall to soften its light.  To learn more about food photography, check out this post: Post on Food Photography     Buy this photo

Scottish traditional music is alive and well and performed almost every night at Sandy Bell’s Pub.  This portrait was made using my favorite portrait lens set to a wide aperture, with a high ISO setting on the camera.  The shallow depth of field throws the whistle player into soft focus, so the emphasis in the image is placed on the fiddler.  Buy this photo

Have you visited Edinburgh?  What are your favorite spots there?  What experiences should a photographer be sure to seek out?  Please leave your comments here.

Want to read more posts about travel photography destinations?  Find them all here: Posts on Destinations.

Portraits from Irish Pubs [Encore Publication]: Ireland’s trad music scene is a visual as well as an aural treat

The Republic of Ireland has undergone tremendous social and financial changes over the last 20 years.  It’s now indisputably a modern global society with a strong diversified economic engine.  Yet it’s also a happy truth that today, as in days of old, the pub remains at the center of Irish social life.  Far more than a simple watering hole, the local Irish pub, whether in the center of cosmopolitan Dublin or in a tiny coastal fishing village, is a gathering place where stories are shared, traditional music is played, old friends catch up, and new friends are made.  Oh, and a pint or two might just be downed.

Many pubs feature live traditional, or “trad,” music on a nightly basis.  The casual informality of Ireland’s pub scene allows local amateur musicians to sit in with seasoned pros and pass down the songs from old to young.  Members of the “audience” (it’s hard to distinguish between performers and audience when the sessions are so participatory) are invited to step up to the “stage” (usually just a table covered with pints of beer) to sing a song at any time.  This informality allows the travel photographer to get to know these wonderful musicians over a few pints and to make authentic portraits without feeling like we’re intruding.

Today’s post is a simple photo essay featuring portraits I made of musicians and fellow customers at a variety of pubs across Ireland (plus one in Scotland).  I will forgo the usual technical details except to remind you that when shooting portraits in low-light settings where the use of flash is impossible, that a good fast portrait lens should be used along with a high ISO setting.

My current favorite lens of all is my Nikon 85mm f/1.8G lens.  This is a classic portrait lens and provides a flattering perspective and great image quality when your subject is a human being.  I use it for nearly all of my portrait work these days.  But this lens also shines for nature and action photography where you don’t need a really long focal length.  It renders really lovely “bokeh,” or the soft quality of the out-of-focus parts of the image.

This young singer and fiddler who we met at Dublin’s famous O’Donoghue’s Pub was already a seasoned pro.  In this portrait I sought to capture her expressiveness with hand gestures.  Even without hearing her sing, the viewer can tell that she is expert at weaving stories.  Buy this photo

O’Donoghue’s is widely known as the spot where bands such as the Dubliners sparked the Irish folk music revival in the 1960s.  This band carries on the tradition, sharing songs old and new.  With a wide aperture comes shallow depth-of-field, so when photographing several people at one time you may have to choose which part of the image will be in focus.  Here I wanted to place the emphasis on the guitarist, so the other players are in softer focus.  Buy this photo

Another of Dublin’s great spots for trad music is the Cobblestone Pub.  On this night they were holding a very casual session, where all musicians were invited to come and play some tunes together.  The informality gave me a chance to get to know most of the players over the course of the evening and to make portraits without feeling like an intruder.  Again, the shallow depth-of-field required artistic choices about which subject would be in sharp focus and which would be in softer focus.  Buy this photo

In lively Kenmare, we wandered into a pub where a fabulous folksinger was performing many of the Irish songs I remember from childhood in Boston.  I chatted with Pat during his set breaks and bought a couple of his CDs.  He was a great subject for some expressive portraits, too.  Buy this photo

We didn’t have to leave our hotel on our first night in Killarney to hear some wonderful trad music.  This trio played many of our favorite songs right in the hotel’s pub, and they got most of the audience up to sing and dance along.  Buy this photo

Surprisingly, we heard only one rendition of Cockles and Mussels (aka “Sweet Molly Malone”) during our whole stay in Ireland.  This brave soul stood up in front of the crowd to sing that old standard.  Buy this photo

There’s nothing like watching an Irish crowd respond to the playing and singing of “The Wild Rover” to get one’s blood pumping.  Be ready to capture action in the “audience” as well as on the “stage.”  Buy this photo

Our second night in Killarney brought us into the center of town to an old and lively pub.  The table next to ours had four generations of a local family in attendance, each enjoying the musical set in their own way.  The oldest generation was my favorite.  Buy this photo

I got to know this fiddler over the course of the evening in Killarney.  During the break between sets she was kind enough to let me make her portrait.  It can be difficult in these crowded settings to avoid a cluttered background, but using a wide aperture for a shallow depth-of-field can help, as can careful post-processing.  Buy this photo

Elements I look for when making a portrait are faces with character and colorful details.  I found both with this accordion player and his beautiful instrument.  Buy this photo


The tiny fishing hamlet of Dingle has a population of just 1900 people, yet it somehow supports 52 lively pubs.  My kind of town!  Over pints of ale and shots of local whiskey in this colorful old pub, we made new friends from across the street and from as far away as Newfoundland.  This portrait of a musician was made almost entirely with light from the fireplace.  Buy this photo

The Scottish traditional music scene is as vibrant as Ireland’s, as evidenced by this band we heard at Edinburgh’s Sandy Bell’s Pub.  This place was bustling and extremely crowded.  The cluttered background somehow doesn’t detract too much from the power of this portrait.  Buy this photo

Have you traveled in Ireland or Scotland?  Do you have favorite portraits of the generous and friendly people you encountered there?  Please share your thoughts in the comment box.


Join Me on a Photography Tour Next Summer!: From the Great American Total Solar Eclipse through the most scenic locations of the Pacific Northwest, this is a trip not to be missed

If there’s a more thrilling experience anywhere on our planet than observing a total solar eclipse, I’ve not yet found it.  And the next one will be cutting a path across the USA on August 21.  I am partnering with a prominent solar eclipse tour company to lead a photography tour that begins in Salem, Oregon with this awe-inspiring event and continues through Oregon and Washington states to photograph some of the Pacific Northwest’s most scenic locations.  From Aug. 19-22 we will be part of a larger group of eclipse chasers, accompanied by leading eclipse expert Prof. Jay Pasachoff, preparing for, observing, and photographing this remarkable natural display in Salem.  Our small group of about 15 will then embark on a travel and photographic journey that will take us to the Santiam Wilderness, Bend, Newberry Volcano National Park, John Day Fossil Beds, Wallowa Mountains, Mt. Hood, Portland, Olympic National Park, and Seattle, among other memorable destinations.

Almost nothing can rival the stunning beauty and sheer excitement of observing and photographing a total solar eclipse.

I will be providing photography instruction for interested participants via daily workshops and in-the-field learning.  During our optional low-key workshops, we’ll review our recent images, plan our shot list for the upcoming locations, and cover techniques to make the best images possible.  While the drama of the eclipse and the breathtaking landscapes of the US Pacific Northwest will be obvious magnets for our photographic pursuits, we will also seek opportunities to make memorable images of the people we meet and of the wildlife and other attractions of the region.  Photographers of any level from advanced beginner through semi-professional will see their images improve, and non-photographer friends and family are welcome to either attend the daily workshops (even a smartphone camera can make great images) or enjoy a few minutes of extra time on their own.   You can enjoy this trip and make memorable images using whatever camera gear you wish to bring; it is not necessary to invest in specialized gear (although for the eclipse itself, a DSLR or mirrorless interchangeable lens camera equipped with an inexpensive solar filter will be helpful).

This tour begins in Salem, OR on Aug. 19 and ends in Seattle, WA on Sep. 2.  Find more details here: Eclipse and Pacific Northwest Photography Tour.  Please let me know if you have questions or are interested in participating on the trip.  Mary and I hope that you can join us for this rare opportunity to experience a total solar eclipse right here in North America and to visit the spectacular attractions of Oregon and Washington states!


Total Eclipse of the Heart [Encore Publication]: Techniques for photographing solar eclipses

Prof. Jay Pasachoff and his student set up scientific gear for observing the total solar eclipse in Svalbard in 2015.  Buy this photo

If there’s a more thrilling experience anywhere on our planet than observing a total solar eclipse, I’ve not yet found it.  The experience of observing the moon slowly move in front of the sun, obscuring our view of the sun one nibble at a time until day turns into night, the temperature drops, the stars come out in the middle of the day, and the delicate corona of the sun is exposed, is like nothing else we earthlings can feel.  An eclipse is a singular event, each a bit different from any other that has ever occurred, and an exclusive event that often can be observed only from a narrow swatch of land and in very remote corners of the planet.  I’ve stood in the umbra (shadow) of the moon during three total solar eclipses thus far in my life: first in Virginia Beach in the USA when I was 7 years old, then in the mountains above Anji in China in 2009, and most recently in 2015 in Svalbard well above the Arctic Circle.  I plan to be in Salem, Oregon in the USA in 2017 when the next total solar eclipse occurs.  These events are truly life-changing, and once you’ve experienced an eclipse you will want to seek out others.

Photographing an eclipse takes all of the normal challenges of travel photography and throws a few special ones into the mix.  To start with, an eclipse can take place anywhere on the planet, and often the best location from which to view one is very remote with little or no travel infrastructure.  The eclipse I experienced last year in Longyearbyen, high in the Arctic on the island of Svalbard, was a transformative event, but the extreme cold coupled with the lack of infrastructure made getting there and photographing the eclipse a special challenge.  And of course, during an eclipse the already challenging conditions are stressed even further due to the tremendous crush of visitors who rush in from all over the world to try to view the solar event.

I recommend you travel with an expert in managing the complicated logistics required to stage a successful eclipse trip.  I always go with A Classic Tours Collection (http://aclassictour.com/travel-company/solar-eclipse-tours-expeditions-total-eclipse/).  Run by travel logistics guru Mark Sood and with scientific consulting from Professor Jay Pasachoff, a world expert in eclipses and the human being who has stood in the shadow of the moon more times than any other, this company has delivered an unprecedented track record of successful eclipse trips since 1980.

Special challenges in photographing a total solar eclipse, like this one in Svalbard in 2015, include remoteness, lack of infrastructure, extreme conditions, the risk of poor weather, and the need for specialized photographic gear.  Go with an expert or risk missing the action.  Buy this photo

Assuming you are able to get all the right gear to the best possible location to observe the eclipse, and then the weather cooperates, the actual technique required to capture remarkable images of this phenomenal event is fairly straightforward.  Here’s what you need to do:

Gather the right gear.  You will need at least one (and I prefer to have two) DSLR or ILC camera bodies with a long telephoto lens or two.  I use a Nikon D810 with a Sigma 150-500mm super-telephoto zoom lens.  For each lens you will need a specialized solar filter to block 99.999% of the sun’s light to enable you to shoot the sun safely during the partial stages of the eclipse.  The solar filter blocks much more of the sun’s light than a standard photographer’s neutral density filter, so don’t try to find this item at your local camera shop.  Instead, you will need to order it from a specialized astronomy company such as Thousand Oaks Optical (http://www.thousandoaksoptical.com/solar.html).  Be sure to order a black polymer threaded camera filter in the proper diameter for your specific lens.  Without a properly fitted solar filter on each lens you plan to shoot with, it is not safe for your eyes or for your camera’s sensor to attempt to photograph a solar eclipse.  You will also need a heavy-duty professional tripod with a good ball head and mounting plate to hold your camera and lens steady during the eclipse.  Also be sure to pack a remote shutter release with extra batteries, the tripod collar that came with your lens (if included), a mini flashlight for checking your camera’s settings, extra memory cards, and extra batteries and chargers for your camera.

Super-telephoto zoom lens with tripod mounting collar.  Don’t forget to order a solar filter to fit your lens(es).


Heavy-duty professional tripod.


Remote shutter release.

Test your gear.  Before the trip, test your full setup at home by shooting the sun with your solar filter on the lens, and by shooting the full moon without the solar filter.  These two scenarios will allow you to test your gear in conditions similar to the partial stages of the eclipse and to totality, respectively.

Prepare your gear the evening before the eclipse.  Charge all batteries, format all memory cards, make all camera and lens settings (per my instructions below), and check all your equipment.  Remove the UV filter you ordinarily keep on your lens(es), because they will interfere with the solar filter you will use during the partial stages.  On eclipse day, have in your pocket your flashlight, extra camera batteries, extra remote batteries, and extra memory cards.  It will be dark during totality and you will be excited, so best to have everything well planned in advance and within easy reach on eclipse day.

Configure your camera’s and lenses’ settings in advance of the eclipse.  Shoot in RAW + JPEG mode using the highest quality setting available on your camera.  I recommend using an ISO setting of 400, and be sure to turn your camera’s Auto ISO setting off.  The exposure changes constantly throughout the eclipse, so I do not recommend manual exposure mode; instead, choose aperture priority mode with the aperture set at f/11.  You may want to choose highlight-weighted metering if your camera has this option; otherwise, select center-weighted metering.  Choose single-frame shooting mode.  I like to turn on exposure bracketing to shoot bursts of 3 frames, each 1 stop different from the previous one, so as to have higher likelihood of getting proper exposure on each series of shots.  Turn your focus mode to manual, because autofocus will not work during or near totality.  Tape your lens’s focus ring to infinity to be sure it won’t move during the eclipse.  Take a deep breath.  You’re almost ready for the eclipse.

Set everything up at the eclipse viewing site.  Place your camera on the heavy-duty tripod and install your remote control.  Remove your regular UV filter and attach your special solar filter.  As the first contact between sun and moon occurs, start to shoot.  Remember to shoot in bursts of 3 (or 5 or 7) if you have turned on exposure bracketing.  Due to the rotation of the earth, you will have to recenter the sun in your viewfinder periodically (unless you are shooting through a telescope with an equatorial mount).

This image shows the early partial stages of the Svalbard total solar eclipse.  Shoot periodically during all the partial stages, and remember to reposition your shooting angle so the sun remains in the center of your field of view.  Buy this photo

Remove your solar filter only during the period of totality.  When the diamond ring effect signals the start of totality, and the world around you is suddenly plunged into darkness, quickly take off your lens’s solar filter.  You won’t need it during totality.  The brightness of the sun during totality is similar to that of the full moon, so viewing and photographing the sun during totality will not be dangerous.  This is the most exciting time, and it will last for only about 1-4 minutes, so enjoy the spectacle of the sun’s corona revealed!  Remember to spend some of the time just looking and not shooting.  This is an experience you will want to remember not only through your camera!

For the brief but exhilarating period of totality, remove your solar filter.  This image captures the diamond ring effect that ushers in the period of totality.  The sun’s delicate corona can be seen around the edge of the photosphere.  Buy this photo

Put your solar filter back on after totality.  The partial stages that follow the period of totality, just like the partial stages that came before totality, are not safe to view or photograph without the special solar filter.  Keep shooting those later partial stages because you will want a complete record of the eclipse to show a compelling narrative and to create montages of the images.

Shoot some landscapes and people images, too.  Don’t forget to use a second camera–either a second DSLR or ILC body you brought for the occasion or your smartphone’s camera–for landscape and people shots during the eclipse.  You don’t want all of your images to be close-up portraits of the sun and moon only.  You will need a solar filter on the second camera, too, if you plan to include the sun itself in these shots.

Remember to shoot some images, with a second camera, of yourself and your travel companions during the eclipse.  Here’s a shot of my family standing in the umbra during totality at the China eclipse of 2009.  Buy this photo

Return all settings to normal after the eclipse.  You will have made quite a few special adjustments in order to capture the eclipse properly.  Don’t forget to restore your usual settings after the eclipse has ended.

Get creative with your eclipse images once you return home.  There are many ways to compile and share your images to give the world a sense of the thrill you experienced while in the shadow of the moon.

Once home from the eclipse trip, get creative about how to share your experience.  Here I have put together a montage of some of my favorite images from each stage of the Svalbard eclipse.  Using Photoshop, I created a composite image showing the sequence of stages from partial to total and back again.  Buy this photo

Have you experienced a total solar eclipse?  Photographed one?  Please share your tips and tricks.

Coming soon: Information about a photography tour I will be leading during and after the upcoming Great American Eclipse this coming summer.  Please join us for this once in a lifetime opportunity!

“To Travel Hopefully” News Flash!: I am honored to be a winner of the Travel Photographer of the Year competition

Dear Readers,

Very excited to share the news that I am a winner of the prestigious Travel Photographer of the Year competition.  I was named runner-up in the Wildlife and Nature category for my image of an alligator and its reflection in a Louisiana bayou.  TPOTY is considered by many in the industry to be the premier international travel photography competition.  A panel of highly regarded judges considered tens of thousands of entrants from 123 countries.

You can see the press release here: Travel Photographer of the Year.  So far there has been press coverage featuring my image in many news outlets including The Telegraph, The Mirror, The Daily Mail, The Guardian, The Sun, CNN, MSN, and AOL.  You can find the CNN coverage at CNN coverage of TPOTY (scroll through the images to see mine) and the Mirror coverage very prominently featuring my photo at Mirror coverage of TPOTY.  My image will be exhibited at the UK City of Culture festival, then in London, and on to international venues.

Feeling very honored and humbled by this major validation of my recent career change.

Thank you for your incredible support thus far.  Please invite your friends and family members who are also passionate about travel and/or photography to join us.  Here’s to the many further travel photography adventures we will share together!

Cheers,

Kyle Adler

Focus on Dublin [Encore Publication]: Ireland’s main city overflows with Guinness, literature, history, and music

We began our rambles through Ireland and Scotland with a whirlwind two-day stay in Dublin.  The capital of the Republic of Ireland, Dublin is well known as the home of Guinness beer and for its literary and historical legacy, but perhaps less known as a remarkable hub of live music and contemporary fine dining.  It’s also a marvelous place to make images that highlight the old and the new elements of this vibrant city.  Here’s a brief photo essay along with some discussion of how the images were made.

Perhaps the world’s grandest study hall, Trinity College’s Long Room is a stately palace to higher learning.  Located next to the vault housing the famous Book of Kells (where photography is not permitted), the Long Room is best photographed with a wide-angle lens using natural light.  Here I shot from one end of the hall looking up at the ceiling and upper gallery.  Be careful to watch your horizons when making an architectural image from such an angle.  Buy this photo

Live trad (traditional Irish folk) music is a staple of Dublin nightlife, and nowhere is it better than at the famed O’Donoghue Pub, where in the 1960’s bands such as the Dubliners sparked the Irish folks music revival.  Irish pubs are convivial and interactive places, where you can mingle with the performers and other locals.

To make portraits of the musicians, sit close to the “stage” (there’s rarely a true stage in the formal sense, but rather a performer’s area) and shoot with a fast normal or portrait lens using a high ISO setting.  It helps to get to know a few of the players during their breaks.  Buy this photo

Dublin is a world-class literary city, with ties to James Joyce, W. B. Yeats, Jonathan Swift, Oscar Wilde, G. B. Shaw, Samuel Beckett, and Seamus Heaney, among many other literary greats.  We took, and highly recommend, a literary walking tour led by scholar, author, and actor Colm Quilligan.  There are many photo opportunities to be found during this informative walk.  You can learn more about Colm’s walking tours here: http://www.dublinpubcrawl.com/writerswalk.htm.

A self-portrait made at The Duke Pub, where many of Dublin’s great authors took their liquid inspiration.  Remember to include yourself in some images, but always look for unusual perspectives.  Buy this photo

A park sculpture commemorates  the Great Famine of the 1840s.  To bring out the textures, I converted this image to black-and-white using Lightroom’s color channel tools, and boosted the contrast slightly.  Buy this photo

Dublin Castle dates from early Anglo-Norman times, and a guided tour provides a sweeping history of Dublin from its origins through the present day.

To photograph the Castle and Dublin’s other architectural gems, use a wide-angle lens.  Watch out for cluttered foregrounds and keep an eye on the lines at the edges of the frame, as it is tricky to avoid distortion when shooting up with a wide lens.  Here I also used a polarizing filter to add contrast to a rather bleak scene.  Buy this photo

The chapel within Dublin Castle offers many photographic possibilities.  Seek out the details in a place like this.  Here I’ve captured the beautiful (but, alas, no longer functioning) pipe organ.  I brought out the shadow detail and increased the vibrance during post-processing.  Buy this photo

It may or may not come as a surprise to learn that Ireland’s biggest attraction is the Guinness Storehouse.  While it’s easy to dismiss sites like this one–essentially a theme park dedicated to a beer brand–that would be a mistake.  The self-guided tour is fascinating for its historical, cultural, and architectural facets, and the view from the top-floor Gravity Bar (with an included pint of Guinness) is the best in Dublin.

The Guinness Storehouse was converted into a museum and tourist attraction, but happily they have retained much of the old brewing machinery, which makes a great photographic subject.  I used a touch of flash here to saturate the colors.  Buy this photo

My wife Mary pulls a perfect pint of Guinness.  It’s more fun to include traveling companions when they’re doing something locally inspired and interesting.  I used natural light with a fast portrait lens and relatively high ISO setting.  The cluttered background isn’t as distracting as it could be, because it documents the bustle of the place.  Buy this photo

Parting shot on our last night in Dublin.  Another trad music session.  This one (which also incorporates a self-portrait) was shot at the Cobblestone Pub.  It was an informal sit-in session, so I had the chance to chat with and really get to know several of the musicians before shooting their portraits.  Buy this photo

Have you visited Dublin?  What do you consider essential activities–and photographic subjects–in this city?  Please share your comments here.

Want to view posts about other travel photography destinations?  Find them all here: Posts on Destinations.

Focus on Dia de los Muertos [Encore Publication]: When a local festival takes you around the world

Sometimes you can attend a local event and feel as though you’re transported to a far-off part of the world, or even feel like you’re traveling across a wide cultural tableau of a whole region.  That’s how I felt while shooting today’s Dia de los Muertas (Day of the Dead) celebrations in downtown San Jose.  Although I had traveled only half an hour from my house, this festival celebrating life and honoring departed relatives took me on a cultural and historic journey across all of Latin America and beyond.  In today’s post I will present a simple photo essay featuring some of my favorite images from this festival.
An Aztec dancer helps convene the day’s celebrations.  Buy this photo

The Aztec fire dance’s origins date back to pre-Columbian times.  Buy this photo

This shrine, erected on the back of a pickup truck, is dedicated to the memory of the owner’s deceased father and brother.  Buy this photo

The “elegant skull” face painting is an element of Day of the Dead celebrations in several Latin American countries.  Buy this photo

These lovely ladies awoke at 5 AM to paint their own faces and those of their family members.  Buy this photo

More wonderful face art.  Buy this photo

I love the cultural juxtaposition of Hello Kitty with Day of the Dead.  Buy this photo

Although this portrait of a couple also worked well in color, I love the dramatic impact it makes when converted to a high-contrast black-and-white image.  Buy this photo

Elegant and beautiful!  Buy this photo

I hope you’ve enjoyed this brief compilation of images from today’s festival and that it inspires you to seek out Day of the Dead celebrations near your own home.

What are some of your favorite cultural traditions?  Have you captured these traditions using your camera?  Please share your experiences in the comments box.

Want to see other posts about what to shoot while traveling and near home?  Find them all here: http://www.to-travel-hopefully.com/category/travel/shoot/

Focus on Turkey: Spectacular photographic opportunities abound in this troubled nation

Last year, my wife and I traveled throughout Turkey on a 2.5-week journey that included adventures in Istanbul, Cappadocia, the Turquoise Coast, and Ephesus.  We traveled with Overseas Adventure Travel (OAT) in the company of a local Turkish trip leader, and we had a wonderful, safe experience.  In today’s post I share our experiences and some of my favorite images from this spectacular but troubled nation.

First, a few words about safety.   Even when we traveled in September and October of 2015, there were concerns about the safety of travel in Turkey.  We did not visit the far southeastern regions of Turkey due to the ongoing violence between various factions from ISIS, Kurdish separatist groups, and the Turkish government.  There was a bombing with many casualties in Ankara while we were visiting a different part of Turkey.  Since our trip, the situation has deteriorated as a result of an escalating crisis in and around the border with Syria, terrorist actions throughout the country, and the broad government crackdown in the wake of the attempted coup earlier this year.  OAT, the company we traveled with, has since suspended all of their trips to Turkey.  Tourism in Turkey is being devastated by the concerns of safety on the ground.

So why would anyone want to go to Turkey?  The cultural, historic, and natural appeals of this destination are undeniable.  It is a travel photographer’s paradise.  And safety is a relative term.  I’ve traveled in over 100 countries and many of them were considered “unsafe” when I visited, but my only two close encounters with real terrorism were in supposedly “safe” cities: a bombing in Tokyo and a mass shooting in Los Angeles.  I felt safer in Turkey late last year than I do in many other parts of the world.  That said, the situation on the ground has deteriorated since I visited, tours to Turkey are becoming hard to find, and only you can decide on your tolerance for risk.  So perhaps wait for more order to return to Turkey before traveling there to make your own images, but in any case you can enjoy my images from this fascinating and gloriously beautiful part of the world.

Our adventure began in Istanbul, an ancient city situated at the border between Europe and Asia.  Its place as a crossroads of history from Roman times through the Byzantine Era, the Ottoman Empire, and the modern Turkish republic is apparent as you stroll its winding streets and ply its crowded waterways.  The are opportunities to make great images everywhere in the city.

Istanbul’s Hagia Sophia, the foremost Byzantine church, is nearly 1500 years old.  When shooting grand architectural sites from up-close, it’s a challenge to try to avoid distortion due to perspective and the necessity of using a wide-angle lens.  Here I kept the horizon level with the ground to avoid excessive distortion.  Buy this photo

The best baklava in Istanbul?  Perhaps.  I certainly didn’t taste any better baklava in the city, and believe me, I tried a lot of baklava.  To make this portrait, I asked our trip leader to introduce me to the baker, who was happy to pose with his wares.  This was shot with natural light and just a touch of fill flash.  Buy this photo

View of the Galata Tower from across the Bosphorous.  Buy this photo

After Istanbul, we traveled to the central region of Cappadocia, famous for its “fairy chimneys,” natural spires formed by the erosion of soft tufa rock.  This region is a veritable dream for travel photographers!

Upon arriving in Cappadocia, we were thrilled to learn our hotel room was inside an ancient cave dwelling.  (Not to worry, it had been recently remodeled.)  When shooting interiors, it’s usually best to use a fast wide-angle lens and to compose the image carefully so as to gain the viewing perspective you want.  Buy this photo

The Goreme Open Air Museum comprises dozens of ancient Byzantine churches carved out of the tufa rock.  Remember to capture some images that include yourself and your travel companions.  Refer to this post for more practical tips about making great self-portraits while traveling: Post on Self Portraits.  To make this image, I set up the camera on a lightweight travel tripod, composed it by having my wife stand in front of the “fairy chimney” church, then joined her in the frame and triggered the camera using a remote release.  Buy this photo

The soft tufa stone formations look almost like sand dunes in the late afternoon glow.  I shot in RAW mode (as always!) and underexposed slightly to allow for a higher-contrast image during post-processing.  Careful cropping also helps a striking landscape really pop.  Buy this photo

We awoke at 5:30 AM to the sight out our cave-hotel’s window of hundreds of hot air balloons launching about the fairy chimneys.  I jumped out of bed, barely remembering to throw some clothes on, before running out the our balcony to set up a tripod and capture this amazing scene.  I exposed for the rock formations and allowed the balloons to be partially silhouetted.  Buy this photo

We visited a school in the region, always a favorite activity during our travels.  While I also made quite a few images in the classrooms with the kids and teachers, I like the unusual perspective in this image.  It was shot from outside the school building as the kids came to the windows to wave goodbye.  Buy this photo

We took a very memorable hot air balloon ride at dawn over Cappadocia’s otherworldly landscape.  I made this image looking down from our gondola at three other balloons in various stages of preparing to launch.  The amphitheaters of soft tufa rock can be seen in the middle-ground and the rising sun in the far background.  Buy this photo

At a rug-weaving cooperative, this woman enjoys a cup of Turkish coffee during her break.  I was drawn by her colorful clothes and enigmatic smile.  I asked our trip leader to introduce us and inquire if it was okay for me to make a portrait.  Shooting quickly with natural light only, no time to set up a tripod, and a too-slow lens mounted on the camera, I had to boost the ISO setting quite high.  Fortunately, I was able to reduce much of the noise in the image during post-processing.  Buy this photo

Hiking up to the top of Uchisar Castle, the highest elevation in Cappadocia.  Buy this photo

We had the chance to watch a whirling dervish ceremony.  The Samazens, followers of Mevlana Rumi, are a mystical Sufi order who practice the ritual we witnessed.  To capture the sense of motion, I used a slower shutter speed to blur the participants.  Buy this photo

The Mevlana Museum houses the monastery and tomb of Mevlana Celaleddin Rumi, the mystic who founded the “Whirling Dervish” sect.  This image captures the incredible workmanship on the interior of the monastery, especially around Rumi’s tomb.  Flashes and tripods are not allowed inside the tomb, so I had to use a fast lens and high ISO setting to handhold the camera.  Buy this photo

We departed Cappadocia and drove to Antalya, the gateway to the southern Mediterranean region known as the Turquoise Coast.  Antalya boasts an ancient Roman harbor and a fascinating archaeological museum.

We happened upon an interesting scene when several archaeologists and their students attempted to match a recently excavated statuary head to a body already in the museum.  Always be on the lookout for serendipitous scenes, which often make the most memorable images from a trip.  Buy this photo

These Lycian house-tombs were carved into the cliffs centuries before the Romans arrived at Myra.  Buy this photo

We boarded our gulet, a traditional Turkish wooden sailing yacht, for a four-day cruise along the Turquoise Coast.  Each day offered a wonderful photographic tapestry of great images, as we sailed, hiked, swam, and dined.

Kayakoy is a ghost town, a Greek village abandoned when the Turks expelled Greeks after their war for independence in the early 20th century.  Turks living in Greece were also expelled the same year.  Buy this photo

My wife Mary spotted this rare wildcat, which looked to us a bit like our local Californian bobcat, along one of our daily hikes.  I changed lenses very quickly while slowly approaching the cat, then captured this portrait using a medium telephoto just moments before he slipped into the brush.  Buy this photo

A riverboat took us from our gulet yacht to the ancient Lycian site of Caunos.  This image of a beautiful kingfisher along the side of the river was captured using a long telephoto lens and a fast shutter speed to allow for handholding the camera on a rocking boat.  Buy this photo

On our last full day in Turkey, we finally got to visit the splendid ruins of Ephesus, a major Roman city in the region.

The ruins at Ephesus include the incomparable Library of Celsus, pictured here in a self-portrait of my wife and me.  To achieve the broad depth-of-field required to ensure both the people and the buildings were in sharp focus, I used a small aperture (large F-stop number).  Major archaeological sites are often packed with other visitors, so try to find vantage points that allow the crowds to appear small in comparison to your main subjects.  Buy this photo

Throughout Turkey, the food was vibrant, simple, and delicious.  Our final day’s lunch, in a beautiful village in the mountains, consisted of course after course of delightful meze (appetizers).  Buy this photo

Turkey is a remarkable destination for travel photography.  Let us hope its current troubles will soon be a thing of the past and that safe and affordable travel will again be available there.

Have you visited Turkey?  What were your most memorable experiences there?  Please share your thoughts here.

Want to read more posts about travel photography destinations?  Find them all here: Posts on Destinations.


To Travel Hopefully is Taking the Day Off: Please help support this site

Dear Reader,

To Travel Hopefully is taking the day off, but don’t worry, we’ll be back with fresh new content soon.

In the meantime, please take a look at the helpful travel photography tips and inspiring images in our archived posts.  Just select a category (Destinations, Gear, Techniques, Travel, etc.) from the right nav bar, or choose a month under Archives, and browse to your heart’s content.

While you’re here, take a moment to tell your friends and family about us.  Anyone who enjoys travel and wants to improve their photography will find great daily content here, including inspiring images from around the world and tips and tricks for making the best possible photos.  You can email any post or share it via social media with the click of one of the buttons at the end of each post.  And if you enjoy To Travel Hopefully, please click in the right nav bar to subscribe via email or RSS feed, so you won’t miss a single post.

And finally, please consider supporting this site by purchasing some of my photos, browsing for some great gear via the Amazon links, or clicking on some of the ads that interest you.

My holiday special, with prices reduced by up to 75% on most images in my portfolio, continues through the end of the year.  Fine art prints and novelty items make great gifts for family and friends.  Check it out at Holiday Special Gallery.

Thank you for visiting To Travel Hopefully!  Without your support, this project cannot continue providing you with daily content including inspiring travel photos and tips and tricks for making great images.

Warm regards,

Kyle Adler


Wildlife and Safari Gear [Encore Publication]: Basic equipment to capture wildlife while traveling or close to home

Wildlife photography is one of the most exciting and rewarding pursuits I know, but it is also very challenging.  Whether on safari in far-flung wilderness regions around the world or in a park or zoo near home, capturing great images of the local fauna requires plenty of patience, a little bit of luck, and some specialized gear.  This post outlines the basic equipment needed for wildlife photography.

Sometimes we get lucky.  This alligator was seeking what little sunshine was available on an overcast winter’s day on the bayou in Louisiana.  He stayed sufficiently still that I was able to capture this image by handholding a medium telephoto lens from our airboat.  Buy this photo

Occasionally, a critter may scamper, fly, or swim right up to where the photographer happens to be standing, but in the vast majority of cases, if we want to capture a really moving and uninhibited portrait of an animal, we need a long telephoto lens.  Working with “big glass” not only fills more of the frame with the main subject, but it has the added benefit of allowing the photographer to shoot from a vantage point far enough away from the animal so as not to frighten it.  It’s also very important when photographing wildlife that we make every effort to keep the wildlife wild, and using a long lens keeps us at a sufficient distance that the creatures we’re observing are less likely to become accustomed to the sight, sound, and smell of humans.

I like to carry both a medium telephoto and a long telephoto when shooting wildlife, so as to be prepared for a variety of situations.  My medium lens of choice is the Nikon 70-300mm f/4.5-5.6 VR lens.  While this lens is built on aging technology and doesn’t always feel as solid as more professional lenses, it is relatively small and lightweight, fairly inexpensive, and provides a very effective vibration reduction function.  This lens has been a staple in my bag for many years, during which time I’ve used it to capture some of my favorite images.

My go-to long lens for wildlife photography is the Sigma 150-500mm f/5-6.3 lens.  It’s more economical than a Nikon or Canon super-tele, and it produces reasonably sharp images even when used at its widest aperture.  You can spend much more on this type of big glass if you want or need to, but I’ve found this lens works quite well for me.

Lilac breasted roller captured with a 500mm lens in Tanzania’s Kilimanjaro region.  Buy this photo

When shooting far-off and often rapidly moving animal subjects with big glass, it is important to have a good means of stabilizing the camera.  Depending on the shooting situation, I use either a lightweight tripod or a beanbag support.

A lightweight travel tripod is perfect for those situations when you have plenty of space and plenty of time in one place.  I like the Manfrotto Be Free travel tripod.  It folds up to an incredibly small size yet affords a surprising amount of stability.  The included ball head works well but is difficult to adjust for sensitivity.  This tripod is designed to fit into a special pouch in my favorite travel photography backpack, also made by Manfrotto.

For situations when you will be on the move much of the time, such as on game drives using safari vehicles, a beanbag support is extremely useful, as you cannot fit a tripod in a safari vehicle and a monopod is awkward.  The bag can be emptied for convenient travel and then filled with “beans” (usually synthetic) upon arrival.   It is placed on top of the safari vehicle while shooting, with the camera and long lens resting on the beanbag.  While the beanbag that I use is no longer available, this one is well reviewed by photographers and represents a good value.

A sleepy leopard yawns in a tree above the Endless Plains of Serengeti National Park.  This image was captured using a 500mm lens resting on a beanbag support placed on the roof of our safari vehicle.  Buy this photo

With a couple of good telephoto lenses, including one long one, and a couple of good options for stabilizing them, you will be armed with the right basic tools for bringing home truly memorable images of the wildlife you encounter on your travels.  Happy hunting!

What are your favorite wildlife subjects and locations, and what gear do you use to capture them?  Please share your experiences here.

Want to read more posts about photographic gear?  Find them all here: Posts on Gear.

Focus on Ireland [Encore Publication]: The Emerald Isle offers unique landscapes and culture

We’re just back from a two-week adventure in Ireland and Scotland.  Our itinerary sandwiched a week of hiking in the glorious southwestern regions of Ireland (Counties Kerry and Cork) in between brief stays in the major cities of Dublin and Edinburgh.  The photographic opportunities in these regions are remarkable, with lovely landscapes, historic architecture, and a generous friendly culture evident everywhere.  I provide an overview in the form of a photo essay in today’s post, and upcoming posts will feature more details on specific places or types of subjects from the trip.

The Irish pub remains a central focus of life on the Emerald Isle.  In cities and tiny rural villages, the pubs are places for people to come together and catch up with old friends, make new friends, listen to live traditional music, and of course drink a pint or two.  This image was made in Dublin’s famed O’Donoghue’s Pub, where in the 1960s bands such as the Dubliners sparked the Irish folk music revival.
To make portraits in pubs, where the lighting is dim and the use of flash is out of the question, use a fast lens and a high ISO setting.  You need a shutter speed of at least 1/80 of a second to get a reasonably sharp image of musicians at work.  Buy this photo

It may come as a surprise (or not) to learn that Ireland’s most popular attraction is the Guinness Storehouse tour in Dublin.  Here my wife pulls a perfect pint of the “black stuff,” which we then enjoyed in the Gravity Bar atop the storehouse with views overlooking all of Dublin.

Another low-light shot, this image was made with ambient light only, using a fast lens and relatively high ISO.  Remember to capture some shots of your traveling companions.  Buy this photo

I highly recommend a visit to the very remote Gougane Barra peninsula.  There’s only one hotel, which offers outstanding food and views over a tiny island with a picturesque church and the ruins of a Sixth Century monastery.  A photographer’s paradise!

St. Finbarr’s Church stands on a tiny island on the Gougane Barra Peninsula.  To make this image, I shot in the early morning when the quality of light was compelling, got down low to include the rushes in the lake, and used a polarizing filter to bring out the textures in the water and sky.  Buy this photo

Don’t put away your gear when the sun sets!  On a rare clear night in rural Ireland, the photography is stunning.  Here’s an image of the Milky Way sprawling above the ruins of St. Finbarr’s Abbey, a Sixth Century monastery.

To capture the Milky Way, use a sturdy tripod and a relatively fast lens with a high ISO setting.  In most cases, a shutter speed of 20-25 seconds is best, but here I used a somewhat shorter exposure to avoid having the cross appear washed out in the site’s artificial light.  Buy this photo

We then hiked a portion of the long-distance Sheep’s Head Way.  You’ll rarely encounter completely clear skies while walking in Ireland, but the changeable conditions can create opportunities for glorious landscapes.  This lovely image was made just as the rain let up and the sun poked out, generating a vivid rainbow that spanned over the green fields and ancient walls.

Here I used my go-to landscape lens, the Nikon 16-35mm f/4 lens, fitted with a good circular polarizing filter.  I adjusted the angle of the polarizer carefully to enhance the sky without weakening the refraction of the rainbow.  I got down low to the ground to include the leading line from the old wall.  Other compositional elements include the sheep in the field and the dramatic clouds in the sky.  Buy this photo

At the end of the Sheep’s Head Way sits the lovely Bantry House, owned by the family since 1750.  Climb the hill behind the house to capture the house and its gardens with the harbor behind.  Buy this photo

On our way to the start of our next day’s hike in Killarney National Park, we stopped at a viewpoint called Priest’s Leap for this lovely view.  I’ve said it before and I’ll say it again: remember to include yourself and your travel companions in some of your images.  Set up the camera and either mount it on a tripod or show another person how to release the shutter.  For more on how to make images including yourself, read this post: Post on Including Yourself

This image at Priest’s Leap was made using a normal lens with polarizing filter, stopped down to maximize depth-of-field.  Buy this photo

Ireland is filled with forests that exude a sense of mystery and magic.  Look for the little things as you walk: a flower or shamrock, a moss-covered tree, a tiny stream.  All that rain has the happy side-effect of making Ireland the greenest place I’ve ever seen.

Slow down and seek out the little natural details around you, like this moss-covered tree in Killarney National Park.  Buy this photo

The legendary Gap of Dunloe outside of Killarney stretches for eight miles through mountains and valleys, along streams and by ancient farmhouses.  It can be traversed by horse-drawn carriages called “jaunting cars,” but the intrepid photographer will want to hike it instead.

The Gap of Dunloe offers compelling photographic subjects like this stream flowing in a valley surrounded by mountains.  A good wide-angle lens with a polarizing filter brings out the color and texture in such a landscape, even on a “soft day” like this one.  Buy this photo

We spent every evening in Ireland visiting a pub or two.  These pubs differ in character, but all reflect the generous and friendly local culture, and many offer live music.

At a pub in Killarney, I was chatting with this fiddler during a break between sets, and made this portrait using natural light with a fast portrait lens, a wide aperture, and a high ISO.  Buy this photo

My essential portrait lens:

We were fortunate to stay two nights in Killarney at the wonderful Lake Hotel.  The hotel grounds include the ruins of an ancient castle situated on a lake with mountains behind.  During breakfast on our second morning, I noticed the cloud cover had lifted but there was still mist hanging on the side of the hills around the lake.  I ran up to our room, grabbed my thirty pounds of camera gear, and rushed outside to capture the ruins with the mist enshrouding the lake and mountains.

There was no time to set up a tripod as the warming sun was burning away the magical mist on the lake, so I shot this image handheld.  Buy this photo

Our final day’s hike was the beautiful Wild Atlantic Way from Ventry to Dunquin.  The lovely views of the Atlantic are punctuated with green fields dotted with odd “beehive huts,” some dating back to the Neolithic Period.
To make this landscape incorporating ancient stone beehive huts and walls, I shot down across the fields to the sea, being sure to keep the horizon level.  Buy this photo

The picturesque Blasket Islands were home to a community of Irish-speaking farmer-fishermen until they were forced to evacuate in 1953.  This is one of Ireland’s most gorgeous stretches of coastline, captured here using a wide-angle lens with polarizer.  Rotate the filter until the sky is dark and dramatic.  Buy this photo

After Ireland, we spent a few days in Edinburgh, Scotland.  This image was shot along the Royal Mile.

Be on the lookout for unusual perspectives.  This image juxtaposes the different colors and textures of  the statue in the foreground with the cathedral in the background.  Buy this photo

Dining is an essential part of any trip, and Edinburgh offers many opportunities to savor the new Scottish cuisine.  This lovely smoked salmon plate (with accompanying wee dram of whisky) was captured at the Tower Restaurant atop the Scottish National Museum.

For more about how to shoot food images, read this post: Post on Food Photography.      Buy this photo

I hope this post inspires you to visit Ireland and Scotland.  Look for posts over the next few days with more details about the trip and images.

If you’d like to read more posts about photographic destinations, you can find them all here: http://www.to-travel-hopefully.com/category/destinations/

Have you visited Ireland?  What did you find most memorable?  Any tips on photographing this enchanted place?  Please share your thoughts in the comment box after this post.


The Sharpest Tack in the Box [Encore Publication]: How to achieve sharp focus in tricky shooting situations

One of the most important elements of an image is focus, and even an untrained viewer can tell immediately when a key part of the image is not in sharp focus.  The stakes are even higher when we consider that poor focus is nearly impossible to correct in post-processing.  Most of us rely on our camera’s autofocus functionality to help us achieve tack-sharp focus while shooting, but as with every other automated system in a camera, even very sophisticated autofocus mechanisms can go awry, especially when we’re faced with tricky shooting situations.  Here’s a quick guide to minimizing focus problems and achieving sharp focus in nearly every shot.

Scenes with low contrast, such as in this image of ice floes on the Barents Sea in Svalbard after sunset, can fool even sophisticated autofocus systems.  Override your camera’s autofocus system and instead shoot manually in these conditions.  Buy this photo

  1. Make sure to select the part of your image that you want to be in sharp focus.  It sounds like a no-brainer, but surprisingly frequently the reason an image’s main subject is not in focus is because the photographer never told the camera’s autofocus system what to focus on.  Remember that as with any assistive technology, a camera’s autofocus system is just a collection of hardware and software designed to make a best guess about what the user wants.  If you leave your camera set to full autofocus mode, it does its best to identify what its software determines is likely to be your intended subject.  A human face, for example, is likely to be what you want to have in sharp focus, so the camera focuses on that.  But often the camera does not guess correctly.  Nearly every camera, including the one in your smartphone, allows you to manually select your desired focus point, often by simply touching the desired part of the image on the screen.  Be sure to check what your camera is doing and correct it by manually selecting the focus point if it guesses wrong.
  2. Recognize that your camera’s autofocus system will likely not work in certain tricky conditions. Most autofocus systems work by looking for areas of the image where the contrast is changing, such as at the outlines of a person or a building.  But in very dim lighting, or when the main subject is badly backlit, or in scenes with very low contrast (think of a stormy sky or the waves of an ocean), the autofocus does not work.  Recognize these deficiencies and be prepared when shooting in these conditions to take manual control.  Every camera has a mechanism to manually select focus, and you need to know how to use that feature.
  3. Choose the autofocus method best suited to your shooting needs.   Most advanced or professional cameras allow you to choose among several different types of autofocus methods.  Often, the first choice is between single-focus mode or continuous-focus mode.  Choose single-focus mode when your subject is relatively stationary and you must have precise focus achieved before releasing the shutter.  For subjects that are moving quickly or where you need to time your shot exactly, even at the expense of not yet having perfect focus, you should choose continuous-focus mode.  Within each of these modes, your camera may offer sub-choices, such as letting you manually choose the exact focus point you want or choosing a range of points from which the camera selects focus based on the motion of the subject.  This is rocket-science technology, but fortunately it is pretty straightforward to choose the desired method once you understand what each one does.  Read your camera’s manual and always practice in the different focus modes before going on any important shoots, especially on a major trip.
  4. Circumvent the whole problem by choosing a wide depth of field.  Sometimes the best artistic choice requires a narrow depth of field so that only the main subject is in sharp focus, and sometimes the light is too dim to choose a narrow aperture, but if you can make the shot work with a wide depth of field (in other words, using a small aperture, represented by a high f-stop number), then you don’t have to worry about focus at all.  In most situations, universal focus from several feet away from your lens through infinity is achieved at apertures of about f/16 or smaller.

Capturing tack-sharp images of fast-moving wildlife like the cheetah requires selection of an autofocus mode capable of dynamically refocusing on the moving subject.  For this shot of a cheetah in Serengeti National Park in Tanzania, there was the added challenge of having low contrast between the animal and the background.  I chose my camera’s continuous-focus mode with predictive focus so the camera would anticipate where the cheetah was moving and focus ahead of the shutter.  Buy this photo

By using these tips, you can achieve tack-sharp focus where you want it in nearly all of your images, whether you’re shooting with a simple point-and-shoot or phone camera, or the most advanced professional camera.  Any camera frequently makes the wrong guess about where the focus point should be, so do not rely blindly on autofocus.  It’s worth investing some time to learn how to configure autofocus appropriately for any shooting situation, and how to turn it off and instead focus manually when required.  Happy shooting!

How do you achieve sharp focus in tricky conditions?  Please share your thoughts in the comment box at the end of this post.

Want to see more articles about techniques?  Find them all here: http://www.to-travel-hopefully.com/category/techniques/.

ProCam 4 Update: Still the best iOS camera app I’ve ever used

I’ve been using the ProCam 4 iOS app for nearly two months now, and today’s post provides a brief update to my previous product review.  My original review can be found just after the quick update.

My already high opinion of ProCam 4 has only been enhanced further after spending several weeks using it in the field.  It’s rare to find an app that combines such a high degree of functionality with such an easy-to-use interface.  While I don’t use the in-app editing features, preferring to use Adobe Lightroom for my post-processing whenever possible, I’ve been using most of ProCam 4’s other powerful features including the manual control over ISO, shutter speed, white balance, and flash; capture in RAW+JPEG formats; exposure bracketing; and the different shutter release options.  Everything is pretty intuitive to use and it’s a joy to shoot with because all the main features are readily accessible “on the fly”.  The resulting images are higher quality than those I’ve been able to obtain with the same iPhone 6S camera hardware controlled by other apps.  Overall, I continue to believe ProCam 4 is the best iOS camera app I’ve seen.

Note to Android users: As far as I know, ProCam 4 still is not available for Android devices.

One more note: With this week’s release of iOS 10.2, there is some enhanced support for RAW capture, but the built-in Apple Camera app still does not support RAW mode, so you will continue to need to use a third-party iOS camera app to capture images in RAW.  I recommend ProCam, but there are many choices out there.

My original product review of the ProCam 4 app follows:

I’ve posted repeatedly about the importance of understanding how to take manual control of your camera in order to make images that are properly exposed and focused.  Whether you are using a professional DSLR, an advanced full-frame mirrorless ILC, a compact point-and-shoot, or the camera built into your smart phone, there is no way you will get consistently acceptable results if you leave the camera’s settings to its auto mode.  See this post for an overview: Post on Beyond the Auto Mode.

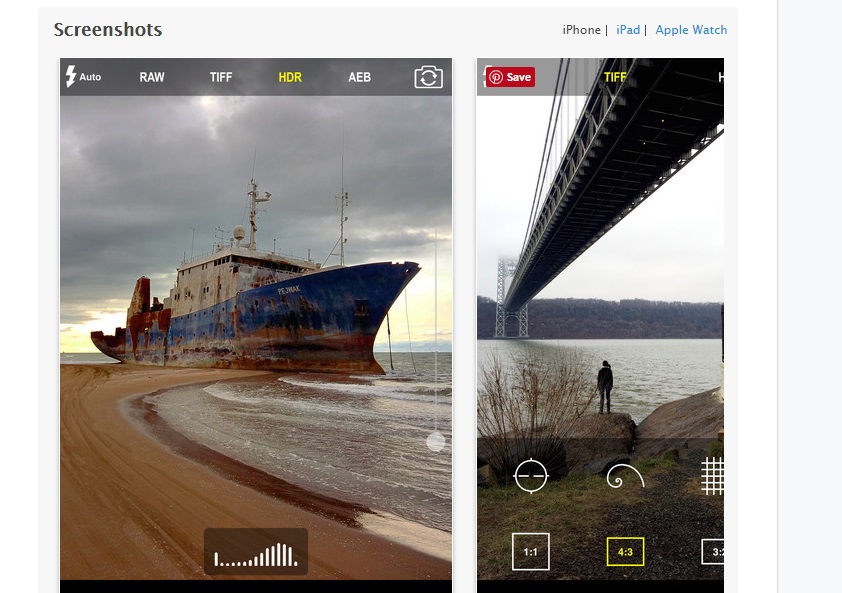
For the past two days I have been testing an iPhone app called “ProCam 4”, which is by far the best iOS camera app I’ve ever used.  Like the “Manual” camera app that I’ve been using for years, ProCam 4 allows the manual selection of ISO, shutter speed, exposure compensation, and focus distance (note that the iPhone camera’s lens has a fixed aperture, so F-stop cannot be manually set).  Also like the Manual app, ProCam 4 allows images to be captured using RAW mode, which has a great many advantages over capture in JPEG format (see this post for more information: Post on Raw Mode).  And both of these camera apps display a histogram to assist in setting exposure properly.  

But ProCam 4 offers far more functionality than does the Manual app or any other iOS camera app I’ve tried.  Here is a partial list of some of my favorite additional features:

  • Shutter Priority: You can choose an exposure mode in which you select the shutter speed first and the app will set the appropriate ISO.
  • Exposure Bracketing: You can shoot a series of four shots at different exposures to increase the likelihood that one of them will be at the best exposure for the lighting conditions.  The series of shots can also be combined using HDR tools found in Lightroom, Photoshop, and other editing software into a single image with a higher range of tones from very dark to very bright.
  • White Balance: You can adjust white balance in the app, which is often preferable to having to adjust it in your RAW files during post-processing.
  • Virtual Horizon: The display can show you when the horizon is level.
  • Slow Shutter Options: You can select long fixed shutter speeds as well as bulb mode to keep the shutter open for as long as you’d like.
  • RAW+JPEG: You can choose to store the image in both RAW and JPEG formats.
  • Editing Options: This app provides many advanced in-camera editing tools and filters.

With all this incremental functionality, your little phone’s camera begins to behave a lot like a more advanced standalone camera.  While the iPhone’s camera, with its small sensor and its tiny fixed-aperture non-interchangeable lens, still cannot compare to a professional or enthusiast DSLR or ILC camera, the results using ProCam 4 are vastly improved compared to using the phone’s native camera app.  At $4.99 to purchase via the iTunes Store, this app is a great buy and a serious enhancement to the iPhone’s built-in camera.

You can find the ProCam 4 app here: ProCam 4 app.

What app do you use to control your phone’s camera?  What do you like and dislike about it?  Please share your thoughts here.

Want to read more posts about photography gear?  Find them all here: Posts on Gear.

People Pictures Beyond the Selfie [Encore Publication]: Why selfies don’t make great images, and how to get really good pictures including yourself

Several times in the pages of “To Travel Hopefully,” I’ve emphasized the importance of including yourself and your travel companions in some of your images.  Not only will you and your friends enjoy seeing yourselves captured in these travel photos, but the inclusion of people in travel images gives a sense of scale to the places you visited and tells a more compelling narrative than would be possible in photos without people.

The standard way of including yourself in a photo these days is to use your phone’s selfie camera, but there are a number of reasons why taking selfies is not the best way to capture your own likeness in an image.  First, the sensor in the front-facing (“selfie”) camera on your phone very likely has a much lower resolution than does the phone’s regular camera, so the picture quality is lower.  Second, it’s difficult to properly compose a photo when holding the camera out at arm’s (or selfie stick’s) length, let alone to smoothly release the shutter.  Third, the perspective imparted to the image when the camera is held above in selfie fashion is distorted and often unflattering.  It’s really quite unlikely that you’ll get professional quality images of people using the selfie technique.

A selfie doesn’t allow you to properly compose your image, is awkward to shoot, and uses a low-quality image sensor.  Instead, mount your camera on a tripod, compose the image exactly the way you want it, and release the shutter remotely or with the camera’s self-timer.  Or enlist the help of another photographer.  Buy this photo

Fortunately, there are better ways of including yourself in your photos, and they’re not difficult to implement.  The two most straightforward methods are placing the camera on a tripod and triggering the shutter with a self-timer or remote release, and setting up the camera for another person to shoot handheld.

The basic setup is the same for either method.  Have the other people you want included in the photo stand in the desired location.  If you’re the only person present, make a note of where your body will be placed in the composition.  Then compose your image from the best vantage point, with the camera either mounted on a tripod or handheld.  Configure your camera’s settings (focus, exposure, flash, etc.) the way you prefer, and test the settings by shooting a few frames without yourself in the image.  Then move into your predetermined position in the frame and either fire the shutter remotely with the self-timer or remote release, or ask another person to push the shutter button for you.

If you do choose to have another person press the shutter release button for you, you need to be thinking about two things: 1) ensure they know how to operate the camera and won’t run away with it, and 2) be aware that in many countries and regions the person who pushes the button owns the copyright for the image even if they did not contribute artistically to making it.  I prefer to use a tripod and remote release whenever practical, so as to have a higher likelihood of capturing the image I envision and to avoid any question as to who owns the copyright.

Do you have a favorite method for including yourself in your photos?  Please share your ideas in the comment box.

Want to see more posts on how to shoot while traveling?  See them all here: http://www.to-travel-hopefully.com/category/travel/shoot/.

Camera as a Service?: A first look at Relonch’s artificial intelligence photography service

In the 150 or so years of its history, the camera has evolved rapidly as a result of the advent of new technologies, each promising to dramatically simplify the photographic process and improve the resulting images.  Just within my lifetime, there have been major upheavals via the introductions of the Kodak Instamatic, the Polaroid SX-70, and of course digital photography.  So perhaps it was inevitable that someone would develop an AI (artificial intelligence) to make photography as simple as pushing a single button.

A company called Relonch (https://relonch.com/) is developing such a system now.  Sometime in 2018, they expect to roll out a Camera as a Service for $99 per month.  You get a loaner of a brightly colored Relonch 291 camera (manufactured by Samsung), with a fixed focal length lens and only a single button, which is used to take the picture.  It doesn’t even have an LCD screen to review your images.  The purported value of the subscription price, of course, is not derived from the camera hardware, but rather from the service.  For this lofty price, your camera transmits your image files to Relonch, who then use algorithms to analyze and process the files.  The next day, they send the processed images that they consider to be your best photos back to your mobile device of choice.

Relonch 291
The Relonch 291 camera

The concept here is that most people are confused by all the settings on their camera, even if it’s a fairly simple point-and-shoot device, so their photos rarely come out the way they envisioned them.  Instead, let them use a simple camera with just a single button, but employ AI techniques to post-process the best images to make them look closer to the way the user intended.

I haven’t tried the camera and its wraparound service yet (the company’s headquarters and showroom are in Palo Alto, near to where I live, so perhaps I can do so soon), but based only on their description of the concept I share my thoughts here.

  1. Will users pay $1200 per year for this service?  I’m skeptical as to whether there is a broad market for the service at this price point.  “Serious” photographers, that is professional and enthusiast amateurs, already know how to use the manual controls on our cameras and enjoy the process of capturing images and enhancing them during post-processing to achieve the final results we want.  Are there enough users who don’t know how to use their cameras but are still willing to pay so much for better images?  Time will tell.
  2. Are people willing to leave the choice of which images they receive up to a software algorithm?  I wouldn’t want someone else, even a top professional photographer, deciding which of my images I get to see and permanently deleting the rest.  And I certainly wouldn’t want an AI to make this decision for me.
  3. Are users okay with waiting a day to see and share their images?  We’ve gotten pretty spoiled as a consumer class.  We expect instant gratification, and ever since the first Polaroid cameras came out in the 1940s, photographers have been able to see their images right away.  Waiting a day may not fly.
  4. Do people really want their photography to be mechanized?  For its whole history, photography has seen its reputation tarnished when compared to other visual art media because a part of this art form includes the use of a mechanical device, the camera.  Just as a great painter creates her art through her vision and her technique, so does a great photographer.  The gear we use is only incidental to the quality of the images we create.  I fear that by taking the craft out of the process and substituting an AI for the artist’s vision, the Relonch service will further degrade photography as an art form.  And let’s be honest here.  An AI can adjust color balance, sharpness, clarity, vibrance, and exposure to improve a raw image, but it can’t determine how to crop or selectively adjust parts of the image to make it artistically pleasing or to give it a story to tell.  And most important of all, no amount of post-processing can turn a poorly composed or an uninteresting image into one worth looking at.  An AI may soon be able to drive our cars from Point A to Point B, be we’re a long way from having an algorithm that can create true visual fine art.  I’ll leave you with the words of master landscape photographer Ansel Adams: “There’s nothing worse than a sharp image of a fuzzy concept.”

What do you think of the Camera as a Service concept?  Valuable evolution of photography that will bring its benefits to a wider range of humanity, or expensive gimmick that will degrade the artistic worth of the medium of photography?  Please share your thoughts here.


Every Day I Write the Book [Encore Publication]: Even in the digital world, there’s a place for a hardcover photo book from your trip

In the brave new digital world, we have a lot of ways to share our travel photos after (and sometimes even before) we return from the trip: social media, on-screen slideshows, video montages, and of course the enduringly popular paper print.  Even with all of these very immediate sharing options, one of my favorite formats for preserving my travel images is the hardcopy photo book, and today there are more choices than ever before regarding how to create these wonderful keepsakes.

Our living room bookshelf and coffee table are home to more than a dozen photo books, each one showcasing the images and preserving the often fleeting memories of the details of a major trip we’ve taken.  Here’s why I love this method of sharing travel photography and how to create your own photo books.

img_3497

The leather cover of a photo book showcasing our recent travels in Turkey.

Why create a photo book?  Over time, new digital formats replace existing ones, and the very old ones become obsolete.  Within about 20 years, it is quite likely that none of our present formats of storing data will still be readable.  The printed page has much more staying power.  It is estimated that photos printed on high quality paper using high quality inks, and stored away from direct sunlight, can last for 100 years.  I’m a big fan of framed prints, as well, but a photo book is more cost-effective and space-efficient as a means to preserve many more photos than we could easily hang on our walls.  And because photo books can include customized captions to accompany the included images, they’re a great reference source for refreshing our memories about what we saw, when, and where.  Finally, photo books look great and are fun conversation-starters to tell the story of our travels when friends and family come to visit.

How do you create a photo book?  There are a number of methods, but unless you are a scrapbooker or handy with bookbinding, all of them involve sending your specifications and images to a vendor that will print the book, bind it, and mail it to you.  Some software packages, including Lightroom, have built-in modules for creating photo books.  And most photo sharing websites, including SmugMug (a fabulous site used by many professionals including me), Snapfish, Shutterfly, and Apple Photos, allow you to create and purchase photo books from your images.  These services vary in features, price, and quality, so shop carefully.  Most of my past photo books were created using Snapfish, but I am transitioning to using Lightroom’s and SmugMug’s services instead.  I will report on the results in a future post.

img_3493

Good book-creation software should allow you to choose from a wide range of formats on each page to display one or several photos plus text.

The basic process works similarly for any of these services.  You specify the book size, cover material, paper quality, printing quality, and other basic parameters for your book.  Then, you fill the pages of the book with your photos, specifying the layout you want for each page.  You can add captions for individual images or series of images, and you may be able to add various special effects.  At the end of the process, you place your order for the book to be printed and mailed to you.  Using the service offered by Blurb, which is available via SmugMug and Lightroom, you can self-publish a large or small print run of books and make them available for sale on Amazon or directly on your own website.

lightroom-book-moduleThe process of creating a photo book using Lightroom’s Book module (shown here) is fairly straightforward.  It’s even more intuitive using an online service such as Snapfish or Shutterfly.

When you receive your photo book a few days after placing your order, you’ll have a keepsake suitable for sharing with visitors and for preserving your own precious travel memories.

img_3494

A two-page spread in our Turkey photo book showcases several images of the incredible rock formations in the Cappadocia region.

Have you created photo books from your travel images?  Which service did you use and how was your experience?  Please share your thoughts here.

Interested in reading more posts about sharing your travel images?  Click here to see them all: http://www.to-travel-hopefully.com/category/travel/share/.

Meteoric Rise: How to shoot the Perseid, Geminid, and other meteor showers

The next two nights (Dec. 13-15) offer a treat to landscape and night photographers around the world.  This time period is the peak of the Geminid Meteor Shower, which, along with the Perseid Meteor Shower (peaking around August 12-14), affords the best opportunity of the year for seeing meteor activity.

While it’s still technically tricky to make great images of a meteor shower, today’s technology certainly makes it possible for those of us without astronomical budgets to do so.  I shot some nice images of last summer’s Perseid shower and would be out there shooting the Geminids the next two nights except that the cloud cover here in the San Francisco Bay Area is expected to be 95-100%.  Here’s a composite of several images I shot last August of the Perseids.

A composite image made up of one long exposure for the lake, mountain, and trees, plus several 25-second exposures capturing the individual meteors I observed over a 2-hour period.  Buy this photo

Most of the techniques you need for capturing a meteor shower are the same as for capturing the Milky Way.  Review my post from a few weeks ago for a refresher course: Post on Milky Way Photography.

The special challenge when shooting a meteor shower is that meteors can occur anywhere in the sky.  Even with a very wide-angle lens, such as a 14mm or 16mm lens on a full-frame camera, only a small portion of the sky can be covered.  As we are limited to a maximum exposure time of about 25-30 seconds with a 14mm or 16mm lens so as to avoid blurring the stars into star trails, it’s clear that we have to shoot a lot of consecutive images to be likely to capture several meteors throughout the night.  We then use software such as Photoshop to combine the images in which meteors are visible into a single composite image showing all of the meteor activity we captured during the night.

A good tutorial on shooting meteor showers, illustrated with amazing images by Glenn Randall, can be found here: Glenn Randall post on photographing meteor showers.

Have you photographed a meteor shower?  What techniques did you use?  Please share your experiences here.

Want to read more posts about photographic techniques?  Find them all here: Posts on Techniques.

The Best Auto Mode You’ve Never Heard Of: What is manual mode with auto ISO, and when should you use it?

I’ve written often in “To Travel Hopefully” about the importance of learning to go beyond your camera’s full “Auto Mode,” in order to be able to control the exposure of your images.  Frequently I like to shoot in full “Manual Mode” so as to be able to choose both my shutter speed and my aperture for full creative control.  But in rapidly changing lighting conditions, it is a real challenge to stay in full manual mode, and it’s a big help to allow the camera’s exposure programs to choose the best overall exposure from image to image.  There are a few ways to do this.  In between the full auto mode and full manual control, there are two common semi-automatic exposure program modes that most photographers are aware of, namely Aperture Priority and Shutter Priority modes.  In today’s post I introduce another exposure mode that few photographers are aware of, but that can give the best of both worlds: automatic exposure setting while retaining full manual control over both aperture and shutter speed.  This exposure mode is called “Manual Mode with Auto ISO.”

It’s important to be able to control shutter speed because that’s the mechanism by which we can freeze action or allow it to blur for creative effect.  It’s equally important to retain control over aperture because this is the means by which we can increase depth-of-field to keep everything in focus or decrease depth-of-field to soften the background.  But there’s a third side to the exposure triangle beyond shutter speed and aperture.  This third parameter is our ISO setting.  Several years ago, most camera sensors weren’t very good at handling noise at very high ISO settings, so we took a risk of ending up with very noisy images if we used our camera’s Auto ISO setting.  Not so today.  Many modern sensors are quite adept at capturing nearly noiseless images at ISO settings up to at least 3200 and often to 6400 or even a lot higher.  So the stigma that “serious” photographers have historically attached to using the Auto ISO setting should really be laid to rest.

That happy development allows us to use a mode called “Manual Mode with Auto ISO,” in which we set the camera’s exposure program to “M” or full manual mode but also enable the camera’s Auto ISO setting.  By doing so we can preserve full control over both our shutter speed and our aperture, but also allow the camera to choose the best ISO setting to give a good overall exposure as lighting conditions change.  Making this mode even more appealing, most cameras let us select the highest ISO setting (say, 6400) that we’re willing to allow.  So if the lighting level gets sufficiently dim, the ISO won’t go so high as to introduce a lot of noise into the image; instead, we just select a slower shutter speed and/or a wider aperture.

A good example of when it makes sense to use Manual Mode with Auto ISO is when shooting a street fair or an outdoor sporting event.  In these situations the lighting can change quickly depending on the cloud cover, what direction we’re shooting, and the subject and type of image we’re making.  The following three images were all shot at this year’s Carnaval San Francisco, a big street festival and parade.  It was a sunny day, but much of the parade route was in open shade, and depending on the subject there were times when I wanted to use some fill flash.  To freeze the motion, I needed a fast shutter speed, and to isolate my main subject I usually wanted a wide aperture.  Using Manual Mode, I could choose both of these settings.  But because the light conditions were ever-changing, coupling the use of Auto ISO with Manual Mode allowed the camera to adapt the exposure to the light levels for each image.

Full direct sunlight on the main subject made for very bright lighting.  Buy this photo

Open shade with a touch of fill flash required slightly different settings.  Buy this photo

A close-up portrait made in cross-lighting needed yet another exposure level.  Buy this photo

The next time you’re shooting in a shifting lighting environment yet also want to preserve full control over both shutter speed and aperture, try Manual Mode with Auto ISO.  It’s not covered in most cameras’ instruction manuals, but it can be a big problem-solver in many situations.

Do you use Manual Mode with Auto ISO to control exposure?  Do you have other tips for how to adapt to changing lighting conditions without handing over the creative control to your camera?  Please share your experiences here.

Want to read other posts about photographic techniques?  Find them all here: Posts on Techniques.

Focus on New Orleans [Encore Publication]: This iconic US city pulsates with jazz, creole, and historic beauty

Some places are magnets that draw us back again and again.  I’ve made at least a dozen visits to New Orleans and each time, I find something new.  It’s an iconic US city that also defies easy categorization.  Home to unique and cutting-edge forms of music, cuisine, and culture, it is also steeped in a grand historic past that evokes France, Spain, Africa, and the Deep South of the US.  Quite simply, there is no other place like New Orleans, and nowhere else do travel photographers find more charismatic subjects.  Here are a few of my favorite images from a recent visit to NOLA, along with a few words about what they depict and how they were made.

Aside from Paris, I can’t think of any other city that has influenced the cocktail more than New Orleans.  Here I captured my older daughter enjoying a classic NOLA libation during dinner on our first night in the Big Easy.  I used only natural light and selected a large aperture to soften the background.  Laissez les bons temps rouler!  Buy this photo

It’s boozy, vomit-filled, sophomoric, touristy, overpriced, and downright awful, but Bourbon Street is a part of the landscape and is worth a quick walk-by.  At night, it’s neon assault can almost seem romantic.  This shot was handheld using a high ISO setting and a small aperture for greater depth of field.  Buy this photo

The lovely Spanish colonial architecture of the French Quarter cries out to be photographed.  I made this shot of a wrought iron balcony using a telephoto lens and enhanced the color vibrancy during post-processing.  Buy this photo

It’s the tiny cheap eateries as much as the temples of haute gastronomy that keep New Orleans at the top of the list of cities for dining.  Be sure to grab some po’ boys, beignets, or muffulettas at these humbler places, and bring your camera to catch some of the action.  This image of workers in a po’ boy shop was shot from the hip, street photography style, using a high ISO to allow for a quick shutter speed.  Buy this photo

New Orleans is rightly famous for its jazz, which seems to seep through every crack in the pavement of the city and can be heard in places humble or elevated.  None is better than the iconic Preservation Hall.  As with many performance venues, this hall allows photography without flash, but it is always better to ask permission first and to be discrete during shows.  Use a fast lens and high ISO setting to allow a fast shutter speed.  Buy this photo

A short trip outside of the city quickly reminds you that New Orleans is a part of the American Deep South.  This image was shot from an airboat plying the bayous of Jean Lafitte National Historic Preserve.  I metered the exposure on the lush vegetation lining the waterway so as to avoid overexposure from the bright reflections.  Buy this photo

I captured this image of an alligator seeking the sun on an overcast winter’s day by framing tightly around the gator and its reflection.  In post-processing, I cropped to emphasize the symmetry of reptile and reflection and converted the image to black-and-white, while increasing its contrast a bit.  Buy this photo

I’m a big fan of food photography, especially when the plate is as strikingly beautiful as this one served at Brigtsen’s Restaurant.  I framed the shot tightly with a fast prime lens and a wide aperture to reduce the depth of field.  Buy this photo

Wherever we travel, we should make images that bring out a sense of place.  This image of my daughters strolling in the Garden District works because it captures the iconic symbols of this neighborhood–the stately mansions and live oak trees–while being a bit playful and framed in an unexpected way.  And as I’ve said many times, remember to capture your travel companions in some of your shots.  Buy this photo

Have you visited New Orleans with a camera in hand?  Please share your experiences.  Where do you like to visit and what do you like to shoot?

Want to read more posts about travel photography destinations?  Find them all here: Posts on Destinations.

“Building” Your Portfolio [Encore Publication]: Architecture gives local flavor and makes a great subject for your photography

Travel photography is exciting in large part because it encompasses all types of subjects.  In a single day while traveling, we may have the opportunity to shoot landscapes of the scenery around us, portraits of the people we meet, wildlife images of the fauna in the region, night images after the sun goes down, and photos of the local architecture.  I’ve already covered how to shoot most of these subjects in previous posts.  Today we’ll focus on how to make compelling images of architecture, which includes both the exteriors and interiors of the buildings we encounter.

For architectural photography, it is essential to carry a good wide-angle lens.  While I’m a big fan of prime (fixed focal-length) lenses, architecture is one subject where a zoom lens comes in very handy.  That’s because it can be difficult to change our vantage point when shooting large buildings in crowded urban environments.  And when photographing buildings, the widest end of the zoom range should be quite wide, indeed.  I recommend a lens that can zoom out to 16mm (for full-frame cameras) or even wider.  The lens doesn’t have to be particularly fast, because buildings do not tend to move quickly and we can use a tripod to steady the camera for longer exposure times, but it must be of very high optical quality for architecture photography.  Cheaper wide-angle lenses are prone to several kinds of distortion that can lend an unprofessional appearance to photos of buildings.  I recommend ponying up for a good professional quality wide-angle zoom lens with a range of somewhere around 16-35mm, or even a fast 14-24mm lens if you have the budget for it.

I use the Nikon 16-35mm f/4 lens for architecture shoots.  It’s got great image quality and is very solid and well built, but at f/4 it is not super fast, and it is rather heavy and bulky.

When shooting the exterior of a building with a wide-angle lens, we need to make an effort not to distort the lines of the building or its surroundings.  A wide-angle lens, especially when pointed upward, has the tendency to exaggerate features so that parallel lines appear to be divergent.  If you have the option of moving to a higher vantage point so you can shoot parallel to the ground instead of upward at the subject, this distortion can be greatly reduced.  But for those frequent situations when you have no choice but to look up at a building from the street level, try to zoom out so that the entire subject can be included in the frame without pointing the lens too far upward.  This image of a stately old building in Buenos Aires was made with the camera pointed nearly parallel to the ground so that even though a very wide focal length was required to fit the building in the frame, there is relatively little distortion of the perspective.
When using a wide-angle lens from street level, try to keep the camera pointed parallel to the ground to avoid severe distortion of the building’s lines.  Buy this photo

In contrast, the next image was shot from a vantage point at the same elevation as the subject, the world’s northernmost church.  I climbed a snowy hill in front of Svalbard’s chapel to attain the same height as the center of the building, so that I could hold the camera exactly level to the ground and still include equal amounts of the church above and below the center of the image.  This minimized the distortion and resulted in a more natural rendering of this fascinating building.

To make this photo of Svalbard’s church, I chose a vantage point at the same elevation as the midpoint of the building, minimizing distortion.  Buy this photo

I like to seek interesting colors and recurring patterns in architecture.  The miners’ houses in Svalbard made an intriguing subject because they were lined up in an even line of identical structures, but they varied in color.  To make the image more compelling, I moved across the street and shot with a moderate telephoto lens (65mm) to compress the scene and make the houses appear closer together.  I based the exposure on the light reflected from the paint on the houses, so that the snow in front of and behind the buildings was nearly blown out.  In post-processing I increased the vibrance slightly to bring out the bold colors in this scene.

Look for architectural scenes featuring interesting patterns and colors, such as this view of miners’ cottages in Svalbard surrounded by snow.  Buy this photo

Sometimes the most effective images of architecture hone in on the details rather than including the whole of the building.  I’m always on the lookout for a characteristic or unusual feature of the buildings around me. In New Orleans’s French Quarter, I framed this shot of a lovely wrought iron balcony using a long telephoto lens so that only this one feature of the building was included.

Zoom in on just the most characteristic or compelling features of a building to make an arresting image of the details rather than the whole building.  Buy this photo

Shooting interiors of buildings poses some of the same challenges as shooting their exteriors.  In particular, since a wide-angle lens is most often required and is frequently pointed upward, it is important to look at the edges of the viewfinder to try to minimize distortion of the building’s lines.  To make this wide-angle image of the inside of a grand mosque in Istanbul, I kept the camera level using a tripod and the camera’s virtual horizon function.  There was still a good deal of distortion around the edges of the upper part of the scene, but I was able to control this to some degree by adjusting the images perspective using Lightroom software during post-processing.

This image of the interior of a mosque in Istanbul shows some distortion, but I was able to keep it under control by shooting level to the floor and adjusting the vertical lines using post-processing software.  Buy this photo

Do you have tips for shooting the interiors and exteriors of buildings?  Please share them here.

Want to read more posts about how to capture amazing images while traveling?  Find them all here: Posts on What to Shoot.

To Travel Hopefully is Taking the Day Off: Please help support this site

Dear Reader,

To Travel Hopefully is taking the day off, but don’t worry, we’ll be back with fresh new content soon.

In the meantime, please take a look at the helpful travel photography tips and inspiring images in our archived posts.  Just select a category (Destinations, Gear, Techniques, Travel, etc.) from the right nav bar, or choose a month under Archives, and browse to your heart’s content.

While you’re here, take a moment to tell your friends and family about us.  Anyone who enjoys travel and wants to improve their photography will find great daily content here, including inspiring images from around the world and tips and tricks for making the best possible photos.  You can email any post or share it via social media with the click of one of the buttons at the end of each post.  And if you enjoy To Travel Hopefully, please click in the right nav bar to subscribe via email or RSS feed, so you won’t miss a single post.

And finally, please consider supporting this site by purchasing some of my photos, browsing for some great gear via the Amazon links, or clicking on some of the ads that interest you.

Thank you for visiting To Travel Hopefully!  Without your support, this project cannot continue providing you with daily content including inspiring travel photos and tips and tricks for making great images.

Warm regards,

Kyle Adler


Bracketing: Hedging Your Bets [Encore Publication]: In challenging shooting conditions, exposure bracketing is a great insurance policy

In the old film days of photography, it would be days or even weeks after shooting before we could see the results.  I would routinely use a procedure called “bracketing” to make a series of shots, each at a slightly different exposure, to increase the odds that one would come out decently exposed.  Even today, when digital photography allows us to see the results immediately, there are two good reasons to employ the exposure bracketing technique: 1) it can be hard to assess on a small LCD screen in bright daylight and while in the excitement of shooting whether the exposure is really correct, and 2) when the contrast between the brighter and dimmer parts of the scene is high we may want to stitch several different exposures together using software to create a high dynamic range (HDR) image later.

Tricky subjects, like this tiny Svalbard reindeer against a glacier background, benefit greatly from exposure bracketing.  From a series of 5, 7, or even 9 images shot at slightly different exposures, you can choose the one with the correct exposure for the conditions.  Buy this photo

So there are still good reasons to use exposure bracketing, and fortunately, it is quite easy to employ this technique.  Here’s how.

If possible, mount your camera on a tripod when using bracketing so it won’t move between exposures.  Then you can combine several of the exposures into an HDR image later if desired.

If your camera has a bracketing button or menu item, use it to specify how many shots you want to take (I usually shoot 5 or 7 different exposures when bracketing) and how much you want to vary the exposure between each shot and the next (often I choose a 1-stop difference).  If your camera lacks this feature, you can still use bracketing by manually adjusting the exposure between each shot and the next; just use your camera’s exposure compensation control to dial in first -2 stops, then -1 stop, then 0, then +1 stop, and finally +2 stops.

I like to set my camera for continuous shooting while bracketing.  That way, I just hold down the remote shutter release and the camera shoots all 5 or 7 exposures in rapid succession.  But it’s fine to shoot each frame individually in single release mode, if you prefer.

There are some subtleties to think about when employing exposure bracketing.  Some cameras let you choose whether to vary the aperture, the shutter speed, or the ISO setting, while holding the other two settings constant.  In most cases, I prefer to vary the shutter speed and hold the aperture and ISO settings constant, because changing the aperture affects the images’s depth-of-field, and changing the ISO setting can affect the noise in the image.

Later, during post-processing, you review the images and choose the one that is properly exposed.  Or if the scene is very high contrast, you can use photo editing software such as Lightroom or Photoshop to stitch several frames in your series together into an HDR image, which ensures good exposure from the brightest to the darkest tones in your photo.

Several exposures were shot using bracketing and then combined in Photoshop to create this HDR  image.  All tones from the darkest shadows on the mountain walls to the brightest highlights on the icebergs and lake are properly exposed in the final image.  Buy this photo

Have you used exposure bracketing techniques?  What are your best practices?  Do you use this process mostly for selecting the best exposure or for creating HDR images?  Please share your thoughts here.

Are you interested in learning new travel photography techniques?  Follow this link to see all the posts on techniques: http://www.to-travel-hopefully.com/category/techniques/.