Join Me on a Photography Tour Next Summer!: From the Great American Total Solar Eclipse through the most scenic locations of the Pacific Northwest, this is a trip not to be missed

Dear Readers:

There are still a few spaces available on the Eclipse and Pacific Northwest photography tour this coming summer.  Please let me know if you are interested in learning more about it.

Kyle Adler

=======

If there’s a more thrilling experience anywhere on our planet than observing a total solar eclipse, I’ve not yet found it.  And the next one will be cutting a path across the USA on August 21.  I am partnering with a prominent solar eclipse tour company to lead a photography tour that begins in Salem, Oregon with this awe-inspiring event and continues through Oregon and Washington states to photograph some of the Pacific Northwest’s most scenic locations.  From Aug. 19-22 we will be part of a larger group of eclipse chasers, accompanied by leading eclipse expert Prof. Jay Pasachoff, preparing for, observing, and photographing this remarkable natural display in Salem.  Our small group of about 15 will then embark on a travel and photographic journey that will take us to the Santiam Wilderness, Bend, Newberry Volcano National Park, John Day Fossil Beds, Wallowa Mountains, Mt. Hood, Portland, Olympic National Park, and Seattle, among other memorable destinations.

Almost nothing can rival the stunning beauty and sheer excitement of observing and photographing a total solar eclipse.

I will be providing photography instruction for interested participants via daily workshops and in-the-field learning.  During our optional low-key workshops, we’ll review our recent images, plan our shot list for the upcoming locations, and cover techniques to make the best images possible.  While the drama of the eclipse and the breathtaking landscapes of the US Pacific Northwest will be obvious magnets for our photographic pursuits, we will also seek opportunities to make memorable images of the people we meet and of the wildlife and other attractions of the region.  Photographers of any level from advanced beginner through semi-professional will see their images improve, and non-photographer friends and family are welcome to either attend the daily workshops (even a smartphone camera can make great images) or enjoy a few minutes of extra time on their own.   You can enjoy this trip and make memorable images using whatever camera gear you wish to bring; it is not necessary to invest in specialized gear (although for the eclipse itself, a DSLR or mirrorless interchangeable lens camera equipped with an inexpensive solar filter will be helpful).

This tour begins in Salem, OR on Aug. 19 and ends in Seattle, WA on Sep. 2.  Find more details here: Eclipse and Pacific Northwest Photography Tour.  Please let me know if you have questions or are interested in participating on the trip.  Mary and I hope that you can join us for this rare opportunity to experience a total solar eclipse right here in North America and to visit the spectacular attractions of Oregon and Washington states!

Focus on Vietnamese Tet Festival: A vibrant lunar new year celebration in America’s largest Vietnamese community

Most Americans are familiar with the Chinese New Year festivities that usher in the lunar new year in late January or early February, but most are not as aware of the Vietnamese cultural celebration of the start of the lunar year.  Called Tet, the Vietnamese new year’s festival has its own distinctive, bright, and colorful symbols and traditions.  By far the biggest Vietnamese community in the USA is in San Jose, California, which not coincidentally also hosts the largest Tet Festival each year in the US.  I’m fortunate to live quite near San Jose, and yesterday I was already collaborating with a favorite model in a studio one city north of there, so I decided to drop by and shoot the Tet Festival.  I’m very glad I did.  Today’s post presents some of my favorite images from the festival in the form of a simple photo essay.  I’ve included some discussion about how the images were made.

Welcome to the Tet Festival!  When shooting symbolic items, always check your background and find a point-of-view that is clean and compelling.  Buy this photo

An unusual cultural juxtaposition: Vietnamese belly dancing.  Here I used a fast shutter speed to freeze the motion and a relatively wide aperture to soften the background.  Capturing the right moment in the dance pattern is important, but it’s equally essential to capture the right facial gesture and eye contact.  Buy this photo

What’s scarier than a clown?  A drunken clown.  This fellow came out on stage with a bottle of beer and a bottle of whiskey, both of which he proceeded to drink onstage.  My wife and I suspect that this was an object lesson for the children in the audience, but we’re not certain.  Buy this photo

The fashion show of people watching the fashion show on stage.  Whether shooting landscapes, people, wildlife, or urban scenes, always remember to look in all directions.  Sometimes the most interesting subject lies in the opposite direction from the one you thought you were shooting.  Buy this photo

To capture this candid moment of young kids trying out the Vietnamese drums, I used a medium telephoto lens.  Most of the time I prefer to approach subjects before photographing them, but occasionally it’s preferable to shoot first and ask questions later, so as to capture the subject without self-awareness.  Buy this photo

Wearing many hats!  Buy this photo

This traditional Vietnamese dance troupe performed a series of dances, each representing one of the seasons of the year.  This was their Spring Dance.  The vibrant colors of the costumes and props contribute greatly to this portrait.  It’s also important to compose and crop the image carefully to achieve a pleasing result.  Buy this photo

Summer dance.  Buy this photo

I love this portrait thanks to the dancer’s look of contemplation and concentration.  To make an effective portrait in spite of the cluttered background, I used a medium telephoto lens set to a wide aperture to set the subject off from the background.  I also cropped the image in post-processing to remove extraneous background objects.  Buy this photo

Parting shot: A favorite portrait of a traditional Vietnamese dancer.  Buy this photo

What are your favorite cultural events and celebrations?  Please share your thoughts on how to successfully photograph them.

Want to read more posts about what to shoot while traveling or near home?  Find them all here: Posts on What to Shoot.


Camera as a Service? [Encore Publication]: A first look at Relonch’s artificial intelligence photography service

In the 150 or so years of its history, the camera has evolved rapidly as a result of the advent of new technologies, each promising to dramatically simplify the photographic process and improve the resulting images.  Just within my lifetime, there have been major upheavals via the introductions of the Kodak Instamatic, the Polaroid SX-70, and of course digital photography.  So perhaps it was inevitable that someone would develop an AI (artificial intelligence) to make photography as simple as pushing a single button.

A company called Relonch (https://relonch.com/) is developing such a system now.  Sometime in 2018, they expect to roll out a Camera as a Service for $99 per month.  You get a loaner of a brightly colored Relonch 291 camera (manufactured by Samsung), with a fixed focal length lens and only a single button, which is used to take the picture.  It doesn’t even have an LCD screen to review your images.  The purported value of the subscription price, of course, is not derived from the camera hardware, but rather from the service.  For this lofty price, your camera transmits your image files to Relonch, who then use algorithms to analyze and process the files.  The next day, they send the processed images that they consider to be your best photos back to your mobile device of choice.

Relonch 291
The Relonch 291 camera

The concept here is that most people are confused by all the settings on their camera, even if it’s a fairly simple point-and-shoot device, so their photos rarely come out the way they envisioned them.  Instead, let them use a simple camera with just a single button, but employ AI techniques to post-process the best images to make them look closer to the way the user intended.

I haven’t tried the camera and its wraparound service yet (the company’s headquarters and showroom are in Palo Alto, near to where I live, so perhaps I can do so soon), but based only on their description of the concept I share my thoughts here.

  1. Will users pay $1200 per year for this service?  I’m skeptical as to whether there is a broad market for the service at this price point.  “Serious” photographers, that is professional and enthusiast amateurs, already know how to use the manual controls on our cameras and enjoy the process of capturing images and enhancing them during post-processing to achieve the final results we want.  Are there enough users who don’t know how to use their cameras but are still willing to pay so much for better images?  Time will tell.
  2. Are people willing to leave the choice of which images they receive up to a software algorithm?  I wouldn’t want someone else, even a top professional photographer, deciding which of my images I get to see and permanently deleting the rest.  And I certainly wouldn’t want an AI to make this decision for me.
  3. Are users okay with waiting a day to see and share their images?  We’ve gotten pretty spoiled as a consumer class.  We expect instant gratification, and ever since the first Polaroid cameras came out in the 1940s, photographers have been able to see their images right away.  Waiting a day may not fly.
  4. Do people really want their photography to be mechanized?  For its whole history, photography has seen its reputation tarnished when compared to other visual art media because a part of this art form includes the use of a mechanical device, the camera.  Just as a great painter creates her art through her vision and her technique, so does a great photographer.  The gear we use is only incidental to the quality of the images we create.  I fear that by taking the craft out of the process and substituting an AI for the artist’s vision, the Relonch service will further degrade photography as an art form.  And let’s be honest here.  An AI can adjust color balance, sharpness, clarity, vibrance, and exposure to improve a raw image, but it can’t determine how to crop or selectively adjust parts of the image to make it artistically pleasing or to give it a story to tell.  And most important of all, no amount of post-processing can turn a poorly composed or an uninteresting image into one worth looking at.  An AI may soon be able to drive our cars from Point A to Point B, be we’re a long way from having an algorithm that can create true visual fine art.  I’ll leave you with the words of master landscape photographer Ansel Adams: “There’s nothing worse than a sharp image of a fuzzy concept.”

What do you think of the Camera as a Service concept?  Valuable evolution of photography that will bring its benefits to a wider range of humanity, or expensive gimmick that will degrade the artistic worth of the medium of photography?  Please share your thoughts here.

Want to read more posts about gear?  Find them all here: Posts on Gear.

Focus on Naatak Mela ’16 [Encore Publication]: Five short plays in five different Indian languages

Note: Naatak’s next production, “Airport Insecurity,” runs from Feb. 24 through Mar. 4, 2017.  You can find more information here: Naatak “Airport Insecurity”.

Last month I was privileged to be invited by Naatak, America’s preeminent Indian theater company, to shoot their annual festival of short plays, Mela ’16.  I’m a loyal follower of Naatak, so I was thrilled to have the opportunity to photograph this exciting production.

The program is comprised of five short plays, each performed by a different cast and in a different Indian language.  I found all five plays to be powerful and vibrant, and truly enjoyed their diversity.  It was also a treat to get to know some of the cast, directors, and staff at Naatak.  In this post, I share a few images from the event along with some tips about photographing live indoor performances.

The lighting at Mela ’16 is first-rate, probably the best I’ve ever encountered when shooting live indoor performances.  This aids photography in two ways: 1) The color balance appears quite natural, and 2) The lighting is bright enough that you can shoot using a fast shutter speed and still keep noise to a minimum by choosing a reasonable ISO setting.

The first play, “Immortal,” is presented in Bengali and is based on a short story by Satyajit Ray.  It’s a mystery involving the unexpected death of a prominent scientist and treats themes of intellectual property rights, scientific ethics, and of course a love triangle.

With good continuous tungsten lighting handled by a talented tech staff, live indoor performances are a joy to shoot.  I used a fast normal lens and a fast portrait lens, both of them primes, so I could select a fast enough shutter speed to freeze action and still choose a slow enough ISO setting to minimize noise.  Buy this photo

The second play, “The Goat Slaughter Game,” is presented in Tamil and based on a short story by well known children’s author Roald Dahl.  It reminded me of an Agatha Christie mystery, but I won’t divulge which one so as not to give anything away.

During action scenes, try to anticipate the “decisive moment” when the drama unfolds.  When something key is happening, shoot liberally so as to maximize chances of capturing just the right instant.  This image is powerful because it captures the instant around which the whole play hinges, and because the fast shutter speed freezes that moment and the shallow depth-of-field isolates each of the two characters.  Buy this photo

The third play, “Look How Artfully I protected You,” is presented in Gujarati and based on a work by George Bernard Shaw.  This little farce is packed with drama and action, Bollywood-style.  The costumes and set provide vibrant colors and contrasts.  I loved shooting this piece.

Once again, the key to making memorable images of performances is to capture just the right instant where the dramatic tension is high.  In this image, the woman is trying to defuse a fight between her husband and her lover.  In post-processing, I cropped the image slightly so as to increase the tension and maximize the storytelling potential.  Buy this photo

The fourth play, “Logging Out,” is presented in Marathi and written by Dharmakiri Sumant.  It tells the story of a boy and girl falling in love, but with the twist that the girl wants to keep their relationship online and not meet in real life.  This piece was the most challenging to shoot because the two actors are physically separated within different areas of the stage and because the lighting was often very dim.

In low-light situations, shoot with a large aperture (small f-stop number) and a high ISO setting, and wait for moments when the action slows down to prevent motion blurring.  I like the moody atmosphere of this image, which reflects the loneliness of life online.  Buy this photo

The final play, “The Mud Wall,” is presented in Hindi and written by Narendra Kohli.  This was my favorite piece of the evening because it deals with many themes of modern Indian life, including wealth, class, bureaucracy, family dynamics, and treatment of women.  It was also a joy to photograph because it had so much dramatic action and tension.

This may be my favorite image from the whole event.  I love the dramatic tension and the irony of the slogan on the sign above the terrified family.  The usual tips apply here: use a fast lens, a fast shutter speed, and a reasonable ISO setting; frame the shot in advance on the area where the action will occur; and shoot many images.  In post-processing, I cropped a bit for dramatic effect and lowered the black point so that the backdrop appears completely black for more contrast with the actors.  Buy this photo

Mela ’16 is an exciting event and also very educational for those of us not intimately familiar with the varied cultures of India.  Since I can’t travel all the time, I try to seek out global learning experiences in my own backyard, and Naatak delivers on this promise.  If you live in the SF Bay Area, I encourage you to attend the final performance today.  And not to worry, each play is presented with easy-to-read supertitles in English, just in case your Bengali, Tamil, Gujarati, Marathi, or Hindi are not up to snuff.

What performances excite you?  Have you attended, or photographed, events that informed you about diverse cultural experiences?  Please share your thoughts here.

Want to read more posts about what to shoot while traveling or near home?  Find them all here: Posts on What to Shoot.

Focus on CounterPulse Performing Diaspora [Encore Publication]: Performances that speak to cultural tradition and transformation

Recently I was privileged to be invited by CounterPulse to shoot their annual artist residency program, Performing Diaspora.  Located in San Francisco’s Tenderloin neighborhood, CounterPulse is an essential local arts organization that gives a voice to performing artists whose message would otherwise not be heard.  I’ve been a fan for a while, and this was my first opportunity to photograph one of their performances.

The program is comprised of two pieces, each designed and choreographed by an artist-in-residence and each presenting a theme related to the links between cultural tradition and transformation, between keeping tradition alive and assimilating.  I found both pieces to be very powerful and moving.  In this post, I share a few images from the event along with a few words describing the main themes I gleaned from the evening.  And of course there are some tips about how to make good images under these challenging shooting conditions.

The first piece, “silbihan,” was conceived, directed, and danced by Filipino-American artist Samantha “SAMMAY” Penaflor Dizon.  Layering dance with voiceover, music, and projected video, this piece traces a journey from the traditional culture of the Philippines to life today in the USA.  The key message I took away is that our cultural underpinnings are within each of us, and when the time is right we will discover how they inform and inspire us.

Artist SAMMAY dances in front of a projected video depicting traditional life in the Philippines.  To make this image, I used a fast portrait lens and high ISO setting to allow a reasonably fast shutter speed in the low light conditions of the theater.  Care needs to be taken in these situations to render the color balance acceptably in the mixed lighting conditions.  Buy this photo

Later in her piece, SAMMAY, now resplendent in bright traditional dance attire with cape, resolves the tension from the earlier segments in a whirl of color and motion.  Here it was important to find a suitable shutter speed that would freeze most of her motion but still allow some of her gestures to be captured as a blur.  Buy this photo

The second and final piece in the program is entitled “unending.”  Choreographed, danced, and directed by dana e. fitchett, the work also incorporates three additional dancers and music in a wide range of styles.  I enjoyed this piece for its sheer physicality and also for the message of tension giving rise to hope that we all can support each other regardless of our backgrounds.

Director dana e. fitchett expresses her themes through patterns of movement.  The mixed LED lighting was especially challenging in this piece, so in post-processing of my RAW image files I paid careful attention to color balance in an attempt to render colors as naturally as I could.  Buy this photo

The patterns established by artist dana early in her piece progress into larger patterns with the addition of several more dancers.  Themes I took away include tension resolving into acceptance and support.  Here I capture a particular moment when the performers are moving from opposition to synchronicity.  Buy this photo

To me, CounterPulse holds a special place in the vibrant and varied San Francisco Bay Area arts scene because they encourage experimentation and interpretation of cultural diversity.  Performing Diaspora 2016 is a terrific program featuring talented artists who deserve to be seen and heard.  As a photographer, I feel privileged when my work can further valuable causes such as theirs.  If you live in the SF Bay Area, please try to attend one of CounterPulse’s upcoming shows.

What performances move you?  Have you attended, or photographed, events that inspired you to open your mind to new ways of thinking?  Please share your thoughts here.

Want to read more posts about what to shoot while traveling or at home?  Find them all here: Posts on What to Shoot.


Cool, Calm, and Composed: All the technology in the world can’t replace your vision when composing images

Photographic composition is the process of determining which elements to include in the image and how to combine them in an artistically pleasing way.

What makes a great photograph?  You’ll hear many different answers to this question from different people, but to me a great photograph needs to integrate at least three of these four elements: compelling subject, beautiful light, flawless technical execution, and thoughtful composition.  Assuming we can find a great subject and either find or manufacture lovely lighting, the technology in modern cameras can assist us in certain technical matters such as exposure and focus.  But even the best of today’s AI technology can’t replace the artist’s vision when it comes to photographic composition.  For more of my musings on the application of AI to photography, see yesterday’s post: Post on AI and Photography.

Today’s post presents a quick primer on some of the guidelines that can help us compose our images.  But keep in mind that there are no hard-and-fast rules when it comes to composition.  The photographer must choose which “rules” to use when composing, and when to break some rules.

      • Rule of Thirds: One of the first compositional tools most beginning photographers learn is the so-called Rule of Thirds, which states that strong composition is achieved by placing key elements along the imaginary lines that divide the frame into thirds vertically and horizontally; better yet, try to place the most important parts of the subject at the intersection of a pair of these lines.  This portrait I made of two sisters in Arusha, Tanzania, places each sister’s dominant eye at an intersection point of two of the imaginary dividing lines.

Tanzania Buy this photo

          • Leading Lines: Another tool to aid in composing strong images is using the natural lines in the image to draw the viewer’s eye into the frame.  This landscape made while hiking part of the Sheep’s Head Way in southwestern Ireland incorporates the leading lines of the ancient stone wall, the rainbow, and the coastline to draw the eye down to the sea, over the rainbow, and across the coast.

 Buy this photo

          • Framing Elements: Using natural frames within the image to set off the main subject can be a useful technique.  Look for doors and windows in a population center, or for natural arches, trees, and other landforms in a natural setting.  This night landscape made in Yosemite National Park frames the Milky Way within a ring of trees and granite walls.

 Buy this photo

          • Point-of-View: Think about how the different elements in the image will appear in the perspective of your location.  I could have shot this portrait of a man with his duck at a street fair in San Francisco straight on with them both looking into the lens.  Instead, I chose a viewpoint that was very close to the duck’s head, shooting up from its perspective and relegating the human to the background and edge of the frame, nearly out of focus.  This changes the nature of the portrait to a more humorous and offbeat tone, which matched the occasion of the How Weird Street Faire.

USA Buy this photo

          • Background: Always be at least as aware of your background as your foreground subject matter.  Careful choice of background to support your image’s overall theme is one of the surest ways to elevate your image.  In many cases it is desirable to have a clean, uncluttered background, but for this image of the San Francisco Pride Parade, I wanted the background to support the theme of solidarity and strength in numbers.  While the main subject in the front is the only element in crisp focus, the layers of marchers with flags behind him supports the concept he is not alone.

 Buy this photo

        • Patterns: Composing an image around a recurring pattern can add considerable dramatic impact.  I framed this image of miners’ cottages in Svalbard, Norway by isolating the repeating pattern of houses, each in a different vivid color, against the stark white of the snow and bleak sky.

 Buy this photo

  • Symmetry: Images with symmetry along one or more dimensions are often striking and artistically pleasing.  The subject can have natural symmetry, such as in a face, or can be framed with its reflection to create symmetry.  I framed this image of a resting alligator with its reflection in the Louisiana bayou waters to create a dramatic symmetry.

 Buy this photo

Keep these guidelines in mind as you choose how to compose your images, but remember that which one(s) you apply will depend on the image, that its okay to break the rules, and that ultimately you are the artist and what you envision, not what the rules state, is correct for you.

What guidelines help you compose your best images?  Please share your thoughts here.

Want to read more posts about photographic techniques?  Find them all here: Posts on Techniques.

Will Photography Soon Be Obsolete?: Musings on AI as artist

A friend recently pondered via a social media post whether we will have photography as we know it in the future, or if artificial intelligence (AI) will soon generate all of our images.  With tens of millions of people now capturing snapshots on their phones’ cameras and instantly applying AI-generated filters to enhance or modify the images, we can certainly observe an increasing trend toward computer involvement in the making of photos.  But I don’t believe AI will replace the artist’s eye in the making of fine-art photographs for quite some time to come.  Here are a few semi-random musings on this theme.

A machine can certainly generate bad art.  In college in the mid-1980s, I wrote a program for my Computer Science final exam that composed musical canons (pieces in which each voice plays the same melody together, but starting at different times).  My code used a semi-random configuration of musical intervals as the opening melody, then applied a simplified set of the rules of counterpoint (how musical lines are allowed to fit together) to complete the canon.  I received an “A” for this project, but truth to tell, any listener familiar with classical music could instantly discern that the pieces composed by my program weren’t anything like the lovely canons written by Telemann, for example.  In other words, my AI didn’t pass the Turing Test.

In the more than 30 years since I wrote that program, AI has progressed by leaps and bounds.  Computers can now generate poetry, classical and jazz music, and even paintings that many non-experts judge as products of human artistic creativity.  I’m fascinated by the progress, but so far the best of the AI-generated “art” is really just imitation and trickery: it takes a seed of something original such as a photograph or a melody, and transforms it using a set of complex rules that could be described as a pre-programmed artistic style into something pleasant enough but not inspiring.

In his landmark 1979 book, “Gödel, Escher, Bach: An Eternal Golden Braid,” Douglas Hofstadter amazed the world by demonstrating comparable interlocking themes of grace and elegance amount the very different disciplines of mathematics, visual art, and music.  He even speculated on the ability of machines to create works of great insight.  But Hofstadter’s proposed approach differed from that of the AI field that has developed since then in that he favored teaching machines to create via an understanding of how the human mind creates, as opposed to today’s AI approach of taking mountains of data and throwing brute force calculations at it.  To my eye, ear, and mind, this brute force method is the reason most of today’s attempts to artificially emulate the creative process are not insightful and do not add anything to their genres.  And so far, the vast majority of these attempts fail their respective Turing Tests.  That is, humans can tell it is a machine and not a human generating the “art.”

Applying these musings to the art of photography, what do see today?  To be sure, more images are being generated today than ever before in human history, and the art of photography is being devalued by its sheer pervasiveness.  Everyone captures images now, and most of them believe that makes them photographers.  While photographers have always required the involvement of a machine in the creation of their art, good photographers have always relied on their artistic vision, the so-called artist’s eye, to create images that are special.  I don’t believe that all the Meitu and similar AI filters that abound today are creating any photographic art that adds insight or helps interpret the world around us.

One very central component in photography is composition.  How does the photographer choose what elements to include in the image, and how will these elements be combined?  I haven’t written a post in this space yet that specifically covers the topic of composition, but it’s on my list to write and publish soon.  This vital aspect of photography does use some “rules”, such as the Rule of Thirds, Leading Lines, Framing Elements, Point of View, Foreground/Background, and Symmetry and Patterns.  Rules, of course, can be programmed into an AI so that the machine can emulate the way humans create.  But in photographic composition, the “rules” are really just guidelines for getting started.  A good photographer knows when to break the rules for artistic impact.

Even the dumbest devices are capable of generating images.  Security cameras can capture images that we would consider to be rudimentary documentary photographs.  Given long enough, a security camera might accidentally capture what we would consider to be a good street photography image, because after capturing millions of dull scenes, sooner or later the camera will catch a random alignment of interesting elements.  It’s like thousands of monkeys typing random characters: given enough time, one of them will coincidentally type out a Shakespeare sonnet or even a full play.  As wearable computing devices become more pervasive, many people’s lives will be documented in real-time via the capture of millions of images.  Some of these may be interesting to their friends and perhaps the general public.  A few may even have artistic value.  But true artistry isn’t characterized by coincidence.

I don’t doubt that eventually we will get to the point where machines can create images as good as much of what humans can create.  I think we’ll get there, but it will take a long, long time.  And in the meantime, the role of photographer as artist, experimenter, and interpreter of the world around us will continue to be central to our society’s need for communication and expression.

What do you think about the future of photography?  Will we soon see machines creating much of our imagery?  How about our good, artistic imagery?  Please share your thoughts here.


In the Nik of Time [Encore Publication]: Google’s Nik Collection offers leading-edge image editing tools for free

In 2012, Nik Software, a small company known for their image processing tools that emulated the look and feel of using old film, was quietly acquired by a somewhat larger company known as Google.  This past spring, Google announced they were making the entire suite of Nik tools available for free to all users.  I’m just getting around to testing this suite of image editing software now, and from what I’ve seen so far its capabilities are leading-edge and would be well worth spending hundreds of dollars to obtain.  It doesn’t do everything, but what it does, it does better than tools such as Photoshop and Lightroom, each of which costs a good deal of money.  That Nik’s great capabilities are available for download completely gratis is a wonderful gift from the folks at Google, and I strongly recommend you give them a try.

It’s important to note that the Nik Collection of software tools is not intended to be standalone image processing software.  It consists of a set of plugins, each specialized for a different specific purpose, that must be accessed by a general-purpose image editing application such as Photoshop, Lightroom, or Aperture.  I use Lightroom for nearly all of my post-processing, so I used that application to access the Nik Collection.

Once you have your general image editing application installed, then you can download the Nik Collection modules for free at this site: https://www.google.com/nikcollection/.  When you are working in your application of choice, you will then the various Nik Collection tools in the editing menus.  For example, when I select an image in Lightroom, I can access six of the seven Nik modules by pulling down the “Photo” menu and then pulling down the “Edit In” sub-menu.  One of the Nik modules, the HDR Efex tool, is accessed instead under the “File” and “Export with Preset” menu choices.

These are the seven Nik Collection modules included in the free download:

Analog Efex Pro

Explore the look and feel of classic cameras, films, and lenses.

Color Efex Pro

A comprehensive set of filters for color correction, retouching, and creative effects.

Silver Efex Pro

Master the art of black-and-white photography with darkroom-inspired controls.

Viveza

Selectively adjust the color and tonality of your images without complicated masks or selections.

HDR Efex Pro

From natural to artistic, explore the full potential of HDR photography.

Sharpener Pro

Bring out hidden details consistently with the professional’s choice for image sharpening.

Dfine

Improve your images with noise reduction tailored to your camera.

So far, I’ve played around with just three of these tools.
Silver Efex Pro did a very good job of converting my test images to monochrome.  I’m pretty good at using Lightroom’s tools to convert color images to black-and-white, but they take a lot of practice to master.  In Nik’s Silver Efex module I was able to make some good choices very quickly.  For those who want to fine-tune their black-and-white conversions, there are very good tools for detailed control over the process.
I used Nik’s Dfine module to attempt to reduce noise in a favorite shot of the Milky Way over Yosemite Valley’s Half Dome.  The results of my quick trial looked comparable to what I had done in Lightroom, but I suspect if I took the time to learn the Nik tool more thoroughly, I could end up with even better results.
Finally, I tested Nik’s HDR Efex Pro tool.  This little gem is a joy to use.  Just select the series of shots from which you want to build an HDR (High Dynamic Range) image, export them to HDR Efex, and click a couple of buttons to generate the base HRD image there.  My default image looked pretty good, but the Nik tool has a wide range of presets that allow you to generate different HDR effects with the click of a button.  I tried several of these presets until I found one that perfectly suited the scene.  A few more small tweaks using the detailed adjustment sliders, and I was ready to save the HDR image back into Lightroom.  In the past I have been very disappointed with Lightroom’s built-in HDR tools, and only slightly more satisfied with Photoshop’s HDR module, but the Nik HDR Efex Pro plugin does an amazing job.  It’s both easier to use and generates better results than the other HDR software I’ve used.  Specifically, the Nik tool does a much better job than the other tools at producing natural-looking colors and at removing the “ghosting” effects from when the underlying images are just a little bit different from one another.  Now I’m eager to find the time to go back to some of my favorite HDR images and rebuild them using the Nik software!
For comparison, here is a favorite HDR image of mine, first shown after processing in Photoshop’s HDR tools and then shown after processing in Nik’s HDR Efex Pro tools.
lrwm-lowres-5884This HDR image of Lago Grey with its glacier and the peaks of Torres del Paine National Park in Chile was processed using Photoshop’s HDR tools.  The colors appear unnaturally saturated and parts of the image (especially the tops of the mountains and the brush in the foreground) show some ghosting effects.
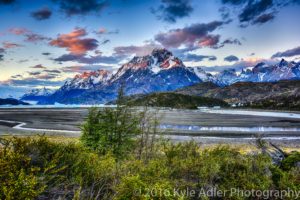
lrwm-lowres-5880-5884-hdrnikThis version was processed using the Nik Collection’s HDR Efex Pro tools.  The colors look much more natural and all parts of the image appear sharp and free from ghosting.
I am looking forward to revisiting many of my favorite images and reprocessing them using the Nik Collection’s tools.  I highly recommend this versatile, easy-to-use, and powerful suite of image editing modules.  And the price can’t be beat.
Have you used the Nik Collection for your own photography?  What do you like and dislike?  Please share your thoughts here.
Want to read more posts about post-processing your images?  Find them all here: Posts on Post-Processing.

To Travel Hopefully is Taking the Day Off: Please tell your friends about us!

Dear Reader,

To Travel Hopefully is taking the day off, but don’t worry, we’ll be back with fresh new content soon.  In the meantime, please take a moment to tell your friends and family about us.  Anyone who enjoys travel and wants to improve their photography will find great daily content here, including inspiring images from around the world and tips and tricks for making the best possible photos.  You can email any post or share it via social media with the click of one of the buttons at the end of each post.  And if you enjoy To Travel Hopefully, please click in the right nav bar to subscribe via email or RSS feed, so you won’t miss a single post.  Thank you for visiting To Travel Hopefully!

Warm regards,

Kyle Adler


Camera of the Future? [Encore Publication]: A new company promises DSLR quality from a cellphone-sized device

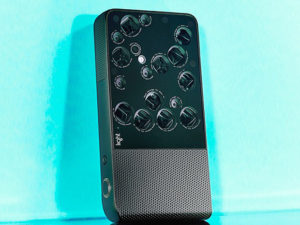
The Holy Grail for us travel photographers would be to have a tiny and affordable cellphone-sized camera that can capture images with the quality and versatility found today only in large, heavy, and expensive digital cameras (DSLRs and medium- to large-format cameras).  A new company called Light promises to offer just such a device starting sometime in 2018.  Reading their pitch in IEEE’s newsletter for this innovative camera design, I was excited by the revolutionary concept but not convinced that their first offering would truly meet travel photographers’ needs.  Take a look at the prototype photo and the IEEE article, and then we’ll discuss the bottom line.

lightcameraconcept

IEEE Article on Light camera concept

My take on Light’s pitch is that they have an exciting new design concept which someday could translate into a truly remarkable product.  The idea of combining multiple cheap camera systems, each with a cellphone camera’s small plastic fixed-aperture lens and tiny inexpensive sensor, and then combining their data using controlling mirrors and software into a single high-resolution image with control over such elements as focal length, depth-of-field, and bokeh effects, is creative and compelling.  By combining the separate power from all of these small cheap lenses and sensors, none of which by itself can gather much light, capture high resolution, nor provide manual control over focal length or aperture, the device and its software can achieve a final image that will be brighter, more detailed, and more controllable than the sum of its parts.

But given how little the sum of its parts costs to produce, this next-gen technology carries a hefty early-adopter premium when priced at $1699.  For that money, one could buy an enthusiast DSLR system (body and a couple of zoom lenses) with similar resolution and a greater range of focal lengths than the Light camera will have.  But there are many other serious advantages to a DSLR or a good advanced mirrorless ILC  system than just resolution and focal length.  Even if the Light device’s software can generate a final processed image that overcomes each lens and sensor’s weaknesses to rival a DSLR’s image in terms of brightness and image quality (and I have real reservations about its ability to do so), it still won’t likely be able to match a DSLR’s power-up time (the time from when you turn it on until it is ready to shoot), capture frame rate (the speed at which it can capture multiple shots), or bright optical viewfinder.

In summary, I like the concept and believe it could hold the key to building a future breed of travel cameras that are smaller, lighter, and cheaper than today’s “serious” cameras while retaining much of their quality.  But the initial device’s high price and design trade-offs won’t leapfrog the advantages of a good DSLR or mirrorless camera just yet.  The first offering would be fun to play with, in the spirit of “the best camera is the one you have with you,” but it won’t get me to leave my DSLR system at home.  This will be a fun technology and a fun company to watch, though.  I’ll provide updates in future posts as I learn of new information.

What do you think of Light’s new camera concept?  Do you see this design as the basis for a new generation devices that would replace your DSLR or mirrorless camera system?  Please share your thoughts here.

Want to read more posts about photography gear?  Find them all here: Posts on Gear.

Cultural Awareness Begins at Home [Encore Publication]: Some musings on the US election and inauguration

Dear Readers: On the eve of the US presidential inauguration, I feel it’s an appropriate time to republish this post from last November and redouble my efforts to reach out more broadly to Americans of different backgrounds.

Like most Americans, I was surprised at the outcome of the US presidential election this week.  This is not a political forum, and I won’t discuss my own personal politics (although for what it’s worth, most travel photographers do lean toward the progressive side), but I would like to share in today’s post a few thoughts on the surprise results.

The big question being asked across the entire political spectrum is how could nearly all of the polls and analysis point toward one outcome (a big win by Clinton) when the actual election went the opposite way (a big win by Trump)?  There is likely quite a lot of complexity behind the answer, but the simple truth is that very few people truly understood the full extent of the anger and frustration so many Americans have been feeling in recent years.  For many, their vote was not cast in support of Mr. Trump so much as it was a cry of protest against what they view as a broken government by the elite that left them out of the economic recovery of the last few years.

And this has gotten me to thinking.  As travel photographers, we roam far from our home, and often far from our home country, seeking to better understand the ways people are similar and different.  In other words, we strive to learn about, document through our images, and share with others a cultural understanding of each place we visit.  I’ve written frequently in this forum about the importance of traveling with sensitivity and an open mind so that we can get to know people from all walks of life in our destinations.  I often discuss here how photography is a wonderful tool to bridge the gap between our culture and that of the people we meet around the world.

But in the wake of this week’s surprise election results, I am realizing that I don’t understand the full range of cultural diversity in my own country.  I may have spent time with a tobacco farmer in rural Cuba, but how much time have I spent getting to know the challenges faced by a small farm owner in rural America?  I’ve had conversations with religious minority groups across China who felt oppressed by Beijing’s rule, but I haven’t spoken much with Americans who feel our federal government isn’t in touch with their religious beliefs.  And I’ve visited a wide range of villages and nomadic settlements in Tanzania to learn how the residents differ in terms of their unequal sharing in that country’s economic growth, but I haven’t been exposed to enough communities across America who feel left out of our country’s economic recovery.  In summary, I open my eyes and mind while traveling abroad better than I do in my own country.

As travelers, and especially as travel photographers, we are in a great position to meet, listen to, and learn from diverse communities all around the world.  Let’s make an effort to do the same in our home countries.  From such learning comes insight, and from insight, perhaps, can come workable solutions to pressing problems without having to resort to hate and extremism.

What’s been on your mind in the wake of the US election?  Do you have thoughts about how we can better understand the differences among our fellow countrymen?  Please share your ideas here.

Focus on Svalbard: Breathtaking beauty at the top of the world

My wife and I area avid eclipse chasers.  One of the joys of seeking out total solar eclipses is their geographic dispersion: each total eclipse can be viewed only from a narrow band of land or sea whose swatch could cut across any corner of the globe.  This means the dedicated eclipse junkie could, and eventually will, end up traveling to nearly any given remote spot on the planet.  In March, 2015, we had the opportunity to observe and photograph a total solar eclipse in Longyearbyen, the only population center in Svalbard, the vast island in the Norwegian Arctic.  This wonderful trip was conducted by A Classic Tour Collection (http://aclassictour.com/travel-company/), specialists in eclipse tours. Home to more polar bears than humans, Svalbard is a place of remarkable pristine beauty located closer to the North Pole than it is to mainland Norway.

In a previous post I provided a primer on eclipse photography.  You can review that post here: Post on Eclipse Photography.  And don’t forget you can join my wife and me for our photography tour including the total solar eclipse and the Pacific Northwest in August-September 2017: Eclipse and Pacific Northwest Photography Tour.

Today’s post focuses on Svalbard’s photographic treasures.  The village of Longyearbyen itself is very distinctive.  The world’s northernmost permanent settlement, it was built to enable the mining industry in the region.  The landscape and architecture are very unusual and starkly beautiful.

This row of miner’s cottages, each painted a vibrant color, makes a nice subject.  I overexposed the foreground and background snow to emphasize the richly saturated colors of the houses.  Buy this photo

Any Arctic location affords the possibility of seeing the Aurora Borealis (Northern Lights).  The conditions must align properly: dark sky, clear weather, and it helps to be near a peak in the solar cycle.  While I’ve seen more impressive displays in the past, the aurora we observed in Svalbard was still impressive.

To capture the Northern Lights, use a fast wide-angle lens and a sturdy tripod.  As a starting point for exposure, try an ISO setting of about 800 and shutter speeds from about 4-15 seconds.  Experiment to see what works best.  Buy this photo

The stark icy landscapes surrounding Longyearbyen are otherworldly.  I photographed this glacier-covered mountain near sunset, and we enjoyed the excitement of climbing it the next day.

To make this image of an icy butte on the outskirts of the village, I used a tripod and exposed using spot metering for the rocky parts of the mountain.  Buy this photo

When shooting in very cold climates like Svalbard in March, it’s important to keep both your gear and yourself safe and functional.  Check out this post on shooting in extreme conditions: Post on Extreme Conditions.

One of the trip highlights was a polar bear safari by snowmobile.  Zipping along pristine ice fields at speeds up to 75 km/hour while the Arctic sun slowly set was thrilling.  Our turnaround point was an old campsite on the shore of the Barents Sea.  It truly felt like the edge of the world.  Due to an incident earlier in the day, in which a group of campers was attacked by a polar bear and forced to shoot it, we did not encounter any of the skittish bears that night.  We did, however, see the doomed animal’s footprints in the fresh snow.

My wife hikes alongside the tracks of a polar bear shot to death earlier the same day.  This dramatic image was made in near total darkness, so I was forced to use flash as the main lighting source.  In these situations, I dial down the power of the flash by at least one stop and try to position it for maximum dramatic impact.  Buy this photo

One of my favorite images from the trip, this was made on the shore of the Barents Sea at sunset.  Landscapes like this one need to be composed especially carefully to best showcase elements in the foreground, middle ground, and background.  I chose a vantage point low to the ground to emphasize the ice floes.  While I also experimented with using a bit of fill flash, I preferred this image with natural light only.  Buy this photo

On eclipse day, there is a palpable air of excitement.  Here is a shot of astronomer and leading eclipse expert Jay Pasachoff preparing for the eclipse along with one of his students.

Even during an exciting event like a total solar eclipse, it’s important to remember to document the people and activities in your group.  Buy this photo

The diamond ring effect signals the start of the period of totality.  Buy this photo

After the eclipse viewing, we enjoyed a dogsled ride back to Longyearbyen village.  I wanted to capture the feeling of exhilaration as the dogs pulled us rapidly along the snow fields into a wide-open horizon.  To capture that emotion, I shot from the perspective of the rider, handheld, using a fast shutter speed and a fairly wide focal length.  Buy this photo

Wildlife is a favorite genre of photography in nearly any region.  During our ascent of a glacier-covered mountain, we were fortunate to observe several Svalbard reindeer, the world’s smallest subspecies.  I used a telephoto lens and exposed for the animal’s fur, as using an auto mode would have underexposed the main subject due to the bright snowy background.  Buy this photo

Longyearbyen is the world’s northernmost settlement, so it stands to reason it would contain the world’s northernmost church.  Care must be taken when photographing architecture using a wide-angle lens not to distort the perspective.  Buy this photo

Your intrepid author photographing the total solar eclipse.  Buy this photo

Parting shot: After returning from Svalbard, I created this montage of several images each depicting a different phase of the eclipse.  Buy this photo

I hope this article inspires you to want to visit Svalbard.  While extra effort is required to visit the world’s most remote and extreme destinations, the returns are enormous in terms of the beauty and unique photographic experiences.

Have you visited Svalbard or other Arctic destinations?  What was most memorable?  Please share your thoughts here.

Want to read more posts about travel photography destinations?  Find them all here: Posts on Destinations.


The Best Auto Mode You’ve Never Heard Of [Encore Publication]: What is manual mode with auto ISO, and when should you use it?

I’ve written often in “To Travel Hopefully” about the importance of learning to go beyond your camera’s full “Auto Mode,” in order to be able to control the exposure of your images.  Frequently I like to shoot in full “Manual Mode” so as to be able to choose both my shutter speed and my aperture for full creative control.  But in rapidly changing lighting conditions, it is a real challenge to stay in full manual mode, and it’s a big help to allow the camera’s exposure programs to choose the best overall exposure from image to image.  There are a few ways to do this.  In between the full auto mode and full manual control, there are two common semi-automatic exposure program modes that most photographers are aware of, namely Aperture Priority and Shutter Priority modes.  In today’s post I introduce another exposure mode that few photographers are aware of, but that can give the best of both worlds: automatic exposure setting while retaining full manual control over both aperture and shutter speed.  This exposure mode is called “Manual Mode with Auto ISO.”

It’s important to be able to control shutter speed because that’s the mechanism by which we can freeze action or allow it to blur for creative effect.  It’s equally important to retain control over aperture because this is the means by which we can increase depth-of-field to keep everything in focus or decrease depth-of-field to soften the background.  But there’s a third side to the exposure triangle beyond shutter speed and aperture.  This third parameter is our ISO setting.  Several years ago, most camera sensors weren’t very good at handling noise at very high ISO settings, so we took a risk of ending up with very noisy images if we used our camera’s Auto ISO setting.  Not so today.  Many modern sensors are quite adept at capturing nearly noiseless images at ISO settings up to at least 3200 and often to 6400 or even a lot higher.  So the stigma that “serious” photographers have historically attached to using the Auto ISO setting should really be laid to rest.

That happy development allows us to use a mode called “Manual Mode with Auto ISO,” in which we set the camera’s exposure program to “M” or full manual mode but also enable the camera’s Auto ISO setting.  By doing so we can preserve full control over both our shutter speed and our aperture, but also allow the camera to choose the best ISO setting to give a good overall exposure as lighting conditions change.  Making this mode even more appealing, most cameras let us select the highest ISO setting (say, 6400) that we’re willing to allow.  So if the lighting level gets sufficiently dim, the ISO won’t go so high as to introduce a lot of noise into the image; instead, we just select a slower shutter speed and/or a wider aperture.

A good example of when it makes sense to use Manual Mode with Auto ISO is when shooting a street fair or an outdoor sporting event.  In these situations the lighting can change quickly depending on the cloud cover, what direction we’re shooting, and the subject and type of image we’re making.  The following three images were all shot at this year’s Carnaval San Francisco, a big street festival and parade.  It was a sunny day, but much of the parade route was in open shade, and depending on the subject there were times when I wanted to use some fill flash.  To freeze the motion, I needed a fast shutter speed, and to isolate my main subject I usually wanted a wide aperture.  Using Manual Mode, I could choose both of these settings.  But because the light conditions were ever-changing, coupling the use of Auto ISO with Manual Mode allowed the camera to adapt the exposure to the light levels for each image.

Full direct sunlight on the main subject made for very bright lighting.  Buy this photo

Open shade with a touch of fill flash required slightly different settings.  Buy this photo

A close-up portrait made in cross-lighting needed yet another exposure level.  Buy this photo

The next time you’re shooting in a shifting lighting environment yet also want to preserve full control over both shutter speed and aperture, try Manual Mode with Auto ISO.  It’s not covered in most cameras’ instruction manuals, but it can be a big problem-solver in many situations.

Do you use Manual Mode with Auto ISO to control exposure?  Do you have other tips for how to adapt to changing lighting conditions without handing over the creative control to your camera?  Please share your experiences here.

Want to read other posts about photographic techniques?  Find them all here: Posts on Techniques.

Calibration Time, Come On! [Encore Publication]: Why you should color-calibrate your display devices and how to do it

We tend to take for granted that the colors we perceive when we look at a scene will be captured faithfully by our camera’s sensor and the lens in front of it, and then rendered accurately in every stage of processing thereafter, from the memory card to the computer and to all our displays including laptops, tablets, smartphones, TVs, projectors, and even ono these same types of displays owned by our friends with whom we share our images.  (We also expect prints made from our images to faithfully reproduce the colors from our camera’s sensor, but that is a story for another day.)

As photographers, we want to ensure the colors in our final images reflect as best we can the original colors we perceived when first framing the scene.  With proper color-calibration of the display screens we use to process our images, we can keep the colors as true and accurate as possible.  Buy this photo

The reality is that every step of the process of capturing, processing, and sharing an image leads to changes in the rendition of the colors.  No device can fully represent every intensity of every color that the human eye can see.  Camera manufacturers go to great lengths to ensure the colors captured by the camera’s sensor are as accurate as possible when you attach a lens made by the same company.  And when you use software such as Lightroom or Photoshop to post-process your images, you may take great pains to ensure the colors you see on your screen look very close to what you remember you saw when you shot the image in the first place.  But without careful attention, the final image we see later on our various display screens can look very different from device to device.  That’s because every type of display, and even every individual screen, has a unique way of representing every color.  So your PC’s monitor will display any given color just a bit differently than your phone’s screen will show that color.  And your friend’s phone’s screen will look a bit different, still (even if it’s the exact same brand and model as yours).

Fortunately, there is a simple and quite affordable way to standardize the representation of colors across all your devices.  It’s called color calibration, and for less than the cost of a good polarizing filter, say about $100, you can purchase a little doodad that can calibrate all your displays.  I use the X-Rite ColorMunki, which can be had for about $110 at retail.

To use a color calibration device, you install some software on your display(s) and then place the device on your display screen.  The software cycles the screen through displaying a wide range of colors, which are read and recorded by the calibration device.  Finally, the needed adjustments to bring your screen’s settings into line so they render colors as accurately as possible are saved in a special file.  From this point on, whenever your display device is started up, it reads the configuration information in that file and renders colors as closely to their actual appearance as it is physically capable of doing.

Because our eyes perceive colors differently in different ambient light conditions, you’ll want to have your calibration device take an ambient light reading for the typical lighting conditions that will be present while you’re using each display.  For example, if you use your laptop PC mostly when bright daylight is streaming into your kitchen, you’ll want to calibrate when those conditions are present.  You can even save different versions of the configuration file for different lighting conditions.

And because display devices do change over time, it’s a good idea to re-calibrate each device every few weeks to control for that.

If you’re serious about your photography, you want your images to look great not only on your own display screen(s), but also when viewed by other people on other types of devices or on the printed page.  Using a reliable color-calibration device helps ensure the colors in your images remain as accurate as possible through all the stages of processing and sharing until they leave your personal control.  This is a good practice that all photographers should employ.

How do you control for color accuracy in your images?  Please share your methods here!

Want to see other posts about post-processing your images?  Find them all here: Posts on Post-Processing.

Focus on Dance Brigade’s “Gracias a la Vida: Love in a Bitter Time”: Creative approaches to shooting inspiring performances

This weekend, I had the privilege of shooting the dress rehearsal for a new show highlighting 40 years of activism through the arts, presented by San Francisco feminist and multi-cultural dance company, Dance Brigade.  Their work was extremely powerful and moving.  Not only was it artistically and technically astonishing, but the show was truly inspiring as a testament to the power of artists fighting for social justice.  In the current era we need this power to be wielded widely and wisely to balance the widespread injustice all around us.

When shooting work as inspiring as this, I often choose less traditional and more creative approaches to presenting my images.  In short, the medium should match the message, so when the message is as powerful as Dance Brigade’s performance, I believe the medium should rise to the occasion.  So, in addition to making some traditional documentary images shot looking directly toward the performers with an eye toward capturing the obvious, I also strove to capture some different and unusual perspectives on the performance.  I present some of them in the post with short descriptions of my intent for each image.

The usual rules for shooting a live indoor performance still apply.  Gain permission to shoot in advance directly from the show’s producer.  Use a fast lens and high ISO setting so as to be able to preserve a fast shutter speed to freeze action while still avoiding use of flash, which distracts performers and crew.  Turn off your LCD display and check your images only when there’s a break in the action.  Use the quietest shutter mode your camera supports.  And never use a tripod or monopod unless you have explicit permission from the producer.

Wait for the telling moment: There are instants during live performances that distill the overall message down to its essence.  Seek those moments.  Buy this photo

Tell a story: Just as a good performance is designed to reveal key messages to the audience at the appropriate time, so should the photographer capture images that disclose the underlying narrative.  This image of the climax from a piece on the plight of refugees captures the essence of the story.  Buy this photo

Find an unusual perspective: When shooting behind-the-scenes such as at a dress rehearsal, you have the opportunity to find just the right combination of vantage point and lens to make your images really pop.  This image was made from the lip of the stage.  I had to lean forward across the front of the stage and shoot upward.  I love this shot because it captures the artist from her eye level just at a decisive moment in the drama.  Buy this photo

Document the power of the performance: This piece started quietly and worked up slowly to a frenzy of pent-up anger and activism.  I found the best vantage point and waited for the perfect moment.  Buy this photo

Know when to break the basic rules of composition: Sure, most of the time you want to avoid cutting a performer’s head off.  But I saw the latent energy inherent in the unorthodox framing of this image.  By shooting from the static artist’s level and capturing only part of the jumping artist’s body, I transformed the image into a bolder statement that supported the message of the piece.  Buy this photo

Gain perspective: Not every image needs to include the whole environment.  Sometimes it’s more powerful to capture just the salient part.  Buy this photo

Capture a moment of pure joy: Shoot lots of images so that you can choose the ones that really make an impact.  The bold colors, shallow depth-of-field, and simple composition of this image work to emphasize the dancer’s aura of joyful triumph.  Buy this photo

Use black-and-white: This image cried out for me to convert it to monochrome.  Its raw documentary power and gritty, graphic nature are more compelling in black-and-white.  Buy this photo

Don’t be afraid to use selective focus: It’s okay for certain elements of your subject not to be in sharp focus.  I chose a narrow depth-of-field in order to obtain selective focus on just the performers in the middle of this triumphant circle.  The soft focus on the dancers in the foreground and far background only serve to enhance the dramatic power of the image.  Buy this photo

I hope this essay provides some ideas for how to shoot creative images that amplify the power of your message.  Modern digital photography provides us with so many tools for making images that go beyond the pure documentary function to also enchant our viewers with imagination.  A performance as moving as Dance Brigade’s “Gracias a la Vida: Love in a Bitter Time” deserves more than a straightforward narrative capture.  I tried to make some images that supported their messaging with a creative visual style.  Continue to capture the obvious message in your images, but keep shooting to go beyond the documentary.  Go wild, and see what you can achieve!

How do you go beyond the obvious to capture images that pop?  Please share your ideas here?

Want to read more posts about what to shoot while traveling or near home?  Find them all here: Posts on What to Shoot.

It’s All in the Telling [Encore Publication]: Sharing images as a photo essay can help tell a story

When we share our images from a trip or from an event close to home, we become more than photographers; we become storytellers.  An individual image can tell a powerful story all by itself, and most of the best ones do.  But presenting a series of related images in the form of a photo essay is a great way to share a story with your viewers.  Each image serves a purpose in the structure of a photo essay, just as each sentence or paragraph does in a written essay.  In this post, I will revisit last weekend’s Sacramento Super Spartan Race (see Post on Spartan Race), taking the same 12 images from the earlier post but rearranging them in the form of a rudimentary photo essay.  We’ll discuss the purpose of each major type of image in creating the essay.  [Note: I am borrowing some of the organizational concepts presented in CUNY’s Photojournalism course materials at this site: http://photo.journalism.cuny.edu/week-5/.]

Establishing Shot: Usually the first image in a photo essay, the establishing shot should draw in the viewer by presenting the big picture.

The establishing shot sets the context of the essay.  Here I use an image of large contingents of athletes running over the hills.  I shot from a distance, using a telephoto lens to compress the perspective and emphasize the massive scale of the race.  Buy this photo

Alternatively, we could use the starting line image as our establishing shot.  Some essays lend themselves well to a chronological telling, in which case it’s good to start at the beginning.  In the case of this specific event, I prefer the establishing shot to be a big-picture overview of many athletes in the middle of their course.

The starting line is a good place to set the stage for your photo essay if you will be using a chronological method of telling the story.  Buy this photo

Portraits: Often the biggest portion of the photo essay, portraits tell the story through images of some of the people who are involved.  The portraits can be tight head-shots, full-body shots, or environmental portraits that show the setting as well as the person.  I like to use a combination of all of these compositional methods.  And it’s also fine to use a mix of posed shots and candids.  Variety can improve some photo essays, although in other cases you may opt for a consistent look-and-feel for many of your images so the mash-up of styles doesn’t distract the viewer from the story.

This environmental portrait shows the athlete in the context of the monkey bars obstacle, with other athletes and the background included in the frame.  Buy this photo

Portraits of athletes don’t have to be in the cliche pose of standing, legs apart, on the ground flexing their biceps.  Athletes are happy to pose in the midst of whatever they’re doing when they see a photographer nearby.  Buy this photo

Not all portraits have to show the subject’s face.  This environmental portrait works because it shows us what the athletes are doing from their point of view.  Buy this photo

This posed portrait is framed rather tightly, showing the power and the elation of the athletes after finishing the race.  The background, while bright and busy, is not overly distracting.  Buy this photo

For powerful portraits, I like to seek out people who have something special to say.  This racer stopped for a moment so I could make a portrait.  His flag makes a nice counterpoint to the rolling hills and featureless sky in the background.  Buy this photo

Interaction: Most photo essays can benefit from at least one shot showing the interaction between different people in the story.

Although Spartan Race athletes are fierce competitors, they also make an effort to support one another and cheer their fellow racers on.  I enjoy capturing these interactions because these moments often tell a strong story visually.  Buy this photo

This shot of kids playing in the shower area at the end of the race shows another type of interaction.  Buy this photo

Close-Up: It’s helpful to include some images that show the little details.  In the case of this particular event, I don’t have many close-up shots, so I’ll include this one fairly tight portrait as a placeholder.  It would be great to include a true close-up shot showing just the athlete’s gloved hands as she grasps the rope, perhaps with part of her face in the background, for example.  This could be done by tightly cropping this image.

This tight portrait shows great action and emotion.  While it’s not a true close-up image, which ordinarily would show only a few details rather than the full person, it can serve a similar function in the essay by focusing the viewer’s attention on a small specific part of the race.  Buy this photo

Closer: This will be the last image in the photo essay, so it needs to be a strong one.  It could be a climactic moment or, if the story is being told chronologically, an image made at the end of the race.  I’ll include two possible closing shots here.  The first captures an athlete jumping over the fire at the finish line; it’s both dramatic and symbolizes the end of the event.  The second shows a classic Spartan Race moment, where the athletes have to carry heavy buckets of sand along a muddy, hilly course; this image could make a good closer because it evokes a quintessentially Spartan Race sense of emotion.

The finish line itself is a dramatic vantage point.  In this particular race, athletes must jump over a line of fire to finish the course.  Buy this photo

An iconic Spartan Race image.  I captured the strenuous activity of carrying buckets filled with sand by shooting from a distance with a telephoto lens.  Buy this photo

Have you presented your images in the form of a photo essay?  How did you structure it?  What advice can you share for fellow photographers who would like to use this format?

Want to read more posts about sharing your images?  Find them all here: Posts on Sharing.

To Travel Hopefully is Taking the Day Off: Please browse the archived posts you may not yet have read

Dear Reader,

To Travel Hopefully is taking the day off, but don’t worry, we’ll be back with fresh new content tomorrow.  In the meantime, please take a look at the helpful travel photography tips and inspiring images in our archived posts.  Just select a category (Destinations, Gear, Techniques, Travel, etc.) from the right nav bar, or choose a month under Archives, and browse to your heart’s content.  Thank you for visiting To Travel Hopefully!

Warm regards,

Kyle Adler

Approach with Care: Sensitive photographic practices help keep wildlife wild and healthy

Photographing wildlife in its natural habitat is one of the most exciting and rewarding activities I can imagine.  From researching the species’ behavior to seeking it (sometimes for days) in the field, to that wonderful moment its image is captured on our memory card and to the thrill of viewing that image when we return from the field, there’s something truly magical about this genre of photography.

Observing and photographing animals in the wild, such as this rare wildcat along Turkey’s Turquoise Coast, is thrilling.  Strive to put the animal’s welfare ahead of your image-making.  Buy this photo

Done properly, wildlife photography can have zero to very modest negative impact on the creatures whose images we capture.  In fact, photographers have done a great deal over the decades to help preserve wildlife through sharing images that inspire local people, governments, and the public to protect endangered species.

But by stalking and encroaching on a species’ territory, we photographers also put wildlife at risk of harm.  Improperly engaging with animals with the intent of photographing them can cause a predator to starve by allowing its prey to escape, cause another creature to become prey by distracting it from its natural wariness, stress the animal to harmful levels, or acclimatize them to being around humans.

Here are some important guidelines for photographing wildlife in as safe a manner as possible:

  1. Do your homework: The more you know before you set out to encounter a creature, the less likely you are to cause it harm inadvertently.  If you will be going with a safari or tour, research the outfit first to make sure they follow the highest ethical standards.  Get to know the behavior of the species you are seeking.  What is their daily and seasonal routine?  Where is their habitat?  What do they eat and what eats them?  What is a safe distance from which to view them?
  2. Keep a respectful distance: As kids we were told to keep away from wildlife for our safety, but as photographers we also need to consider how far away we must stay in order not to cause the animals undue stress.  Knowing where their meal ticket comes from, some safari and tour operators are willing to break park or preserve rules and approach the animals very closely so their clients can get great photos.  Do not encourage this.  Aside from the harm this stress can cause the animal, a stressed animal will look stressed in your photo and is more likely to bolt and leave you with no photo at all.  So, use a long telephoto lens, keep your distance, and both your subject and your images will be the better for it.
  3. Show special respect for the young: Baby animals are extremely vulnerable and should be treated with special care.  If you are traveling with a tour, defer to your guide’s knowledge.  If you’re on your own, be sure you’ve done your homework first, and err on the side of caution.Young animals, such as this baby baboon in Tanzania’s Serengeti National Park, should be photographed with special care.  I made this image using a long telephoto lens and shot from a safari vehicle parked at a respectful distance.  Buy this photo
  4. No kidding–don’t feed the animals: It seems almost too obvious to have to state, and yet nearly every day I encounter humans attempting to feed wildlife.  In Yosemite National Park, a number of bears must be killed each year because they have become dependent on humans for food.  At your local city park, you’ll probably observe people trying to feed the birds or squirrels.  And of course there are the big news stories (the recent major one was about the killing of the beloved Cecil the Lion) about hunters baiting animals with food.  A well placed and properly maintained bird feeder in the backyard may be okay, but no other attempts should be made to feel wildlife.
  5. Come back another time: In today’s networked world, word about rare animal sightings travels quickly.  If you hear about a sighting while traveling or near home, chances are many other photographers and watchers have also heard about it.  Multitudes of humans crowding around an animal will put it under undue stress and will also ensure you won’t make a great portrait of it.  Come back another time when there are fewer other people.  No photo opportunity is so irreplaceable that we should put the wildlife at risk.

With a little knowledge and courtesy, photographers can make great wildlife images while helping preserve and protect their subjects and keeping the wildlife wild.  Conversely, without respect or information about the local fauna, we run the risk of putting them at grave risk.  As the saying goes, make good choices!

The world’s smallest species of reindeer, the Svalbard reindeer is at risk due to global climate change.  Cautious and respectful photographers can use their images to help protect and preserve at-risk species.  Buy this photo

Do you have best practices about shooting (with a camera, that is) wildlife in the field?  Have you observed human behavior–positive or negative–that serves as an example?  Please share your thoughts here.

Want to read more posts about what to shoot while traveling or near home?  Find them all here: Posts on What to Shoot.

Black-and-White to the Rescue [Encore Publication]: Converting a noisy or strangely colored image to monochrome can save the day

In a recent post (Post on Circus Automatic), I shared several practical tips for shooting fast-moving indoor performances, using a circus performance as an example.  While I was happy with many of my images from that evening’s shoot, I discussed how the single-colored LED lights now used at many indoor performances can impart an unnatural color cast to photos that can be hard to correct in post-processing.  In today’s post, I show how converting these images to black-and-white can overcome some of the limitations of shooting under these adverse lighting conditions, with the added bonus that the noise imparted to the images (from having to shoot at a very high ISO setting) can also be less noticeable in black-and-white conversions.

First, a little background explanation on why these LED lights are so troublesome for the photographer to work with.  When we refer to the resolution, or number of pixels, in our camera’s sensor, that number is actually the total count of three different kinds of pixels, each kind sensitive to only one of the three primary colors (red, blue, and green).  Without going into the nitty-gritty technical details, suffice it to say that in most camera sensors, about 50% of the pixels record only green data, about 25% only red data, and about 25% only blue data.  My camera (the Nikon D810) is said to have a resolution of 36.3 megapixels (MP), but if my subject is lit by a single-colored red LED, in reality only about 9 MP of resolution is recorded.  The other two color channels will essentially contain no data.  This is bad for several reasons, most notably because the image will be cast unnaturally toward the red color channel and because its effective resolution will be low.

There’s very little we can do in post-processing to recover from the loss of resolution during capture, but we can adjust the color temperature to try to correct a little bit of the strange color cast.  Converting the image to black-and-white, though, can restore the image to a more natural appearance by masking the color cast.  This can be aided by using Lightroom’s contrast and color control sliders to adjust the balance of the black-and-white version until it appears closest to a normal tone.

Consider the following two versions of the same shot.  The first version is in color, and even after adjusting the color temperature and contrast, there is still a distracting red color cast.  There is also some noise apparent in the image as a result of the high ISO setting required to freeze the acrobats’ motion.

The color version of this image appears unnatural even after adjusting color temperature, due to the lighting which consisted of a red-colored LED array.

Now, take a look at the black-and-white version of the same image.  Creating this version required careful attention to the balance of each color and contrast setting to make the final image.  The good news: the monochrome image appears much more natural to the eye than does the color version.  The skin tones seem less artificial, and the curtain in the background does not distract as much.  Furthermore, there is less noise apparent in the black-and-white version.
The same shot appears more natural and less noisy when converted to a black-and-white photo.  Buy this photo

This next shot appears much more acceptable in its color version.  During a live performance, the lighting often changes drastically from one moment to the next, and in this image the LED lights didn’t impart as harsh a red cast as in the previous image.  Furthermore, the aerialist was dressed entirely in red and was working with red ropes, so what red color cast was present does not appear as unnatural.

This image is highly effective when presented in full color.  Buy this photo

While I like this image for its dramatic power and strikingly vibrant red colors, let’s take a look at a black-and-white conversion for comparison.  The monochrome version lacks the visceral impact of the strident red color, but it benefits from a more natural tone, a quasi-documentary look and feel, and a nice clean black background.  In this case, the black-and-white conversion doesn’t so much rescue the image as change the kind of feeling it elicits.  I like both versions.
The black-and-white version is cleaner and evokes a very different set of emotions than does the color version.  Buy this photo

When you are forced to shoot under very difficult lighting conditions, try converting to black-and-white during post-processing.  It just might rescue some of your images and can evoke a very different feel in other images.

For a refresher on the black-and-white conversion process and when you may want to use it, read this post: Post on B&W Conversion.

During post-processing, have you been able to rescue or improve images shot under challenging lighting conditions?  Did you convert to black-and-white, or use different techniques?  Please share your experiences here.

Focus on Sacramento Spartan Race [Encore Publication]: Covering a Spartan Race can be an endurance event

Some events are just plain fun to shoot from beginning to end.  One of my favorite types of sporting events to cover is the Spartan Race.  Basically a combination of long-distance running with a supersized obstacle course, a Spartan Race is an extreme athletic event that attracts thousands of athletes from elite to weekend warrior.  I enjoy shooting these races because they offer so many exciting elements: color, drama, showmanship, grit, stamina, and humor.  Adding to the photographic fun quotient are the glorious natural surroundings, the photogenic and extraordinarily fit athletes, and the wide range of athletic rigors required of them.

In this post I’ll present some of my images from this past weekend’s Super Spartan Race held near Sacramento, California.  I will also share some tips on how to capture the best of a big and sprawling event like this one.

The Spartan Race organization recognizes and welcomes professional and enthusiast photographers more readily than do many US sporting authorities.  For any large sporting event, I apply several weeks in advance for a media (or press) pass so that I can bring in all my gear, shoot in all areas including those off-limits to spectators, gain free or reduced-price entrance and parking, and access VIP areas.  I’ve found the Spartan Race organizers to be quite helpful and understanding of what working photographers do.

img_3701
Yours truly with media badge.  This pass is important for the professional, as it allows access to otherwise off-limits areas and lets athletes and officials know you’re a working photographer.

One point to keep in mind when covering an endurance event spread out over long distances is that as a photographer, you will experience some portion of the rigors the athletes face.  The Super Spartan Race traverses a course about 8 miles long over steep and often muddy hills, interspersed with a couple of dozen obstacles of different types.  While I don’t typically try to cover all of the obstacles, it’s important to get a reasonable sample of the different challenges, so I do usually hike quite a few miles during the course of the day.  Photographers with a media pass have access to the whole course, but there are no special roads or ramps to get us there.  We have to trek up and down the same hills, through the same mud, and over the same terrain as the athletes do.  So come prepared for a bit of a workout!

The starting line is a good place to set the stage for your photo essay.  There is usually a DJ and music to get the athletes pumped up for the race.  Everyone is fresh, clean, and excited at this early stage.  Buy this photo

In addition to portraits and close-ups of individual athletes, it’s important to capture some establishing shots to set the context of the race.  I like to get some images of large contingents of athletes running over the hills.  I shoot from a distance, but often use a telephoto lens to compress the perspective and emphasize the massive scale of these races.  Buy this photo

When shooting individual athletes on the obstacles, use a fast shutter speed to freeze the action and a relatively small aperture to blur the background.  Buy this photo

Portraits of athletes don’t have to be in the cliche pose of standing, legs apart, on the ground flexing their biceps.  Athletes are happy to pose in the midst of whatever they’re doing when they see a photographer nearby.  Buy this photo

After finishing the course, athletes gather in the festival area.  This is a great place to make portraits.  The athletes are exhausted and muddy but in a celebratory mood.  Buy this photo

Spartan athletes in the festival area display strength as well as excitement for having completed the race.  Buy this photo

The finish line itself is a dramatic vantage point.  In this particular race, athletes must jump over a line of fire to finish the course.  I shot from a low perspective to emphasize the height of the jump, and used a fast shutter speed and small aperture to freeze the moment and isolate the athlete from the background.  Buy this photo

This image works so well because the shooting angle looking upward from below emphasizes the athlete’s power, and because the timing captured her expression at just the perfect moment.  I shot many frames to increase the likelihood of capturing the right moment, and, once again, I chose a fast shutter speed to freeze the motion along with a small aperture to blur the background.  Buy this photo

The shower area at the end of the race was taken over by hordes of kids who used the hoses for water play.  Humorous moments like this one lend a playful element to the day’s portfolio of images.  Buy this photo

An iconic Spartan Race image.  I captured the strenuous activity of carrying buckets filled with sand by shooting from a distance with a telephoto lens.  This technique compresses the perspective to include more athletes in the frame while still showing the strain on their faces.  Buy this photo

I like to seek out the athletes who have something special to say.  This racer stopped for a moment so I could make a portrait.  His flag makes a nice counterpoint to the rolling hills and featureless sky in the background.  Buy this photo

Although Spartan Race athletes are fierce competitors, they also make an effort to support one another and cheer their fellow racers on.  I enjoy capturing these interactions because these moments often tell a strong story visually.  Buy this photo

What are your favorite sporting events to shoot?  Do you have tips you can share for making great images of athletes?

Want to read more posts about what to shoot while traveling?  Find them all here: Posts on What to Shoot.


New Year’s Resolutions: My opinionated list of the top 5 promises all travel photographers should make and keep

Personally, I’m not a big fan of new year’s resolutions.  Common sense dictates that if we really want to make change in our lives, we should resolve to take specific steps toward that change every day.  Promises we make on December 31 each year will most likely be broken by January 15.  That’s certainly what I’ve observed over many years on the running trails and gyms where I run or work out daily.  A huge surge in attendance begins on January 1 and dissipates within about two weeks.

So I waited a couple of weeks to share my thoughts on what we travel photographers should resolve to do differently.  Since these aren’t technically “new year’s resolutions,” it’s my hope that these practices will stick.

  1. Book that once-in-a-lifetime trip now:
    Visit that exotic destination you’ve always wanted to see!  Buy this photo
    That travel photography “bucket list” needs to be emptied before you kick the proverbial bucket.  I know too many people who always found excuses to put off taking the trips they most desired, until it became too late for them.  The kids are too young, my job is too demanding right now, I can’t afford the cost.  I’ve made these excuses, too.  But the one thing we can’t live a full life without and can’t ever lose once we’ve attained it is experience.  Every trip I’ve taken helped me grow as a person and as a photographer, and also helped me grow closer to my family and other travel companions.  So book that trip today and go this year.  You won’t regret it.
  2. Just get out there and shoot:
    USAThere are countless exciting subjects for your photography within a few miles of your home.  Buy this photo
    Even professional travel photographers can’t be on a lengthy shoot in an exotic part of the globe all the time.  So, book those once (or a few times) in a lifetime trips as soon as feasible, but in the meantime find some wonderful local attractions where you can hone your craft by making compelling images.  I love to shoot little-known local cultural events such as street fairs and performances of dance, theater, and music.  It’s also a great pleasure to find scenic spots near home where we can make some striking landscape images that haven’t been shot thousands of times before.  Remember, you’re the local expert near your home, so seek out frequent opportunities to shoot in your own community.
  3.  Learn to use your camera as a tool to bridge the gap between your culture and the culture of the land you’re visiting:
    CubaPhotography can bring us closer to the people we meet on our journeys.  Buy this photo
    Instead of letting your photography separate you from the people you’ve come to learn from, resolve to turn your image-making into an opportunity to meet more people and get to know them more deeply.  Check out my pillar post on how to do this: Post on Photography as a Cultural Bridging Tool.
  4. Approach wildlife with respect:
    The more we learn about and respect the fauna we encounter during our travels, the healthier they will emerge from the experience (and the better our images will turn out).  Buy this photo
    A photo safari is a life-changing experience and should be on every travel photographer’s list.  But just as our cameras can be used either to alienate local people or to bond with them, so can photographing animals be used to harm them or to respect and help preserve them.  This will be the subject of an upcoming post, but in the meantime I will summarize by emphasizing the importance of prioritizing the animal’s welfare ahead of our desire to get an amazing shot of it.  Getting too close to wildlife will stress the animal and could even cause it to become lunch (or cause a predator to starve by losing its meal).  The more we get to know a species’ behavior before encountering it in the wild, the better our images will be and the healthier the animal will emerge from the encounter.
  5. Continually improve technique:
    I strive to hone my technique with every shoot.  Buy this photo
    There are more important elements in photography than technique, but a mastery of technique does help us make the images we want, so I always work to improve mine.  If you haven’t already gained the confidence to shoot in manual mode, start learning now.  Remember that while cameras have become very smart, they aren’t artists and they can’t know what the photographer is trying to achieve, so learn to take control of your camera’s settings today.  Here’s a short post listing five key techniques that will help your images stand out: Post on Top Five photography “hacks”.

So, resolve to take that trip of a lifetime, shoot locally while you’re waiting for it, learn to use your camera as a tool to interact beneficially with the people and the wildlife you meet during your travels, and work to hone your technique.  I’ll be doing the same!  Happy trails in 2017.

What do you resolve to do in 2017?  Please share your thoughts here.

Not My Circus, Not My Monkeys [Encore Publication]: How to shoot a live performance with fast action and challenging lighting

Last night I had the opportunity to shoot a live performance by Circus Automatic, a talented young San Francisco-based circus troupe.  Indoor performances, where the action is fast and the lighting dim and unpredictable, can be extremely challenging to shoot.  In this post I share some images from the circus show as well as a few tips on how to make the best of these difficult conditions.

The first tip is to use a fast lens and a high ISO setting.  Since you will need a shutter speed of 1/200 second or faster in order to freeze most of the action, and given that the light is often very dim, you will likely have to use an ISO of at least 1600 and perhaps quite a bit higher, even when using a fast f/1.8 or f/2.8 lens wide open.  All of these images were made shooting wide-open with my favorite portrait lens, the Nikon 85mm f/1.8.  ISO ranged from 800-3200, and shutter speeds ranged from 1/160 to 1/800 second.

To capture this striking image of the aerialist, I shot wide-open with a fast prime lens and used a high ISO setting in order to obtain a fast enough shutter speed to freeze her action.  Buy this photo

The second tip is to seek the drama present in all aspects of the show.  Sometimes the most interesting subject is not the star performer.  In this image I captured the expressions of the rest of the cast as they watched the star of the final act.

Part of the fun of a circus is getting to know the cast members, who tend to be very interesting and photogenic characters even aside from their remarkable performing abilities.  Look for the “side shows” as well as the “big top” acts.  Buy this photo

During our “intermission,” let’s review some basic rules for shooting an indoor performance: 1) Get permission from the producer before you bring your camera to the show; 2) never use flash (it annoys your neighbors and can cause injury or even death by blinding an unsuspecting aerialist); 3) use your camera’s quietest shutter mode and disable its LCD display so as not to distract those around you; and 4) don’t attempt to use a tripod or monopod unless you’ve obtained special permission.

My next tip is to look for those moments when the action subsides naturally.  In most kinds of fast-action performances, including dance, sports, and yes, circus acts, there are brief moments of stasis when the motion is swinging from one direction to another.  Even a juggler balancing on a teeter-totter placed precariously atop a pile of four metal cylinders will reach moments of relative rest.  Here I fired the shutter at the exact instant when two of the batons are in his hands while the third has just reached its apogee.  This image encapsulates all of the excitement of the act but has almost no perceptible motion blur.

Find those brief moments when the fast action settles into a natural lull.  Buy this photo

Another tip is to shoot in RAW mode.  That’s a good practice for nearly all types of photography, but for indoor performances the color of the lighting is often very tricky and rapidly changing, so using RAW files allows much greater control over the color temperature during post-processing.  The venue for last night’s show used awful single-colored LED lights that cast a very strange temperature over many of my images.  Some I could correct in post-processing, but others remain unnatural looking and cold.  Regrettably, these LED lights are becoming very popular so this is a common challenge when shooting live indoor events.  Other useful post-processing techniques for these types of shows include noise reduction (required due to the high ISO settings) and image sharpening.

The final tip is to keep shooting, because you rarely can tell in advance when something remarkable may happen!

Parting shot: The acrobat dismounts dramatically to end the show.  Buy this photo

Now it’s your turn.  Please share your experiences and advice for shooting live performances.

Want to read more posts about photographic techniques?  Find them all here: Posts on Techniques.

A Good Camera Store is Hard to Find [Encore Publication]: Can anything be done to prevent the extinction of pro camera stores?

img_3689

This past week, the doors closed permanently at one of the San Francisco Bay Area’s few remaining pro camera shops, Keeble & Shuchat of Palo Alto.  After 51 years of providing sales of a tremendous range of fairly priced photographic gear, friendly service, lifesaving repairs, and informative classes, this local institution was forced to shut down.  The story is a familiar one, and extends beyond the San Francisco Bay Area and beyond the photography sector.  Local brick-and-mortar stores nationwide and in all sectors of the retail economy are being forced out of business due to severe price competition with online and big-box retailers and rising commercial real estate prices.  Over the last few years, my neighborhood has lost the last of its independent coffee shops, bookstores, and movie theaters, and it now seems that camera stores oriented toward enthusiast and professional photographers are also going the way of the dodo bird.

I’m sad about the closure of Keeble & Schuchat because there really is no substitute store within an hour’s drive of my house, and because I knew several of the staff there and don’t know what they’ll do next.  But at the same time, I share some of the blame over their closing.  I was a regular in their store, where I browsed their range of new gear and asked all manner of questions of the friendly and helpful staff.  I made it a point to buy a few doodads at K&S, and I attended paid classes there from time to time.  I depended on them for the repair and maintenance of most of my gear.

But whenever it came time to drop some big bucks on a new pro camera or lens, guess what?  I always purchased from a big online retailer like Amazon or B&H.  I’m sure many other serious photographers behave similarly.  It’s hard to justify paying a 10-20% price premium as well as the local 9.25% sales tax in my county when we’re already stretching to afford the gear in the first place.  It’s very tempting to save so much money with just a few clicks in our web browser.  But something significant is lost when we drive away the local experts who sell books, cameras, or cappuccinos in our neighborhoods.  We lose the local merchant’s accumulated knowledge and the passion for the category we love.  For us photographers, that means there soon won’t be many places we can go locally to chat about the merits or drawbacks of some new piece of gear, to repair or maintain our existing gear, or to learn from people who share our passion for image-making.

When my main portrait lens had some dirt stuck between the inner elements that was causing a speck to appear on all my images, and I observed this on the day before a major portrait shoot for two clients, I took the lens to K&S and their tech diagnosed and repaired it while I waited.  He charged me the whopping sum of $10 for his efforts.  Why?  Because he also was a working photographer and he knew the importance of getting this problem solved quickly and without impacting the clients.  We may save a few dollars by buying our gear online, but what is lost by the mass shift from local stores to e-commerce sites?  I’d better be thinking about what I’m going to do the next time I need an urgent repair done, because there is no longer anywhere reliable to go within an hour’s drive of my home.

How about you?  Please share your thoughts on the value or lack thereof of having experienced, passionate tradespeople in our neighborhoods?  Is it worth spending extra cash to ensure we preserve access to these local stores?  Or do you have a different viewpoint?

img_3690

Focus on Las Migas Quartet [Encore Publication]: Indoor concerts can be challenging to shoot, but these techniques will help

Last night I had the opportunity to shoot the wonderful and vibrant flamenco quartet, Las Migas, at the venerable Freight & Salvage Coffeehouse in Berkeley.  Las Migas is a Barcelona-based band comprised of four young women from different regions of Spain who came together over their love for traditional and modern flamenco music and dance.  They’re in the middle of their first US tour, and being a lover of flamenco, I made sure to attend their only SF Bay Area concert.

Shooting from the audience in a crowded hall with dim lighting is a challenge.  To make this image of all the members of Las Migas together, I used a fast normal lens nearly wide open with a high ISO setting in order to allow a reasonably fast shutter speed.  Buy this photo

Shooting indoor concerts near home and while traveling is a special joy of mine, but it poses some very real technical challenges.  Today’s post offers a host of tips and tricks to help you get the best images possible under these challenging conditions.

  1. Planning: Before you arrive at the concert venue, learn as much as you can about the performers and the space.  What are the policies of both the performers and the venue regarding photography?  Sometimes one or both of these entities may not allow photography at all, but other times discreet photography is welcome.  Of course, flash photography ordinarily will not be allowed, as it disrupts both performers and audience.  What is the layout of the venue?  How many performers will be on stage and in what configuration?  Can you shoot from your seat, from a special area designated for photography/video, or from some other location (a balcony, for example)?  Where should you sit to get the best images without bothering other patrons or the musicians?  For this particular concert, I knew the venue’s policy was to defer to the wishes of the performers.  Upon arrival (and you should always arrive early), I spoke with the house manager to confirm their policy, and she introduced me to the band.  I learned that Las Migas were eager to have some professional-quality images made at this event.  The next order of business was determining where to shoot from.  Because the hall was fairly crowded, and there was no designated photography area, I chose a seat in the center of the second row, close enough to get some close-up shots of the musicians but without disturbing them or the other audience members.
  2. Gear: A concert is not usually the time to bring a lot of bulky kit.  Think “light and mobile.”  Remember that even after securing permission to shoot the event, you still want to remain inconspicuous.  Tripods and monopods are not suitable for most concerts, and flash is out of the question.  A fast telephoto can be useful if you are far away from the stage, but it’s hard to handhold a long lens in low lighting conditions.  For the Las Migas concert, I brought only the camera body with two small fast prime lenses, a 50mm “normal” lens and an 85mm portrait lens.
  3. Shot List: What shots are on your or your client’s must-capture list?  Do you or they want close-ups of the individual band members, small group shots of two or three musicians interacting, shots of the full band, and/or panoramic views that include the audience?  For this concert, I wanted to capture a mix of close-ups, small group shots, and full band images.
  4. Shooting: The Golden Rule of concert photography is to be courteous and not to disrupt the event.  Since lighting levels are often very dim at concerts, and because the use of flash is out of the question, it is important to have a fast lens or two and to use a high ISO setting on the camera.  Vibration reduction in the lens or camera body can be helpful to avoid camera shake, but because musicians and dancers are usually moving rather quickly, the bigger problem is subject motion blur.  For this reason, I used fast prime lenses (f/1.4 and f/1.8, respectively) and ISO settings ranging from 1200 to 3200.  To avoid disrupting the musicians or other audience members, I used the quiet setting on my camera’s shutter and turned off the LCD display on the back of the camera.  There is always the opportunity to take a quick peek at your images during downtime between songs.  I try to compose and shoot through the gaps between the audience members in front of me, but sometimes the seating configuration will limit the workable shooting options.  There can be times, such as when the audience gets up to dance or during standing ovations at the end of a set, when it’s okay to stand up for a moment to shoot a few quick images, but in general I try not to stand out from any other audience members.
  5. Post-processing: There are three special challenges in concert photography that can be addressed, to a certain degree, during post-processing of your images.  First, there’s color balance.  The lighting in many concert halls imparts a strange color cast on the musicians.  To fix this, I adjust the white balance in Lightroom until the subject appears as natural as possible.  Obviously, it is important to shoot in RAW format so that white balance can be adjusted later.  Even after adjusting during post-processing, there will often be mixed lighting or very strangely colored parts of the image that cannot be made to look fully natural.  Accept this as an occupational hazard.  Second, there’s the issue of noise in the images.  Because high ISO settings are usually required to achieve motion-freezing shutter speeds under dim lighting conditions, noise reduction must be performed in post-processing.  I find that with my camera (a Nikon D810) and with Lightroom’s noise reduction capabilities, I can usually shoot at ISO settings up to 3200 and sometimes even higher before noise because unmanageable.  Your mileage may vary.  And third, there’s often a need to crop the image in order to yield the most powerful composition.  In general I like to compose my images in the camera and leave cropping to a minimum, but at most indoor concerts the restrictions on shooting location and the need for fast prime lenses mean that cropping will often be necessary during post-processing.
  6. Sharing: Always honor the policies and requests of the venue and the band before sharing or selling your images.  While the specifics vary according to the event, in most cases I will offer the band and/or the venue a license to use a few of my images free of charge for their publicity or communications, with the condition that they credit me as the photographer wherever the images appear.  That way, the band is usually happy for the free use of the images, and I get free word-of-mouth and perhaps sell some prints to the band’s fans.  It’s a win-win.

Part of the fun of shooting a concert is capturing the interaction between two or more of the performers.  I used a normal lens shooting slightly upwards from my seat to make this image of violinist and guitarist playing together.  Buy this photo

To make portraits of the individual performers on stage, I like to use a fast prime portrait lens.  Cropping can be performed during post-processing to yield the most effective composition.  Buy this photo

Shooting live music and dance performances is challenging but is also a real treat.  I hope the techniques outlined in this post will help you with your own concert photography.

Have you photographed memorable concerts?  What tips and tricks do you use to get the best images?  Please share your thoughts in the comment box here.

Want to read more posts about photographic techniques?  Find them all here: http://www.to-travel-hopefully.com/category/techniques/.