Portrait Photography Gear [Encore Publication]: Affordable kit for making great portraits

Whether in my home town or traveling around the world, I love to shoot portraits.  There is something magical about creating an image that captures the essence of a person.  It can be daunting for many photographers to describe what gear they think is required to make professional-quality portraits: we often visualize a fully equipped studio with tens of thousands of dollars’ worth of high-end lights, modifiers, and backgrounds.  The reality is that we can make portraits of publication quality, shot on location and using kit that costs far less.  Here I outline a basic setup that is portable enough to pack on nearly any trip and costs only a few hundred dollars (not including your basic DSLR or mirrorless camera body).

Really all you need to get great people photos is a good portrait lens and a little know-how.  Make sure to set exposure and focus on your subject’s face.  I often use my camera’s Spot metering mode to get the correct exposure in tricky lighting conditions, such as when the subject is backlit.  In these conditions, it can also be helpful to fill in any harsh shadows on the subject’s face by using a touch of flash with a diffuser attached or a reflector.  That’s really all the gear you need: camera with portrait lens, flash unit, and a reflector kit.  Let’s look at the gear and basic techniques.

My indispensable portrait lens is the Nikon 85mm f/1.8G lens.  I shoot at least three-quarters of all my portraits, whether in the studio or on location, using this one piece of glass.  This is a classic portrait lens and provides a flattering perspective and great image quality when your subject is a person.  But this lens also shines for nature and action photography where you don’t need a really long focal length.  It renders really lovely “bokeh,” or the soft quality of the out-of-focus parts of the image.

This portrait of a grandmother and granddaughter at Carnaval San Francisco was made with natural light using an 85mm lens at a wide aperture to throw the background into soft focus.  Because no flash or reflector was used, there are some shadows on the subject’s faces, but I like the shallow depth of field that really emphasizes the subjects, and this would have been difficult to achieve with the slower shutter speed required to synchronize with a flash.  Also, carrying a reflector through the hustle and bustle of a chaotic street fair can be impractical.  I’m very pleased with this image even with a few shadows.

This portrait was shot using natural light only.  Some shadows are visible on the faces, but the effect is not unpleasant, and the soft focus from shooting without a flash is very effective.  Buy this photo

Your camera most likely has a built-in flash, and in many cases it is good enough to provide some fill-in lighting for backlit subjects or even to serve as a main light in very dark situations.  But for more control over how much light you want, the quality of that light, and where that light comes from and goes to, you likely want to have a separate flash unit.  I use the Nikon SB-910, which is powerful and flexible enough for most settings.  It has been discontinued and replaced by the Nikon SB-5000, but the older model is often still available.

Whatever flash you use, it is best to attach a diffuser of some sort to soften the otherwise very harsh light of the flash.  I also keep my camera set to lower the flash output by 1 stop, and I only override this setting occasionally.  Flash is often best when used sparingly.

This next image was shot at the same location as the previous one, but here I used an off-camera flash with diffuser to provide fill lighting on the subjects’ faces, thus reducing the shadows.  The only downside of using flash on location is that a slower shutter speed (typically about 1/160 of a second or slower) must be used, which in turn requires a smaller aperture (here it is f/8), and this can lead to more distraction from in-focus backgrounds.  I could have mitigated this problem by attaching a neutral density filter to block some of the light and allow a larger aperture.

This group portrait was made under similar conditions to the previous image, but here a fill flash was used to soften the shadows.  Buy this photo

An inexpensive accessory can provide the best of both worlds for on-location portraiture.  For less than $20 you can purchase a reflector kit with a variety of different colored reflectors and diffusers.  The reflectors are used to bounce some of the sun’s light back onto the face of the subject, thereby filling in any harsh shadows, while allowing you to shoot at any combination of aperture and shutter speed you choose in order to soften the background.  Each color of reflector imparts a different mood to the image.  An added bonus is that you can preview the precise effect the reflector has in your viewfinder or on your LCD screen.  Really the only downside of using a reflector in the field is that they are bulky to carry and often require an assistant to hold in place while you shoot.

This is the reflector kit I carry with me to most portrait shoots.  It’s high quality, very portable, and affordable.

This portrait was made by metering off the face of the model, choosing a wide aperture to blur the background, and bouncing some sunlight onto her face using the gold reflector from the kit mentioned above.

Using a reflector to bounce sunlight onto your subject’s face can reduce shadows while allowing you to retain full control over your aperture and shutter speed.  Buy this photo

There you have it: my formula for getting professional-looking portraits in the field with relatively inexpensive gear that’s easy to carry and use.

What is your favorite gear for portraiture?  Please share your thoughts in the comment box at the end of this post.

Interested in other posts about photography gear?  See them all here: http://www.to-travel-hopefully.com/category/gear/.


When You Get Back Home [Encore Publication]: An introduction to the essentials of postprocessing

You may want to share some of your favorite images with friends and family right out of the camera while you’re still traveling, and as long as you’re not sharing so broadly that potential thieves may be alerted to your absence from home, that’s a fine thing to do.  To enable immediate and easy sharing, you can choose the setting available on many cameras to shoot both RAW and JPG files; the JPG images will often look pretty decent for sharing when they come straight from the camera, and you still have your much more detailed image data saved in the RAW files.

But when you get home from your trip, it’s worth making the effort to catalog and post-process the RAW files of your favorite images so that they will look their very best and so you will be organized for finding them in the future.  I’ll cover how to organize your catalog of images in a later post, but for now let’s take a look at the essentials of post-processing.

There are many software applications available to perform these tasks, but I strongly encourage you to check out Adobe Lightroom.  I use this tool, and nearly all professional and enthusiast photographers I know also use it.  You can license it along with other Adobe software on a pay-per-month basis as part of Adobe’s Creative Cloud, but it can also be purchased with a perpetual license (i.e., you purchase the software once and can use it forever), which is how I acquired it.

Once you have Lightroom installed on your PC, it’s easy to import your images from your camera’s memory card or from your PC’s hard drive and to organize your catalog of images using the software’s Library module.  When your images are in your Lightroom catalog, the software allows you to perform all post-processing you desire using its Develop module.  After shooting the image, my second-favorite part of the digital photography process is enhancing the the image in the Develop module.  The software package even gets its name, Lightroom, as the new digital equivalent of the work we older photographers formerly had to do in the darkroom, such as dodging, burning, and cropping our film negatives to get the images looking their best.

As an example of how a little post-processing can dramatically enhance an image, let’s take a look at a night shot I made of Copenhagen’s Christiansborg Palace, the seat of the Danish Parliament.  Here’s the “Before” picture:


Lightroom’s Develop module

The beauty of Lightroom’s method is that it doesn’t actually change your original image files as you edit them.  Instead Lightroom saves a roadmap of the various edits you make and stores this list of adjustments along with a pointer to the original file.  This is called “non-destructive editing”, and it allows you to edit your images to your heart’s content without overwriting or changing the originals at all.  You can go back as many times as you want later to revisit your edits and change them again and again.

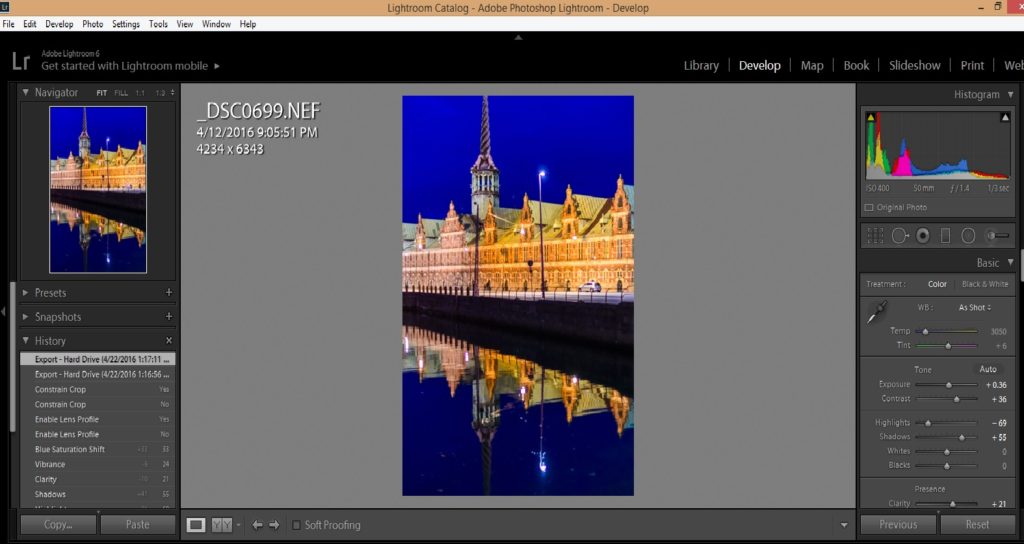
Let’s look at this process in more detail.  Here is the basic Lightroom Develop module screen:

lightroom develop module

The left bar shows a thumbnail of the image you’re working on and a list of the most recent edits you have made.  The central part of the screen shows a larger version of your image and this can be zoomed in and out to work on details or the whole image.  The right bar has a histogram (a graph showing how many pixels in the image are at each brightness level from totally black to totally white) at the top, then a toolbar from which you can choose some of the editing tools quickly, and then a large area with sliders (only some of which are shown in this screenshot) that you move left or right to adjust various elements of your image.  The editing tools in Lightroom are comprehensive enough that I find I very rarely need to import an image into Adobe Photoshop to make really sophisticated edits; nearly all of the time, I can perform all of my post-processing using only Lightroom.

Some photographers spend a lot of time making major enhancements to their images, but I like to try to adjust my camera’s settings precisely enough that the image is made in the camera the way I envisioned it when shooting, so that I need to make only minor adjustments in post-processing.  While the exact steps of post-processing will be different for every image, here is my basic workflow (note that for the most part, I work from the top to the bottom of the adjustment tools found in the right bar):

  1. Adjust the white balance as needed.  Remember my advice to always shoot in RAW mode.  One of the advantages of RAW files is that you can adjust the white balance in post-processing, regardless of what your camera’s white balance controls were set for while you were shooting the image.  In JPG files you have much less control over the white balance after the fact.  Just choose a different preset white balance type (such as Daylight, Shade, or Flash) from Lightroom’s menu, or create a custom white balance yourself.
  2. Adjust the exposure as needed.  Use the histogram and the image preview pane to lighten or darken the whole image until it looks best.
  3. Adjust the contrast as needed.  Increasing contrast gives more separation between the darkest and lightest portions of the image, while decreasing contrast does the opposite.  I find that most images require the contrast to be increased slightly to moderately.
  4. Adjust the highlights and shadows as needed.  Highlights are the brighter parts of the image, and I find that often these need to be reduced in brightness to regain some detail that may have been lost in the camera.  Shadows are the darker parts of the image, and often these need to be made brighter to bring out lost shadow detail.  After the highlights and shadows have been adjusted, you may need to adjust the whites and blacks (very brightest and very darkest points in your image) if there are extremes of contrast present.  Most of the time I do not need to change the white and black points.
  5. Adjust the clarity as needed.  The clarity slider changes the contrast of the middle tones (neither the darker nor the lighter parts) of the image.  Usually images need a subtle increase in clarity to bring out the details in the texture.  Don’t overuse this tool or the image can become unnatural looking.
  6. Adjust the vibrance and/or saturation as needed.  Both of these sliders will change the concentration of the colors in your image, but vibrance tries to avoid changing the color of skin tones so images with people will often look more natural after increasing the vibrance than after increasing saturation.  Occasionally you might need to make adjustments to both vibrance and saturation, but usually I find a subtle increase in vibrance is sufficient.  Again, don’t overuse these tools or your image will start to look exaggerated and surreal (unless you’re going for those effects).
  7. Adjust the concentration of individual colors as needed.  Each color channel has its own slider to increase or decrease its saturation.  I don’t use these sliders often, but occasionally you may want to increase or decrease the saturation of just a single color.  For example, when shooting a landscape with sky or water, you may want to increase the blue saturation to bring out those parts of the image.
  8. If you want to work on your image in black-and-white, the color channels area is the tool I use to do the conversion from color to monochrome.  Click on the “B&W” tab above the individual color channel sliders, and then adjust the mix of how the colors are blended by increasing or decreasing each color’s slider to see how the black-and-white image looks.  I find that I often have to readjust the contrast slider at this point to get the image looking its best in black-and-white.
  9. There is some sharpening already applied to your image file by default, but if it looks too soft in the important areas, you can dial in some additional sharpening.
  10. When the image you’re editing was shot at a high ISO (sensitivity) and/or a very long shutter speed, there will likely be some noise in the image.  This can be managed somewhat in Lightroom’s noise reduction tool.
  11. Under basic lens corrections I will usually select all three of the check box items.  Lightroom knows how most camera and lens combinations work and can eliminate many of the optical glitches that would otherwise show up in the image.  Under manual lens corrections, I may need to rotate the image if the horizon wasn’t level when it was shot.
  12. All of the above adjustments affect the entire image.  After completing these adjustments, it’s time to make any selective adjustments that affect only a selected part of the image.  These selective adjustment tools can be found in the toolbar just below the histogram.
  13. Of these selective adjustment tools, the most generally useful is the cropping tool, which of course allows you to remove unwanted portions of the image on the sides, top, or bottom.  It’s always best to try to compose the image correctly in the camera, but cropping is often still needed in post-processing.
  14. The spot removal, filters, and adjustment brush are more complicated selective adjustment tools that can easily be subjects of additional posts in their own right.

These steps usually won’t all be needed for any one image.  If you have several images that were shot under similar conditions, you can select them all in the Library module and turn on Auto Sync, which then allows you to make the adjustments only once and apply them to all the selected images.  Another big time saver is creating your own presets, which are saved routines that you can call at the click of a button to automate tasks that would otherwise have taken multiple steps.  Unlike Photoshop, Lightroom was designed by Adobe specifically for photographers to use, so it is set up in such a way as to make life much easier for us to organize, edit, and share our images.

Here is the “After” version of our sample image of Copenhagen by night.  You can see how a few simple edits during post-processing can really make an image pop.

Buy this photo

I hope you’ve found this very basic introduction to the essentials of post-processing to be helpful.  Now it’s your turn.  What are your go-to techniques in editing your images?  Do you have tips and tricks that you’ve found make your life easier after you return from a trip?  Please share your thoughts in the comment box at the end of this post.

Want to read more posts about post-processing your images?  Find them all here: Posts on Post-Processing.

Sports Roundup [Encore Publication]: How to get amazing shots at sporting events

Whether we’re traveling afar or close to home, sporting events make for exciting photography.  The thrill of victory and the agony of defeat (credit: ABC’s Wide World of Sports), the heroic effort, and the little moments of humor and repose amidst the adrenaline rush of competition: all of these elements can be captured in images of athletic events.

While every sport has its own rhythm and rules, there are certain techniques that apply across a wide range of sports photography situations.  Let’s take a look at a few situations and discuss how to get the best images given the inherent challenges.  Note that these photos were all made during outdoor sporting events; there are special challenges with many indoor sports, such as basketball or hockey, because the action remains just as fast but there is less light to work with, and the artificial lighting can impart an unnatural color cast.  But that’s a topic for a different post.

Whatever the sport, I like to shoot from different perspectives, from wide to very close.  The wider views show the environment as well as the athletes, so these make good establishing shots.  But often the most compelling and dramatic sports images are the tight compositions, because they portray the athletes in a very personal and relatable way.

Below are two shots of the same rowing crew during the same race at a high school regatta.  The first image was composed from slightly farther away and with a less extreme focal length (300mm), so the resulting composition is more environmental.  It shows not only all the rowers and the coxswain in the shell, but also the width of the river and the surrounding scenery.  This shot establishes the setting and gives the big picture.
Environmental shot of a crew racing at a rowing regatta.  Buy this photo

Now here’s the same crew, but captured from a closer vantage point and using a longer focal length lens (750mm).  This perspective isolates the athletes from the background and shows their expressions and postures.  There’s certainly more drama here, at the expense of some insight into the environment.

A tighter shot of the same crew in the same race.  Buy this photo

There are exceptions, such as when you choose to blur the motion to give a sense of the athlete’s grace, but as rule you want to use a fast shutter speed to freeze the action in sports photography.  Very often that means shooting at 1/1000 of a second or even faster.  Choose the Shutter Priority mode on your camera to gain control over the shutter speed, and be sure to select a high enough ISO setting to allow the shutter speed you require.  If your camera has different auto-focus settings, you may find it helpful to choose a single-point focus setting if you know where the action will be, or a dynamic focus setting if the location of the action changes very quickly.  For this image of a professional beach volleyball tournament, I chose single-point auto-focus so I could select the exact spot where the players would be jumping.  I also find the best way to capture a great image in fast-moving sports (as with wildlife photography) is to set the camera to continuous or burst mode and continue to shoot rapidly through the action.  That way, you’ll have several different images to choose from, and with luck at least one will have caught that “decisive moment.”

A fast shutter speed and single-point auto-focus allow the fast action of a beach volleyball competition to be captured precisely.  Buy this photo

My favorite sports images portray the human element in a very personal way.  This photo from a Spartan Race (an extreme athletic event that combines long-distance running with a supersized obstacle course) captures the strength and the struggle of the athlete as he nears the end of a long race through the 100-degree California desert.  Keys to success in making this image were shooting from a vantage point low to the ground, using a medium-length prime telephoto lens with a large aperture to soften the background, and waiting for just the right moment.

An endurance athlete completes an obstacle near the end of a Spartan Race.  Buy this photo

The fun of shooting a sporting event doesn’t end when the competition is over.  Be sure to capture the dramatic and often humorous moments during award ceremonies and downtime during and after the action.

These athletes have finished their Spartan Race and strike a humorous pose at the finish line.  Buy this photo

Want to see more posts on what to shoot at home and while traveling?  See them all here: http://www.to-travel-hopefully.com/category/travel/shoot/

What sports do you enjoy shooting?  Do you have tips on how to get great sports images?  Please leave a comment in the box after this post.


Focus on Sacramento Spartan Race [Encore Publication]: Covering a Spartan Race can be an endurance event

Some events are just plain fun to shoot from beginning to end.  One of my favorite types of sporting events to cover is the Spartan Race.  Basically a combination of long-distance running with a supersized obstacle course, a Spartan Race is an extreme athletic event that attracts thousands of athletes from elite to weekend warrior.  I enjoy shooting these races because they offer so many exciting elements: color, drama, showmanship, grit, stamina, and humor.  Adding to the photographic fun quotient are the glorious natural surroundings, the photogenic and extraordinarily fit athletes, and the wide range of athletic rigors required of them.

In this post I’ll present some of my images from this past weekend’s Super Spartan Race held near Sacramento, California.  I will also share some tips on how to capture the best of a big and sprawling event like this one.

The Spartan Race organization recognizes and welcomes professional and enthusiast photographers more readily than do many US sporting authorities.  For any large sporting event, I apply several weeks in advance for a media (or press) pass so that I can bring in all my gear, shoot in all areas including those off-limits to spectators, gain free or reduced-price entrance and parking, and access VIP areas.  I’ve found the Spartan Race organizers to be quite helpful and understanding of what working photographers do.

img_3701
Yours truly with media badge.  This pass is important for the professional, as it allows access to otherwise off-limits areas and lets athletes and officials know you’re a working photographer.

One point to keep in mind when covering an endurance event spread out over long distances is that as a photographer, you will experience some portion of the rigors the athletes face.  The Super Spartan Race traverses a course about 8 miles long over steep and often muddy hills, interspersed with a couple of dozen obstacles of different types.  While I don’t typically try to cover all of the obstacles, it’s important to get a reasonable sample of the different challenges, so I do usually hike quite a few miles during the course of the day.  Photographers with a media pass have access to the whole course, but there are no special roads or ramps to get us there.  We have to trek up and down the same hills, through the same mud, and over the same terrain as the athletes do.  So come prepared for a bit of a workout!

The starting line is a good place to set the stage for your photo essay.  There is usually a DJ and music to get the athletes pumped up for the race.  Everyone is fresh, clean, and excited at this early stage.  Buy this photo

In addition to portraits and close-ups of individual athletes, it’s important to capture some establishing shots to set the context of the race.  I like to get some images of large contingents of athletes running over the hills.  I shoot from a distance, but often use a telephoto lens to compress the perspective and emphasize the massive scale of these races.  Buy this photo

When shooting individual athletes on the obstacles, use a fast shutter speed to freeze the action and a relatively small aperture to blur the background.  Buy this photo

Portraits of athletes don’t have to be in the cliche pose of standing, legs apart, on the ground flexing their biceps.  Athletes are happy to pose in the midst of whatever they’re doing when they see a photographer nearby.  Buy this photo

After finishing the course, athletes gather in the festival area.  This is a great place to make portraits.  The athletes are exhausted and muddy but in a celebratory mood.  Buy this photo

Spartan athletes in the festival area display strength as well as excitement for having completed the race.  Buy this photo

The finish line itself is a dramatic vantage point.  In this particular race, athletes must jump over a line of fire to finish the course.  I shot from a low perspective to emphasize the height of the jump, and used a fast shutter speed and small aperture to freeze the moment and isolate the athlete from the background.  Buy this photo

This image works so well because the shooting angle looking upward from below emphasizes the athlete’s power, and because the timing captured her expression at just the perfect moment.  I shot many frames to increase the likelihood of capturing the right moment, and, once again, I chose a fast shutter speed to freeze the motion along with a small aperture to blur the background.  Buy this photo

The shower area at the end of the race was taken over by hordes of kids who used the hoses for water play.  Humorous moments like this one lend a playful element to the day’s portfolio of images.  Buy this photo

An iconic Spartan Race image.  I captured the strenuous activity of carrying buckets filled with sand by shooting from a distance with a telephoto lens.  This technique compresses the perspective to include more athletes in the frame while still showing the strain on their faces.  Buy this photo

I like to seek out the athletes who have something special to say.  This racer stopped for a moment so I could make a portrait.  His flag makes a nice counterpoint to the rolling hills and featureless sky in the background.  Buy this photo

Although Spartan Race athletes are fierce competitors, they also make an effort to support one another and cheer their fellow racers on.  I enjoy capturing these interactions because these moments often tell a strong story visually.  Buy this photo

What are your favorite sporting events to shoot?  Do you have tips you can share for making great images of athletes?

Want to read more posts about what to shoot while traveling?  Find them all here: Posts on What to Shoot.


Cards, Calendars, and Keepsakes: Oh, My! [Encore Publication]: Ways to share your images beyond social media and prints

With the holidays fast approaching, now is a great time to think about creative ways to share your favorite images as gifts for family and friends or perhaps to enhance your own home.  Most commonly we share images via social media and, for more special occasions, as prints.  Review this classic post for a list of 10 ideas for sharing your images: Post on Image-Sharing Ideas.   

In today’s post, I discuss three of these methods that are particularly festive and well-suited to the holiday season: cards, calendars, and keepsakes.

5x7folded
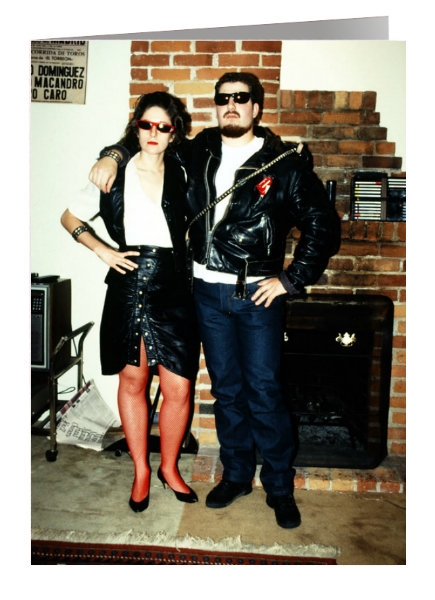
A  likeness of one of the earliest holiday cards my wife and I created.  The original version was in black-and-white and had a humorous caption at the bottom.  This version was made more recently using a modern digital process.

Cards: For the entire 31 years we’ve been together, my wife and I have sent our families and friends custom-made holiday cards.  We created our first card in 1986, the year we started dating.  The process was extremely complicated back then.  We had to take the photograph using a film camera, send the film to a lab for processing, wait for the prints to be mailed back to us, select the image we wanted to use, cut the print down to the right size, tape it onto a printed template we had to design ourselves using a primitive word processor, and photocopy it onto card stock at a graphics store.  It was strictly a black-and-white affair because color copying was very expensive in that era.  Even for black-and-white cards, the cost was quite high.

Today, the process is vastly simpler and less expensive, and the quality very high.  There are countless companies that will take your photo files and caption information, blend them with a design you choose from their library of sometimes up to hundreds of choices, and create an attractive customized card for a range of occasions.  Shop around carefully before selecting one, because price, quality, and flexibility vary tremendously.  My current favorite is Snapfish.  Even though I no longer use Snapfish to host my image galleries, I continue to create and order photo cards from this site because it offers a good range of card designs, reasonably high printing quality, and affordable pricing.  There are often very deep discounts available at Snapfish and other photo sharing sites.  Try using a search engine to find discount or coupon codes.  I rarely pay more than 60% of the listed price.

When creating a card on any platform, there are a few basic steps to follow.  First, you choose the card design from a library of choices.  There may be only a few designs for some types of occasions, but for the winter holidays there are usually dozens to choose from.  Then you upload your images if they’re not already on the site, and select where you want them to go in the card template.  Next, you add captions to customize the card.  You may be able to include a return address on the envelopes shipped with the cards.  Be sure to review your card carefully before ordering.  The final step is to place your order by specifying the quantity (per-unit prices usually drop when ordering larger quantities), shipping address, and payment information.

Calendars: Photo calendars make great holiday gifts because they are personal, functional, and seasonal (the weeks before the start of the new year is typically when your loved ones will be looking for a calendar).  Every year I create a calendar with images that present the past year in review.  I send it to several family members and keep one for my own home and one for my office.  As with cards, calendars can be ordered from a wide variety of companies with differing levels of quality and cost, so shop around.

Creating a calendar is similar to making a card.  You choose a size and design, upload your images, and lay them out on the calendar template.  Some sites allow you to further customize your calendar by including special dates such as birthdays, anniversaries, and other events important to your family or friends.  The better companies let you include a photo to represent each special date during the year, and will save these dates for creating new calendars in future years.  The ordering process for calendars is similar to that for cards: review the calendar and then place the order.  Again, you may be able to find discount or coupon codes that will substantially lower your cost.

Keepsakes: These days, it seems that images can be reproduced on nearly any type of item you can imagine.  This variety translates into a high likelihood of finding something for everyone on your gift list.  I use SmugMug, the platform that powers my online professional photography business, for nearly all of the keepsakes I order as gifts, and my clients also have been happy with their purchases of these items.  There’s a wide array of keepsake items to choose from, each customized with your image(s), including coffee mugs, coasters, smartphone cases, playing cards, desk organizers, and stickers.

To make a keepsake, simply upload your photo(s) if they’re not already on the site, select the type of item you want to order, ensure the image is cropped and/or sized appropriately for the item, and go through the checkout procedure.

This holiday season, get creative.  Share your images on holiday cards, calendars, and a range of keepsakes.  It’s never been as easy or inexpensive to make these items as it is right now, so have fun and experiment.

What are your favorite ways to share you images during the holiday season?  Please add a comment with your ideas.

Want to read more posts about sharing your images?  Find them all here: Posts on Sharing.

Black-and-White to the Rescue [Encore Publication]: Converting a noisy or strangely colored image to monochrome can save the day

In a recent post (Post on Circus Automatic), I shared several practical tips for shooting fast-moving indoor performances, using a circus performance as an example.  While I was happy with many of my images from that evening’s shoot, I discussed how the single-colored LED lights now used at many indoor performances can impart an unnatural color cast to photos that can be hard to correct in post-processing.  In today’s post, I show how converting these images to black-and-white can overcome some of the limitations of shooting under these adverse lighting conditions, with the added bonus that the noise imparted to the images (from having to shoot at a very high ISO setting) can also be less noticeable in black-and-white conversions.

First, a little background explanation on why these LED lights are so troublesome for the photographer to work with.  When we refer to the resolution, or number of pixels, in our camera’s sensor, that number is actually the total count of three different kinds of pixels, each kind sensitive to only one of the three primary colors (red, blue, and green).  Without going into the nitty-gritty technical details, suffice it to say that in most camera sensors, about 50% of the pixels record only green data, about 25% only red data, and about 25% only blue data.  My camera (the Nikon D810) is said to have a resolution of 36.3 megapixels (MP), but if my subject is lit by a single-colored red LED, in reality only about 9 MP of resolution is recorded.  The other two color channels will essentially contain no data.  This is bad for several reasons, most notably because the image will be cast unnaturally toward the red color channel and because its effective resolution will be low.

There’s very little we can do in post-processing to recover from the loss of resolution during capture, but we can adjust the color temperature to try to correct a little bit of the strange color cast.  Converting the image to black-and-white, though, can restore the image to a more natural appearance by masking the color cast.  This can be aided by using Lightroom’s contrast and color control sliders to adjust the balance of the black-and-white version until it appears closest to a normal tone.

Consider the following two versions of the same shot.  The first version is in color, and even after adjusting the color temperature and contrast, there is still a distracting red color cast.  There is also some noise apparent in the image as a result of the high ISO setting required to freeze the acrobats’ motion.

The color version of this image appears unnatural even after adjusting color temperature, due to the lighting which consisted of a red-colored LED array.

Now, take a look at the black-and-white version of the same image.  Creating this version required careful attention to the balance of each color and contrast setting to make the final image.  The good news: the monochrome image appears much more natural to the eye than does the color version.  The skin tones seem less artificial, and the curtain in the background does not distract as much.  Furthermore, there is less noise apparent in the black-and-white version.
The same shot appears more natural and less noisy when converted to a black-and-white photo.  Buy this photo

This next shot appears much more acceptable in its color version.  During a live performance, the lighting often changes drastically from one moment to the next, and in this image the LED lights didn’t impart as harsh a red cast as in the previous image.  Furthermore, the aerialist was dressed entirely in red and was working with red ropes, so what red color cast was present does not appear as unnatural.

This image is highly effective when presented in full color.  Buy this photo

While I like this image for its dramatic power and strikingly vibrant red colors, let’s take a look at a black-and-white conversion for comparison.  The monochrome version lacks the visceral impact of the strident red color, but it benefits from a more natural tone, a quasi-documentary look and feel, and a nice clean black background.  In this case, the black-and-white conversion doesn’t so much rescue the image as change the kind of feeling it elicits.  I like both versions.
The black-and-white version is cleaner and evokes a very different set of emotions than does the color version.  Buy this photo

When you are forced to shoot under very difficult lighting conditions, try converting to black-and-white during post-processing.  It just might rescue some of your images and can evoke a very different feel in other images.

For a refresher on the black-and-white conversion process and when you may want to use it, read this post: Post on B&W Conversion.

During post-processing, have you been able to rescue or improve images shot under challenging lighting conditions?  Did you convert to black-and-white, or use different techniques?  Please share your experiences here.

Post-Processing without Post-Traumatic Stress [Encore Publication]: A pro’s case study on quick and simple workflow for large batches of images

As a working professional photographer, I wouldn’t trade my job for any other in the world.  I get to travel the world while capturing images of the diversity of cultures, landscapes, foods, events, and wildlife it has to offer.  And when I’m not traveling, I have the opportunity to document so many wonderful people and events in my own San Francisco Bay Area neighborhood.  Every job, not matter how wonderful, has its challenges.  In this digital age, we photographers are often faced with workflow challenges: how do we cull 10,000 images from a big shoot down to a manageable number, post-process the best ones so that they’ll look their best, and distribute them quickly to the client?  Today’s post offers one professional’s take on a quick and simple workflow that meets these challenges, delivering wonderful images to the client in a short period of time while (hopefully) preserving the sanity of the photographer.

I recently had the opportunity to capture two dress rehearsals and two performances of Dance Identity’s annual Spotlight production, showcasing 250 students and company dancers in 22 numbers.  I shot nearly 10,000 images, culled them down to about 700, post-processed, and delivered a gallery to the client, all within 24 hours of the final show.  Here’s how.

To illustrate the workflow, we’ll use as a case study the annual Spotlight production of local dance school and company Dance Identity.  To document their 250 dancers in 22 dance numbers, I shot both dress rehearsals and both performances, as well as capturing dancers backstage and during candid moments.  I captured some group shots of all the performers, instructors, and crew.  And to get the big picture, I even shot from the catwalks at the top of the theater down onto the stage.  In all, I shot nearly 10,000 images, which I culled to about 700 of the best photos, each of which required individual attention in post-processing.  I delivered a gallery with these top images to the client within 24 hours of the end of the final show.  Needless to say, without an efficient workflow this challenge would have been crushing.  Here’s how I did it.  The process I share here will be helpful for enthusiast photographers as well as pros.  It doesn’t matter whether you’re delivering your images to a paying client or to your friends and family.  When it’s crunch time and you have to turn around thousands of images from a shoot very quickly, this is a workflow that gets results.

Every image is different, but for large-scale shoots it is important to have a workflow that is streamlined so much of the processing can be done in an automated fashion.

Step 1: Culling Your Images

After each shoot, if there’s time before the next one starts, I review and begin to cull my images.  There are some advantages to culling on a bigger screen, but to save time during big events like Dance Identity’s Spotlight production, I cull right on my camera’s LCD screen.  Sure, some excellent images will be discarded using this approach, but with 10,000 images to get through quickly, it’s impractical to upload all of them to a PC and rank them all in a tool like Lightroom.  I zoom in on the images when required in order to get a closer look at focus, facial expressions, etc., and I use the camera’s histogram to check exposure.  I delete liberally as I go, keeping only the best images for a second review on the laptop.  In the case of the Dance Identity shoots, I culled in-camera from 10,000 down to about 1500 images.

With so many similar images to choose from, the culling process needs to be quick and dirty.  I do it using my camera’s LCD screen, transferring only the best images to the laptop for further culling and processing.

Step 2: Post-Processing

After culling down to a manageable number of images, but ensuring that the selected photos still represent all the dance numbers and all the performers, as well as a range of styles (group shots, motion shots, closeups, etc.), it’s time to post-process.  I use Lightroom nearly exclusively as the tool for this job when it’s a large-scale shoot.  Lightroom is optimized for the professional photographer’s workflow, and its presets, synchronization tools, and intuitive layout allow photographers to get the job done quickly and properly.

First, I import the selected images into Lightroom, using a preset to automatically adjust white balance, exposure, and noise reduction to the subject, in this case a fast-moving dance performance shot in an indoor theater.  For example, I use the import preset and/or synchronization capability in the Develop module to quickly apply noise reduction for all the shots made at high ISO settings (1600 and above).

Next, I turn off synchronization and go through each image individually in the Develop module, fine-tuning the settings for that specific image.  With many hundreds of images to fine-tune, I can only spend about thirty seconds on each one, so the workflow has to be very straightforward.  Typically I use the crop tool first, as this will be required for nearly every image.  I use the straightening tool within the crop toolset, selecting a line (such as a line on the stage or the bottom of the theater’s curtain) that I want to align with the top and bottom of the image.  Then I crop the image to highlight the subject in the most powerful way.  Sometimes I turn off the aspect ratio lock and set the image’s proportions manually, but most of the time I try to work with the aspect ratio as shot in the camera.  After straightening and cropping the image, I do some fine adjustments on the exposure and color settings, and then apply any needed effects such as post-crop vignetting or conversion to black-and-white.  Rarely, I may have to apply some selective adjustments such as brightening just one part of the image or removing a distracting background, but this slows down the workflow and should only be used when required.

Each image should be quickly straightened and cropped, then color and exposure settings (like the black point in the image above) can be applied to show the subject most effectively.  

Step 3: Delivering the Final Images

Once all the selected images have been processed, it’s time to deliver them to the client.  It can save time and simplify the workflow to use Lightroom’s Publish module to send your images directly to the platform you plan to use to deliver them.  My website is powered by SmugMug, which integrates well with Lightroom.  However, in the case of the Dance Identity shoots, I exported the top images to my PC’s hard drive, then uploaded the files from there to a new gallery on my website.  It’s your call as to which method you like to use.  In either case, once your final image files have been uploaded to your platform, it’s a good idea to apply security settings such as watermarking, right-click protection, and passwords to protect the images from misuse.  This is also the time to apply keywording so that you, your clients, and the public can find the images now and in the future.  Finally, communicate the availability of the final images, the access method, and the pricing to your client.

Delivering your images to a high quality platform quickly is a requirement to meet client needs in today’s world of fast-paced digital media.

So, there you have it: A quick but effective workflow to go from many thousands of raw images down to a few dozen or a few hundred beautifully processed photos, delivered to the client quickly and professionally.  And the best part is that you, the photographer, can retain at least some of your sanity in the process.  Of course, if you’re preparing fine art images for a major competition or exhibition, you’ll want to labor painstakingly over each one, hand-crafting every element of the image until you get it perfect.  But when you’ve got many, many raw images that need to be delivered promptly, this process is a workmanlike way to get the job done!

Take a bow!  You’ve married art with process engineering to deliver high-quality images to your client in a minimum amount of time.

Whether you’re a pro shooting for a paying client or an enthusiast shooting for family and friends, this basic workflow will get your images looking great and in the hands of those who want to see them in the shortest possible time.

What tips and tricks do your use when processing very large batches of images?  Please share your suggestions here!

Want to see more posts about image post-processing?  Find them all here: Posts about post-processing.

Filtered Down to the Essentials [Encore Publication]: Why you should always have these filters in your bag

Filters are the Rodney Dangerfield of photographic gear: They don’t get enough respect.  Most photographers will begin to salivate when talking about the latest camera bodies or lenses and even plates or heads for our tripods, but we tend to think of filters as pedestrian items, if we think about them at all.  I nearly always make room in my bag for several filters, and I believe that using them properly is more important than what camera or even which lens I choose.  Let’s look into why these affordable little accessories are so important.

Three kinds of filters are essential gear for most photographers.  I’ll cover each type here.  Note that you must use a filter that is the correct size to attach to your lens.

It’s a good idea to keep a UV filter (also known as a haze filter) attached to your lenses at all times, as this helps protect the front element of the lens from fingerprints, moisture, and even scratches.  In addition to offering some physical protection for your lens, a good UV filter can also improve image quality when there is atmospheric haze or moisture in the air.  Use a good quality filter, though, as some can adversely affect your image quality.  I would recommend removing the UV filter when shooting with certain other combinations of filters, as the edges of the image can be cut off (vignetting) with too thick a stack of filters on the end of the lens.  In most cases, use of a UV filter does not affect the exposure more than about half a stop, so they can be used in most lighting conditions. I’ve had good luck with Hoya UV filters.  Always be sure to look at the specifications for your lens before buying any screw-on filter, because the diameter of the filter thread must match the size of the lens.

The second must-have type of filter is the circular polarizer.  A polarizing filter can reduce glaring reflections and can darken skies and enhance natural colors.  This little gadget is almost a secret weapon for making images that really pop.  Again, I like the Hoya products, which are thin, well made, and perform as they should.

It takes a bit of practice to learn to use a polarizing filter properly.  While looking through your camera’s viewfinder or LCD screen, turn the outer part of the filter slowly to see the effect.  The greater the angle between the light source (typically the sun) and the shooting direction, the bigger the effect of turning the outer ring of the filter.  You will observe as you rotate the outer ring of the filter that the sky, clouds, and any bodies of water will transform quite dramatically.  When you see the effect you like best, overshoot a little bit and then rotate the outer ring back to where you want it.  In most cases, I recommend not using the maximum amount of polarizing effect when there are reflections from water or glass, because you usually want some of these reflections to be visible in your final image, but this is art, not science, so you get to choose the effect you want.  Note that using a polarizing filter will cost you about 2-3 stops of exposure.  You will have to use a slower shutter speed and/or faster ISO or wider aperture, so use a steady tripod if the lighting conditions are dim.

Here’s an example of a shooting situation in which a polarizing filter can really make an image pop.  For this shot of the imposing peaks in Southern Patagonia’s Torres del Paine National Park, I rotated the polarizer to about 2/3 of its maximum effect to darken the sky, make the clouds more dramatic, and bring out the bright sheer faces of the granite peaks.

A circular polarizing filter makes a big difference when shooting mountains, skies, and/or bodies of water.  Buy this photo

The final essential filter is the neutral density (ND) filter.  These reduce the amount of light that reaches the camera’s sensor, so you can use slower shutter speeds to blur motion, or so you can use a wider aperture to get a shallow depth-of-field, even in bright sunlight.  ND filters come in different strengths as designated by the number in the filter’s specifications.  For example, an ND2 filter blocks 1/2 the light for a one-stop reduction in exposure, while an ND8 filter blocks 7/8 of the light for a three-stop reduction in exposure.  It’s a good idea to carry a range of ND filters for each lens you plan to use in the field.  A newer type of ND filter even allows for variable adjustment of the strength of the ND effect with just one filter, but these tend to be expensive.

A classic example of a situation in which you’d want to use an ND filter is when shooting moving water in bright lighting conditions.  You may want to use a longer shutter speed to blur the water, but even at your camera’s lowest ISO setting and your lens’ smallest aperture there could still be too much light for a slow shutter speed.  Mounting an ND8 filter to your lens will allow you to use a shutter speed eight times longer than without the filter, so for example you could move from shooting at 1/30 of a second to 1/4 of a second.

Here’s a photo of my younger daughter by a waterfall in Yosemite National Park.  The image was made in the early afternoon under very bright sunlight, bright enough that even using my camera’s slowest native ISO sensitivity and my lens’s most narrow aperture, I would still have had to use a shutter speed of 1/60 of a second, which would have frozen the water in the falls.  Using an ND8 filter, however, I was able to slow down the shutter speed to 1/8 of a second, long enough to impart a nice blur to the falling water.

 Use of a neutral density filter allowed me to blur the falling water even under very bright lighting conditions.  Buy this photo

I recommend carrying a kit containing several ND filters of different strengths for each lens you plan to use for landscape images.  Once again, make sure the diameter of the filter matches the diameter of the lens you intend to fit it to.

Note that there’s another type of ND filter called the “graduated ND filter,” and this filter varies the light-blocking effect from one end of the filter to the other end.  I used to use this type of filter quite often, but in this digital era I find it usually works just as well to simulate the effect of a graduated ND filter using post-processing software later.

Armed with these three types of filters, you will be prepared to create the images you have in your mind, even under challenging shooting conditions.  Happily, filters are small, light, and not terribly expensive, making them one of the better values we photographers can find.

Which filters do you always carry, and when have you found them most useful?  Any tips or tricks on how to use filters for the best results?  Please leave a comment in the box after this post to share your thoughts.

Want to see more posts about photography gear?  Find them all here: Posts on Gear.


Getting Oriented [Encore Publication]: Shooting vertically as well as horizontally expands your artistic vision

Who says a portrait image has to be shot in portrait orientation, or that a landscape photo must be shot using landscape orientation?  Rules are meant to be broken, and they call it “artistic license” for a reason.  I would estimate that a third of my people images are shot in landscape (horizontal) orientation, and that a third of my landscape images are shot in portrait (vertical) orientation.  It’s always a good idea to shoot at least a few frames in both orientations so you can decide later which ones work best for your artistic vision.  Let’s take a look at a few examples.

Laura is one of my all-time favorite models (she also creates all her own costumes and does her own hair and makeup), and she looks great framed in any orientation, but I think her remarkable inventiveness is shown to good advantage in this composition using landscape orientation.  Buy this photo

It’s a cliché that people pictures should be composed vertically, so that we can fill the whole frame with the model’s head or full body.  A lot of the time this portrait orientation works well.  But there are some good reasons to shoot people images using landscape orientation as well as portrait orientation.

First, sometimes the model’s pose or the environmental elements around the model favor a horizontal image.  When traveling, I like to shoot environmental portraits that show us more than just the person by including elements of his or her home, livelihood, or lifestyle.

Second, we need to think about how the image will be used.  If I’m shooting publicity photos for musicians, for example, I know they need horizontal images at least as often as vertical images, so as to meet the requirements for the venues and promoters with whom they work.  Magazines and billboards often require landscape orientation, as well.  Even more prosaic uses of our photos, such as Facebook or LinkedIn cover photos, must be oriented horizontally.

Third, some portraits just cry out artistically to be framed in landscape orientation.  The image of the model Laura, above, for example, just works better to my eye in horizontal format, because the negative space behind her leads the viewer’s eye to admire her remarkably creative style, and leaving the lower part of her body and her dress out of the image allows us to focus on her expressive face.

By the same token, there are some good reasons to shoot landscape images in portrait orientation.

First, there could be some limitations to the left or right of the frame that, when shot horizontally, could distract from the power of the image we want to create.  Think about a coastal landscape with a glorious sunset sky and delightful foreground elements such as rocks with water flowing around them, but to the left of our vantage point there’s an unattractive pile of litter.  Frame the image in portrait orientation and avoid the problem.

Second, there are publication media where portrait orientation is required.  Knowing where the image is likely to be published will dictate the orientation in which we shoot.  A card or trifold brochure, for example, will likely require a vertical shot.

Third, again, consider your creative vision.  This night landscape of the Milky Way over Yosemite National Park’s Half Dome also worked beautifully in the more traditional landscape orientation, but here I shot the same scene using portrait orientation to frame the granite mountains with a circle of trees and to create a leading line using the Milky Way’s galactic core to bring the viewer’s eye around the valley’s landforms and the night sky.

This night shot of the Milky Way over Yosemite Valley works especially well in portrait orientation because the pine trees create a frame around the leading line of the galactic core.  Buy this photo

Whenever possible, remember to mix it up and shoot with the non-standard orientation for at least a few frames.  You may find your best shots–and the most marketable ones for placement in certain forums–are the ones you make using the unconventional orientation.

Do you have a favorite image that you shot using the opposite orientation from the expected one?  Please share your experiences here.

Want to learn some more photographic techniques?  Here’s a list of all my posts dealing with the technical aspects of travel photography: http://www.to-travel-hopefully.com/category/techniques/


Beyond the Postcard Shot [Encore Publication]: Some sites are so iconic, you have to think differently to get a unique shot

Much of the joy of travel photography is seeking out and capturing images of little-known places and the ordinary daily lives of the people who live in them.  But when we’re traveling it is also inevitable that we’ll come face to face with the world’s most famous, overexposed, iconic sites.  You know, those places that are so often documented and discussed that we automatically associate them with the city or country where they are located.  London has Big Ben, Paris has the Eiffel Tower, San Francisco has the Golden Gate Bridge, Tibet has Potala Palace, India has the Taj Mahal, Cambodia has the Angkor Wat temple complex, and so on.  These sites have been photographed and shared so many millions of times that they are ingrained in our visual memories.  But there are ways we can approach and photograph the world’s iconic sites so as to avoid the “postcard shots” and create something different.  In today’s post, we’ll explore a few methods you can use to make less familiar images of the world’s most familiar locations.

Focus on part rather than the whole: Instead of capturing an iconic site such as London’s Big Ben with a normal or wide-angle lens to include the whole structure, try using a longer lens or getting up close to capture just a portion.

Big Ben is nearly always photographed from a distance using a normal or wide-angle lens to include the whole tower.  Here I used a medium telephoto lens looking up at the clock’s face to emphasize some of the detail on the facade.  Buy this photo

Embrace the crowds: Instead of working to remove the hordes of visitors from images of iconic locations, sometimes it is effective to embrace the crowds.  This can create a “nod and a wink”, self-referential photo that tells the viewer we all know this site is a tourist draw.  In this image of Stonehenge, I used a wide-angle lens to include not only the monoliths but also the long line of visitors who have come to see them.

Intentionally including the hordes of visitors in some of our images can give a different effect from the usual photos in which we attempt to remove the people.  Buy this photo

Try a different time of day: Many of the world’s most famous sites are associated with a specific time of day or lighting conditions.  The Golden Gate Bridge, for example, is often photographed at sunset or as the banks of fog roll over it.  Tibet’s Potala Palace is usually pictured by day.  So, for a different view of this lovely temple/palace complex, I visited it by night.  The resulting images offer a different mood from the postcard shots.

A different time of day can yield very different images from the usual ones.  Here, Potala Palace is captured by night, a seldom seen view that offers a very different mood than the postcard pictures.  Buy this photo

Incorporate unexpected visual elements: We associate certain visual themes with iconic locations, so surprise your viewers by including unexpected elements in your images.  I especially enjoy incorporating anachronistic visuals, such as a Buddhist monk speaking on a cell phone (though even that is becoming something of a cliche these days).  In this image of Delhi’s iconic Qutub Minar, I framed the shot first and then waited for the jetliner to enter the frame just behind the minaret.

Including non-contextual visual references in our shots of iconic sites can surprise the viewer.  This image of Delhi’s ancient Qutub Minar minaret incorporates a modern jet airplane for a mashup of old and new.  Buy this photo

Find a different vantage point: The Taj Mahal is a gloriously lovely building, but its true beauty is often overlooked by photographing it straight on from the iconic vantage point across the reflecting pool at the main entrance to the site.  Instead, try capturing the Taj from an unusual vantage point, such as the Moonlight Garden across the river from the back of the Taj.  The resulting image will surprise the viewer by offering a less-seen perspective and by framing the iconic site in an unusual context.

This image of the back side of India’s iconic Taj Mahal was made from the Moonlight Garden across the river.  Freed from the usual framing of the front of the Taj with its reflection in the pool, the viewer can truly appreciate the gracious beauty of the structure itself.  Buy this photo

Next time you visit one of the world’s most overexposed sites, try making some images using one of more of these new approaches to surprise the viewer with something different.  Avoid the cliches by emphasizing just certain portions of the site or by including crowds or non-contextual elements in your images.  Shoot from a different vantage point or at an unexpected time of day.  There’s really no need to add one more to the heap of millions of identical photos of these places, so go wild and try something unique!

How have you created unusual images of the world’s most iconic locations?  Please share your thoughts here!

Want to read more posts about what to shoot while traveling?  Find them all here: Posts on What to Shoot.

Planning a Shoot [Encore Publication]: A case study in planning and executing a photo shoot

Whether traveling or near home, some of our best photo opportunities occur spontaneously.  Serendipity is part of the fun of photography, but another big part of the photographer’s craft is to carefully plan and professionally execute a photo shoot.  Using a recent shoot in which I collaborated with professional dancer Molly as a case study, in this post I’ll cover the essential elements of planning and conducting a shoot.

Good planning is key to ensuring a fun, safe, and efficient shoot as well as obtaining the desired artistic outcome.  Buy this photo

Elements to Consider When Planning a Shoot:

  • What is the theme or mood?  The artistic concept will inform all the other elements of the shoot.  For the shoot with Molly, we decided on an edgy, urban theme.  Based on that choice, the decisions about location, timing, gear, technique, and post-processing all flowed consistently.

We chose a gritty, urban theme for this shoot, and all other decisions flowed from that choice.  Buy this photo

  • Where is the location?  Often one of the most challenging aspects of planning a shoot is scouting for a suitable location.  The location, of course, should support the theme of the shoot.  It also needs to be accessible, safe (for this shoot, we rejected shooting on or near railroad tracks for safety reasons), and suitable for making the type of images desired.  There are also legal considerations, as in most cases permission is required to shoot on private property and even some public spaces require permission for commercial uses.  Molly and I eventually decided on using the old barracks at the decommissioned Presidio of San Francisco and the adjacent Crissy Field recreation area.  This space was accessible, relatively safe, provided a gritty and urban mood, and afforded sufficient working room for both dancer and photographer.
  • When should the shoot be scheduled?  Obviously, the date and time scheduled need to work for all parties involved.  These parties include not only the model(s) and photographer, but also other client(s) and often an assistant.  Equally important is ensuring the timing supports your artistic choices.  The season of the year and the time of day should offer the best chances of obtaining the lighting you desire.  The scheduled time should also work as well as possible with respect to other considerations such as opening hours of the chosen space, traffic and volume of other people in the location, and even tides, snowfall amounts, or other environmental factors.  Molly and I chose to shoot in the “golden hour” just before sunset on a Sunday to ensure good lighting and access to the location.
  • What gear and techniques should be used?  After choosing the theme and the supporting logistical elements, it’s time to select the techniques desired to capture the images and the gear required to execute.  Elements to consider include lighting (I prefer to work with available light and reflectors/diffusers whenever possible, but sometimes speedlights or portable studio lights are required), lenses (it’s often best to bring a range of lenses for different perspectives), props, and accessories (will you need to stabilize with a tripod, or perhaps you’ll require neutral density filters to obtain the shutter speed and/or aperture you want?).  In the shoot with Molly, I used the camera handheld at mostly fast shutter speeds and low camera angles with fast prime lenses to get that edgy look.

To capture the fast motion of the dancing and to support the urban theme, I worked handheld with fast prime lenses and low camera angles.  Buy this photo

  • How should the images be post-processed?  Again, the overall artistic concept should inform decisions about post-processing.  For this shoot, I aimed for a high-contrast, slightly grainy look and also converted several of the images to black-and-white.
  • How will the images be distributed and used?  All parties should agree before the shoot on how the images will be shared and/or sold.  To protect both model and photographer, it’s a good idea to sign a model release.  For more information on model releases, see this post: Post on Model Releases.

With attention to planning and execution, a photo shoot will be more enjoyable and productive and the artistic results will be better.  Buy this photo

Do you have tips and tricks you use when preparing for your shoots?  Please share your thoughts here.

Want to read more posts about planning your photography?  Find them all here: Posts on Planning.

Focus on Ireland [Encore Publication]: The Emerald Isle offers unique landscapes and culture

We’re recently returned from a two-week adventure in Ireland and Scotland.  Our itinerary sandwiched a week of hiking in the glorious southwestern regions of Ireland (Counties Kerry and Cork) in between brief stays in the major cities of Dublin and Edinburgh.  The photographic opportunities in these regions are remarkable, with lovely landscapes, historic architecture, and a generous friendly culture evident everywhere.  I provide an overview in the form of a photo essay in today’s post, and upcoming posts will feature more details on specific places or types of subjects from the trip.

The Irish pub remains a central focus of life on the Emerald Isle.  In cities and tiny rural villages, the pubs are places for people to come together and catch up with old friends, make new friends, listen to live traditional music, and of course drink a pint or two.  This image was made in Dublin’s famed O’Donoghue’s Pub, where in the 1960s bands such as the Dubliners sparked the Irish folk music revival.
To make portraits in pubs, where the lighting is dim and the use of flash is out of the question, use a fast lens and a high ISO setting.  You need a shutter speed of at least 1/80 of a second to get a reasonably sharp image of musicians at work.  Buy this photo

It may come as a surprise (or not) to learn that Ireland’s most popular attraction is the Guinness Storehouse tour in Dublin.  Here my wife pulls a perfect pint of the “black stuff,” which we then enjoyed in the Gravity Bar atop the storehouse with views overlooking all of Dublin.

Another low-light shot, this image was made with ambient light only, using a fast lens and relatively high ISO.  Remember to capture some shots of your traveling companions.  Buy this photo

I highly recommend a visit to the very remote Gougane Barra peninsula.  There’s only one hotel, which offers outstanding food and views over a tiny island with a picturesque church and the ruins of a Sixth Century monastery.  A photographer’s paradise!

St. Finbarr’s Church stands on a tiny island on the Gougane Barra Peninsula.  To make this image, I shot in the early morning when the quality of light was compelling, got down low to include the rushes in the lake, and used a polarizing filter to bring out the textures in the water and sky.  Buy this photo

Don’t put away your gear when the sun sets!  On a rare clear night in rural Ireland, the photography is stunning.  Here’s an image of the Milky Way sprawling above the ruins of St. Finbarr’s Abbey, a Sixth Century monastery.

To capture the Milky Way, use a sturdy tripod and a relatively fast lens with a high ISO setting.  In most cases, a shutter speed of 20-25 seconds is best, but here I used a somewhat shorter exposure to avoid having the cross appear washed out in the site’s artificial light.  Buy this photo

We then hiked a portion of the long-distance Sheep’s Head Way.  You’ll rarely encounter completely clear skies while walking in Ireland, but the changeable conditions can create opportunities for glorious landscapes.  This lovely image was made just as the rain let up and the sun poked out, generating a vivid rainbow that spanned over the green fields and ancient walls.

Here I used my go-to landscape lens, the Nikon 16-35mm f/4 lens, fitted with a good circular polarizing filter.  I adjusted the angle of the polarizer carefully to enhance the sky without weakening the refraction of the rainbow.  I got down low to the ground to include the leading line from the old wall.  Other compositional elements include the sheep in the field and the dramatic clouds in the sky.  Buy this photo

At the end of the Sheep’s Head Way sits the lovely Bantry House, owned by the family since 1750.  Climb the hill behind the house to capture the house and its gardens with the harbor behind.  Buy this photo

On our way to the start of our next day’s hike in Killarney National Park, we stopped at a viewpoint called Priest’s Leap for this lovely view.  I’ve said it before and I’ll say it again: remember to include yourself and your travel companions in some of your images.  Set up the camera and either mount it on a tripod or show another person how to release the shutter.  For more on how to make images including yourself, read this post: Post on Including Yourself

This image at Priest’s Leap was made using a normal lens with polarizing filter, stopped down to maximize depth-of-field.  Buy this photo

Ireland is filled with forests that exude a sense of mystery and magic.  Look for the little things as you walk: a flower or shamrock, a moss-covered tree, a tiny stream.  All that rain has the happy side-effect of making Ireland the greenest place I’ve ever seen.

Slow down and seek out the little natural details around you, like this moss-covered tree in Killarney National Park.  Buy this photo

The legendary Gap of Dunloe outside of Killarney stretches for eight miles through mountains and valleys, along streams and by ancient farmhouses.  It can be traversed by horse-drawn carriages called “jaunting cars,” but the intrepid photographer will want to hike it instead.

The Gap of Dunloe offers compelling photographic subjects like this stream flowing in a valley surrounded by mountains.  A good wide-angle lens with a polarizing filter brings out the color and texture in such a landscape, even on a “soft day” like this one.  Buy this photo

We spent every evening in Ireland visiting a pub or two.  These pubs differ in character, but all reflect the generous and friendly local culture, and many offer live music.

At a pub in Killarney, I was chatting with this fiddler during a break between sets, and made this portrait using natural light with a fast portrait lens, a wide aperture, and a high ISO.  Buy this photo

My essential portrait lens:

We were fortunate to stay two nights in Killarney at the wonderful Lake Hotel.  The hotel grounds include the ruins of an ancient castle situated on a lake with mountains behind.  During breakfast on our second morning, I noticed the cloud cover had lifted but there was still mist hanging on the side of the hills around the lake.  I ran up to our room, grabbed my thirty pounds of camera gear, and rushed outside to capture the ruins with the mist enshrouding the lake and mountains.

There was no time to set up a tripod as the warming sun was burning away the magical mist on the lake, so I shot this image handheld.  Buy this photo

Our final day’s hike was the beautiful Wild Atlantic Way from Ventry to Dunquin.  The lovely views of the Atlantic are punctuated with green fields dotted with odd “beehive huts,” some dating back to the Neolithic Period.
To make this landscape incorporating ancient stone beehive huts and walls, I shot down across the fields to the sea, being sure to keep the horizon level.  Buy this photo

The picturesque Blasket Islands were home to a community of Irish-speaking farmer-fishermen until they were forced to evacuate in 1953.  This is one of Ireland’s most gorgeous stretches of coastline, captured here using a wide-angle lens with polarizer.  Rotate the filter until the sky is dark and dramatic.  Buy this photo

After Ireland, we spent a few days in Edinburgh, Scotland.  This image was shot along the Royal Mile.

Be on the lookout for unusual perspectives.  This image juxtaposes the different colors and textures of  the statue in the foreground with the cathedral in the background.  Buy this photo

Dining is an essential part of any trip, and Edinburgh offers many opportunities to savor the new Scottish cuisine.  This lovely smoked salmon plate (with accompanying wee dram of whisky) was captured at the Tower Restaurant atop the Scottish National Museum.

For more about how to shoot food images, read this post: Post on Food Photography.      Buy this photo

I hope this post inspires you to visit Ireland and Scotland.  Look for posts over the next few days with more details about the trip and images.

If you’d like to read more posts about photographic destinations, you can find them all here: http://www.to-travel-hopefully.com/category/destinations/

Have you visited Ireland?  What did you find most memorable?  Any tips on photographing this enchanted place?  Please share your thoughts in the comment box after this post.

Focus on Dia de los Muertos [Encore Publication]: When a local festival takes you around the world

Sometimes you can attend a local event and feel as though you’re transported to a far-off part of the world, or even feel like you’re traveling across a wide cultural tableau of a whole region.  That’s how I felt while shooting the recent Dia de los Muertas (Day of the Dead) celebrations in downtown San Jose.  Although I had traveled only half an hour from my house, this festival celebrating life and honoring departed relatives took me on a cultural and historic journey across all of Latin America and beyond.  In today’s post I will present a simple photo essay featuring some of my favorite images from this festival.
An Aztec dancer helps convene the day’s celebrations.  Buy this photo

The Aztec fire dance’s origins date back to pre-Columbian times.  Buy this photo

This shrine, erected on the back of a pickup truck, is dedicated to the memory of the owner’s deceased father and brother.  Buy this photo

The “elegant skull” face painting is an element of Day of the Dead celebrations in several Latin American countries.  Buy this photo

These lovely ladies awoke at 5 AM to paint their own faces and those of their family members.  Buy this photo

More wonderful face art.  Buy this photo

I love the cultural juxtaposition of Hello Kitty with Day of the Dead.  Buy this photo

Although this portrait of a couple also worked well in color, I love the dramatic impact it makes when converted to a high-contrast black-and-white image.  Buy this photo

Elegant and beautiful!  Buy this photo

I hope you’ve enjoyed this brief compilation of images from this recent festival and that it inspires you to seek out Day of the Dead celebrations near your own home.

What are some of your favorite cultural traditions?  Have you captured these traditions using your camera?  Please share your experiences in the comments box.

Want to see other posts about what to shoot while traveling and near home?  Find them all here: http://www.to-travel-hopefully.com/category/travel/shoot/


The Sharpest Tack in the Box [Encore Publication]: How to achieve sharp focus in tricky shooting situations

One of the most important elements of an image is focus, and even an untrained viewer can tell immediately when a key part of the image is not in sharp focus.  The stakes are even higher when we consider that poor focus is nearly impossible to correct in post-processing.  Most of us rely on our camera’s autofocus functionality to help us achieve tack-sharp focus while shooting, but as with every other automated system in a camera, even very sophisticated autofocus mechanisms can go awry, especially when we’re faced with tricky shooting situations.  Here’s a quick guide to minimizing focus problems and achieving sharp focus in nearly every shot.

Scenes with low contrast, such as in this image of ice floes on the Barents Sea in Svalbard after sunset, can fool even sophisticated autofocus systems.  Override your camera’s autofocus system and instead shoot manually in these conditions.  Buy this photo

  1. Make sure to select the part of your image that you want to be in sharp focus.  It sounds like a no-brainer, but surprisingly frequently the reason an image’s main subject is not in focus is because the photographer never told the camera’s autofocus system what to focus on.  Remember that as with any assistive technology, a camera’s autofocus system is just a collection of hardware and software designed to make a best guess about what the user wants.  If you leave your camera set to full autofocus mode, it does its best to identify what its software determines is likely to be your intended subject.  A human face, for example, is likely to be what you want to have in sharp focus, so the camera focuses on that.  But often the camera does not guess correctly.  Nearly every camera, including the one in your smartphone, allows you to manually select your desired focus point, often by simply touching the desired part of the image on the screen.  Be sure to check what your camera is doing and correct it by manually selecting the focus point if it guesses wrong.
  2. Recognize that your camera’s autofocus system will likely not work in certain tricky conditions. Most autofocus systems work by looking for areas of the image where the contrast is changing, such as at the outlines of a person or a building.  But in very dim lighting, or when the main subject is badly backlit, or in scenes with very low contrast (think of a stormy sky or the waves of an ocean), the autofocus does not work.  Recognize these deficiencies and be prepared when shooting in these conditions to take manual control.  Every camera has a mechanism to manually select focus, and you need to know how to use that feature.
  3. Choose the autofocus method best suited to your shooting needs.   Most advanced or professional cameras allow you to choose among several different types of autofocus methods.  Often, the first choice is between single-focus mode or continuous-focus mode.  Choose single-focus mode when your subject is relatively stationary and you must have precise focus achieved before releasing the shutter.  For subjects that are moving quickly or where you need to time your shot exactly, even at the expense of not yet having perfect focus, you should choose continuous-focus mode.  Within each of these modes, your camera may offer sub-choices, such as letting you manually choose the exact focus point you want or choosing a range of points from which the camera selects focus based on the motion of the subject.  This is rocket-science technology, but fortunately it is pretty straightforward to choose the desired method once you understand what each one does.  Read your camera’s manual and always practice in the different focus modes before going on any important shoots, especially on a major trip.
  4. Circumvent the whole problem by choosing a wide depth of field.  Sometimes the best artistic choice requires a narrow depth of field so that only the main subject is in sharp focus, and sometimes the light is too dim to choose a narrow aperture, but if you can make the shot work with a wide depth of field (in other words, using a small aperture, represented by a high f-stop number), then you don’t have to worry about focus at all.  In most situations, universal focus from several feet away from your lens through infinity is achieved at apertures of about f/16 or smaller.

Capturing tack-sharp images of fast-moving wildlife like the cheetah requires selection of an autofocus mode capable of dynamically refocusing on the moving subject.  For this shot of a cheetah in Serengeti National Park in Tanzania, there was the added challenge of having low contrast between the animal and the background.  I chose my camera’s continuous-focus mode with predictive focus so the camera would anticipate where the cheetah was moving and focus ahead of the shutter.  Buy this photo

By using these tips, you can achieve tack-sharp focus where you want it in nearly all of your images, whether you’re shooting with a simple point-and-shoot or phone camera, or the most advanced professional camera.  Any camera frequently makes the wrong guess about where the focus point should be, so do not rely blindly on autofocus.  It’s worth investing some time to learn how to configure autofocus appropriately for any shooting situation, and how to turn it off and instead focus manually when required.  Happy shooting!

How do you achieve sharp focus in tricky conditions?  Please share your thoughts in the comment box at the end of this post.

Want to see more articles about techniques?  Find them all here: http://www.to-travel-hopefully.com/category/techniques/.

People Pictures Beyond the Selfie [Encore Publication]: Why selfies don’t make great images, and how to get really good pictures including yourself

Several times in the pages of “To Travel Hopefully,” I’ve emphasized the importance of including yourself and your travel companions in some of your images.  Not only will you and your friends enjoy seeing yourselves captured in these travel photos, but the inclusion of people in travel images gives a sense of scale to the places you visited and tells a more compelling narrative than would be possible in photos without people.

The standard way of including yourself in a photo these days is to use your phone’s selfie camera, but there are a number of reasons why taking selfies is not the best way to capture your own likeness in an image.  First, the sensor in the front-facing (“selfie”) camera on your phone very likely has a much lower resolution than does the phone’s regular camera, so the picture quality is lower.  Second, it’s difficult to properly compose a photo when holding the camera out at arm’s (or selfie stick’s) length, let alone to smoothly release the shutter.  Third, the perspective imparted to the image when the camera is held above in selfie fashion is distorted and often unflattering.  It’s really quite unlikely that you’ll get professional quality images of people using the selfie technique.

A selfie doesn’t allow you to properly compose your image, is awkward to shoot, and uses a low-quality image sensor.  Instead, mount your camera on a tripod, compose the image exactly the way you want it, and release the shutter remotely or with the camera’s self-timer.  Or enlist the help of another photographer.  Buy this photo

Fortunately, there are better ways of including yourself in your photos, and they’re not difficult to implement.  The two most straightforward methods are placing the camera on a tripod and triggering the shutter with a self-timer or remote release, and setting up the camera for another person to shoot handheld.

The basic setup is the same for either method.  Have the other people you want included in the photo stand in the desired location.  If you’re the only person present, make a note of where your body will be placed in the composition.  Then compose your image from the best vantage point, with the camera either mounted on a tripod or handheld.  Configure your camera’s settings (focus, exposure, flash, etc.) the way you prefer, and test the settings by shooting a few frames without yourself in the image.  Then move into your predetermined position in the frame and either fire the shutter remotely with the self-timer or remote release, or ask another person to push the shutter button for you.

If you do choose to have another person press the shutter release button for you, you need to be thinking about two things: 1) ensure they know how to operate the camera and won’t run away with it, and 2) be aware that in many countries and regions the person who pushes the button owns the copyright for the image even if they did not contribute artistically to making it.  I prefer to use a tripod and remote release whenever practical, so as to have a higher likelihood of capturing the image I envision and to avoid any question as to who owns the copyright.

Do you have a favorite method for including yourself in your photos?  Please share your ideas in the comment box.

Want to see more posts on how to shoot while traveling?  See them all here: http://www.to-travel-hopefully.com/category/travel/shoot/.

The Best Auto Mode You’ve Never Heard Of [Encore Publication]: What is manual mode with auto ISO, and when should you use it?

I’ve written often in “To Travel Hopefully” about the importance of learning to go beyond your camera’s full “Auto Mode,” in order to be able to control the exposure of your images.  Frequently I like to shoot in full “Manual Mode” so as to be able to choose both my shutter speed and my aperture for full creative control.  But in rapidly changing lighting conditions, it is a real challenge to stay in full manual mode, and it’s a big help to allow the camera’s exposure programs to choose the best overall exposure from image to image.  There are a few ways to do this.  In between the full auto mode and full manual control, there are two common semi-automatic exposure program modes that most photographers are aware of, namely Aperture Priority and Shutter Priority modes.  In today’s post I introduce another exposure mode that few photographers are aware of, but that can give the best of both worlds: automatic exposure setting while retaining full manual control over both aperture and shutter speed.  This exposure mode is called “Manual Mode with Auto ISO.”

It’s important to be able to control shutter speed because that’s the mechanism by which we can freeze action or allow it to blur for creative effect.  It’s equally important to retain control over aperture because this is the means by which we can increase depth-of-field to keep everything in focus or decrease depth-of-field to soften the background.  But there’s a third side to the exposure triangle beyond shutter speed and aperture.  This third parameter is our ISO setting.  Several years ago, most camera sensors weren’t very good at handling noise at very high ISO settings, so we took a risk of ending up with very noisy images if we used our camera’s Auto ISO setting.  Not so today.  Many modern sensors are quite adept at capturing nearly noiseless images at ISO settings up to at least 3200 and often to 6400 or even a lot higher.  So the stigma that “serious” photographers have historically attached to using the Auto ISO setting should really be laid to rest.

That happy development allows us to use a mode called “Manual Mode with Auto ISO,” in which we set the camera’s exposure program to “M” or full manual mode but also enable the camera’s Auto ISO setting.  By doing so we can preserve full control over both our shutter speed and our aperture, but also allow the camera to choose the best ISO setting to give a good overall exposure as lighting conditions change.  Making this mode even more appealing, most cameras let us select the highest ISO setting (say, 6400) that we’re willing to allow.  So if the lighting level gets sufficiently dim, the ISO won’t go so high as to introduce a lot of noise into the image; instead, we just select a slower shutter speed and/or a wider aperture.

A good example of when it makes sense to use Manual Mode with Auto ISO is when shooting a street fair or an outdoor sporting event.  In these situations the lighting can change quickly depending on the cloud cover, what direction we’re shooting, and the subject and type of image we’re making.  The following three images were all shot at last year’s Carnaval San Francisco, a big street festival and parade.  It was a sunny day, but much of the parade route was in open shade, and depending on the subject there were times when I wanted to use some fill flash.  To freeze the motion, I needed a fast shutter speed, and to isolate my main subject I usually wanted a wide aperture.  Using Manual Mode, I could choose both of these settings.  But because the light conditions were ever-changing, coupling the use of Auto ISO with Manual Mode allowed the camera to adapt the exposure to the light levels for each image.

Full direct sunlight on the main subject made for very bright lighting.  Buy this photo

Open shade with a touch of fill flash required slightly different settings.  Buy this photo

A close-up portrait made in cross-lighting needed yet another exposure level.  Buy this photo

The next time you’re shooting in a shifting lighting environment yet also want to preserve full control over both shutter speed and aperture, try Manual Mode with Auto ISO.  It’s not covered in most cameras’ instruction manuals, but it can be a big problem-solver in many situations.

Do you use Manual Mode with Auto ISO to control exposure?  Do you have other tips for how to adapt to changing lighting conditions without handing over the creative control to your camera?  Please share your experiences here.

Want to read other posts about photographic techniques?  Find them all here: Posts on Techniques.


Dispatches Magazine Story [Encore Publication]: My article on travel photography in Patagonia is published by a leading travel magazine

Dear Readers,

As a travel photographer and writer, I strive to place my stories and images in magazines, newspapers, and websites for travel companies.  My piece on travel photography in Patagonia was just published in Dispatches Magazine.  Dispatches is the quarterly glossy print magazine from Overseas Adventure Travel, one of the largest travel companies in the USA.

I also appreciate the introduction from Overseas Adventure Travel’s Vice Chairman and travel industry leader, Harriet Lewis: “Kyle Adler belongs behind a lens. In the hands of a master, a camera can actually create connections with local people and bring their culture to life. Kyle is a 10-time O.A.T. traveler, and he creates stunning photo narratives of his trips.”

Please take a look!  And thanks, as always, for your great support.

Read Kyle’s article in Dispatches Magazine

Warm Regards,

Kyle

A “Fixer” for the Rest of Us [Encore Publication]: How you can leverage local resources to shoot like a pro

How do professional travel photographers on assignment create those amazing, make-your-jaw-drop images?  You know, the photos we see when browsing the pages of a major travel magazine or website?  There are several advantages the pros have, including technique honed over decades of practice, state-of-the-art equipment (with prices to match), and the ability to spend a lot of time at the same location, returning again and again until the time of day, lighting, weather conditions, and subject matter are perfectly aligned for a great shot.  But one advantage available to the pros can be borrowed, at least in part, by the rest of us who love travel photography, too.  That is the use of a “fixer,” a local expert who knows the region, the language, the culture, and the way to get things done, and whose expertise helps the travel photographer get those incredible shots.

While we were visiting a carpet weaving collective in Goreme, Turkey, our group’s trip leader introduced me to this worker who was enjoying a cup of Turkish coffee during her break.  Buy this photo

If you are traveling on a group trip run by a good travel company, you may already may have a fixer working to make your experience (including your photographic experience) as rewarding as possible.  The operator will likely have chosen an itinerary that will get you off the beaten path and into the settings where unusual and powerful images can be made.  They will have arranged your accommodations and transportation well in advance of your departure.  The company should have planned some activities and excursions that will allow you to interact with local people and see how they truly live.  And best of all, they have provided you with a local expert, often called a trip leader or program director, who knows the lay of the land, speaks the local language(s), and can facilitate your getting the kinds of shots you want.  This is of paramount importance when you want to have lots of interaction within a culture very different from your own, which I believe is the best part of traveling as a photographer.

For example, I made the above portrait after being introduced to the young worker at a carpet weaving collective by our trip leader in Turkey.  He translated so that she and I could get to know each other a little bit first, and then asked her if I could make her portrait.  It is certainly possible (I’ve done this countless times) to ask for yourself by using sign language, pointing to your camera, and smiling a lot, but having a local person with you can be a great help.

Sometimes, knowing where to go to seek out authentic cultural interactions works magic.  I captured this shot of our host family during a home-hosted lunch on an estancia (ranch) in Patagonia.

Our hosts, Chango and his extended family, were happy to pose for a portrait after we enjoyed their hospitality on their Patagonian ranch.  A local guide and good travel company can help arrange these kinds of authentic interactions.  Buy this photo


Visiting a rural elementary school in Tanzania afforded us the chance to meet kids in the classroom.  This type of experience would be hard to arrange while traveling independently, but a good group leader or guide can facilitate meaningful interactions with local people.  Buy this photo

When the trip is scheduled specifically to attend a special event, it is especially vital to have a good leader who is adept at working with local professionals to plan all the details.  For example, it was quite a major logistical feat to get a large group of scientists and photographers into place to study and view a total solar eclipse in a part of the world as remote and forbidding as Svalbard.  Our trip leader partnered with an astrophysicist who is a world authority on eclipses, beginning years in advance of the solar event, to ensure we had the best chance possible of clear weather conditions and the right vantage point from which to study and photograph the eclipse.  This is the sort of value that an expert fixer brings when you book a trip with one of the top companies.

Our eclipse expert and one of his students set up their gear on the morning of the total solar eclipse in Svalbard.  Buy this photo

To be sure, there are some compromises required for group travel, and having access to a shared program director is not the same as having a dedicated personal fixer to arrange your photo shoots for you.  I like to travel independently in places with developed infrastructure and where I can readily bridge the cultural or language gaps myself.  That said, I also love to travel in small groups run by excellent travel companies, in large part because their planning, coupled with the knowledge of the local trip leader, helps me make those memorable images.

Want to read other posts about planning your travel photography?  Find them all here: http://www.to-travel-hopefully.com/category/travel/plan/

Have you had a situation where you got your shot thanks to the knowledge of a local expert?  How do you arrange your travel when you’re visiting remote parts of the world or when you want to have lots of interaction within a culture very different from your own?  I’d love to hear your thoughts and experiences!  Please respond via the comment box.

Focus on Turkey [Encore Publication]: Spectacular photographic opportunities abound in this troubled nation

In the fall of 2015, my wife and I traveled throughout Turkey on a 2.5-week journey that included adventures in Istanbul, Cappadocia, the Turquoise Coast, and Ephesus.  We traveled with Overseas Adventure Travel (OAT) in the company of a local Turkish trip leader, and we had a wonderful, safe experience.  In today’s post I share our experiences and some of my favorite images from this spectacular but troubled nation.

First, a few words about safety.   Even when we traveled in September and October of 2015, there were concerns about the safety of travel in Turkey.  We did not visit the far southeastern regions of Turkey due to the ongoing violence between various factions from ISIS, Kurdish separatist groups, and the Turkish government.  There was a bombing with many casualties in Ankara while we were visiting a different part of Turkey.  Since our trip, the situation has deteriorated as a result of an escalating crisis in and around the border with Syria, terrorist actions throughout the country, and the broad government crackdown in the wake of the attempted coup earlier this year.  OAT, the company we traveled with, has since suspended all of their trips to Turkey.  Tourism in Turkey is being devastated by the concerns of safety on the ground.

So why would anyone want to go to Turkey?  The cultural, historic, and natural appeals of this destination are undeniable.  It is a travel photographer’s paradise.  And safety is a relative term.  I’ve traveled in over 100 countries and many of them were considered “unsafe” when I visited, but my only two close encounters with real terrorism were in supposedly “safe” cities: a bombing in Tokyo and a mass shooting in Los Angeles.  I felt safer in Turkey late last year than I do in many other parts of the world.  That said, the situation on the ground has deteriorated since I visited, tours to Turkey are becoming hard to find, and only you can decide on your tolerance for risk.  So perhaps wait for more order to return to Turkey before traveling there to make your own images, but in any case you can enjoy my images from this fascinating and gloriously beautiful part of the world.

Our adventure began in Istanbul, an ancient city situated at the border between Europe and Asia.  Its place as a crossroads of history from Roman times through the Byzantine Era, the Ottoman Empire, and the modern Turkish republic is apparent as you stroll its winding streets and ply its crowded waterways.  The are opportunities to make great images everywhere in the city.

Istanbul’s Hagia Sophia, the foremost Byzantine church, is nearly 1500 years old.  When shooting grand architectural sites from up-close, it’s a challenge to try to avoid distortion due to perspective and the necessity of using a wide-angle lens.  Here I kept the horizon level with the ground to avoid excessive distortion.  Buy this photo

The best baklava in Istanbul?  Perhaps.  I certainly didn’t taste any better baklava in the city, and believe me, I tried a lot of baklava.  To make this portrait, I asked our trip leader to introduce me to the baker, who was happy to pose with his wares.  This was shot with natural light and just a touch of fill flash.  Buy this photo

View of the Galata Tower from across the Bosphorous.  Buy this photo

After Istanbul, we traveled to the central region of Cappadocia, famous for its “fairy chimneys,” natural spires formed by the erosion of soft tufa rock.  This region is a veritable dream for travel photographers!

Upon arriving in Cappadocia, we were thrilled to learn our hotel room was inside an ancient cave dwelling.  (Not to worry, it had been recently remodeled.)  When shooting interiors, it’s usually best to use a fast wide-angle lens and to compose the image carefully so as to gain the viewing perspective you want.  Buy this photo

The Goreme Open Air Museum comprises dozens of ancient Byzantine churches carved out of the tufa rock.  Remember to capture some images that include yourself and your travel companions.  Refer to this post for more practical tips about making great self-portraits while traveling: Post on Self Portraits.  To make this image, I set up the camera on a lightweight travel tripod, composed it by having my wife stand in front of the “fairy chimney” church, then joined her in the frame and triggered the camera using a remote release.  Buy this photo

The soft tufa stone formations look almost like sand dunes in the late afternoon glow.  I shot in RAW mode (as always!) and underexposed slightly to allow for a higher-contrast image during post-processing.  Careful cropping also helps a striking landscape really pop.  Buy this photo

We awoke at 5:30 AM to the sight out our cave-hotel’s window of hundreds of hot air balloons launching about the fairy chimneys.  I jumped out of bed, barely remembering to throw some clothes on, before running out the our balcony to set up a tripod and capture this amazing scene.  I exposed for the rock formations and allowed the balloons to be partially silhouetted.  Buy this photo

We visited a school in the region, always a favorite activity during our travels.  While I also made quite a few images in the classrooms with the kids and teachers, I like the unusual perspective in this image.  It was shot from outside the school building as the kids came to the windows to wave goodbye.  Buy this photo

We took a very memorable hot air balloon ride at dawn over Cappadocia’s otherworldly landscape.  I made this image looking down from our gondola at three other balloons in various stages of preparing to launch.  The amphitheaters of soft tufa rock can be seen in the middle-ground and the rising sun in the far background.  Buy this photo

At a rug-weaving cooperative, this woman enjoys a cup of Turkish coffee during her break.  I was drawn by her colorful clothes and enigmatic smile.  I asked our trip leader to introduce us and inquire if it was okay for me to make a portrait.  Shooting quickly with natural light only, no time to set up a tripod, and a too-slow lens mounted on the camera, I had to boost the ISO setting quite high.  Fortunately, I was able to reduce much of the noise in the image during post-processing.  Buy this photo

Hiking up to the top of Uchisar Castle, the highest elevation in Cappadocia.  Buy this photo

We had the chance to watch a whirling dervish ceremony.  The Samazens, followers of Mevlana Rumi, are a mystical Sufi order who practice the ritual we witnessed.  To capture the sense of motion, I used a slower shutter speed to blur the participants.  Buy this photo

The Mevlana Museum houses the monastery and tomb of Mevlana Celaleddin Rumi, the mystic who founded the “Whirling Dervish” sect.  This image captures the incredible workmanship on the interior of the monastery, especially around Rumi’s tomb.  Flashes and tripods are not allowed inside the tomb, so I had to use a fast lens and high ISO setting to handhold the camera.  Buy this photo

We departed Cappadocia and drove to Antalya, the gateway to the southern Mediterranean region known as the Turquoise Coast.  Antalya boasts an ancient Roman harbor and a fascinating archaeological museum.

We happened upon an interesting scene when several archaeologists and their students attempted to match a recently excavated statuary head to a body already in the museum.  Always be on the lookout for serendipitous scenes, which often make the most memorable images from a trip.  Buy this photo

These Lycian house-tombs were carved into the cliffs centuries before the Romans arrived at Myra.  Buy this photo

We boarded our gulet, a traditional Turkish wooden sailing yacht, for a four-day cruise along the Turquoise Coast.  Each day offered a wonderful photographic tapestry of great images, as we sailed, hiked, swam, and dined.

Kayakoy is a ghost town, a Greek village abandoned when the Turks expelled Greeks after their war for independence in the early 20th century.  Turks living in Greece were also expelled the same year.  Buy this photo

My wife Mary spotted this rare wildcat, which looked to us a bit like our local Californian bobcat, along one of our daily hikes.  I changed lenses very quickly while slowly approaching the cat, then captured this portrait using a medium telephoto just moments before he slipped into the brush.  Buy this photo

A riverboat took us from our gulet yacht to the ancient Lycian site of Caunos.  This image of a beautiful kingfisher along the side of the river was captured using a long telephoto lens and a fast shutter speed to allow for handholding the camera on a rocking boat.  Buy this photo

On our last full day in Turkey, we finally got to visit the splendid ruins of Ephesus, a major Roman city in the region.

The ruins at Ephesus include the incomparable Library of Celsus, pictured here in a self-portrait of my wife and me.  To achieve the broad depth-of-field required to ensure both the people and the buildings were in sharp focus, I used a small aperture (large F-stop number).  Major archaeological sites are often packed with other visitors, so try to find vantage points that allow the crowds to appear small in comparison to your main subjects.  Buy this photo

Throughout Turkey, the food was vibrant, simple, and delicious.  Our final day’s lunch, in a beautiful village in the mountains, consisted of course after course of delightful meze (appetizers).  Buy this photo

Turkey is a remarkable destination for travel photography.  Let us hope its current troubles will soon be a thing of the past and that safe and affordable travel will again be available there.

Have you visited Turkey?  What were your most memorable experiences there?  Please share your thoughts here.

Want to read more posts about travel photography destinations?  Find them all here: Posts on Destinations.

Baggage Claim: A photographer’s guide to how to pack for a trip

 Special trips often require specialized gear.  To photograph the total solar eclipse in Svalbard in 2015, I had to pack a heavy professional tripod, 500mm super-telephoto lens, a remote release capable of functioning in extreme cold, and a custom-made solar filter.  Thankfully, most trips are easier to pack for.  Buy this photo

Packing is never the most fun part of a trip, and the special challenges we travel photographers face can be particularly vexing.  But with a few guidelines and some common sense, we can easily bring along just what photo gear we’re likely to need and still be able to make room for some socks and underwear.  Here is my very opinionated guide to how to pack for any length and type of trip.

    1. What type of trip are you taking?
      • If it’s a driving trip directly from your home, you can bring all the gear your heart desires.  Just be sure not to leave valuables in plain sight in the car when you step away for more than a moment (thieves love camera gear), and make sure you have a shoulder bag or backpack to carry just what you need for car-free excursions.
      • If you’re flying (unless you have your own private jet, in which case you also need to make room for me on your next trip), you’re going to have to reduce the gear you carry to just the essentials.  It is possible to customize the foam insert in a hard-sided case to hold your photography gear, and then you can check this bag in the hold of the aircraft, but this requires some effort to prepare the case for your specific gear and then you will likely find the case quite heavy to lug around for the land portion of your trip.  And woe to you if your bag is misrouted, lost, or stolen.  I recommend packing a carry-on item that meets your carrier’s size requirements and filling it with just the most essential gear you’ll need on your trip.  More on that topic in a moment.
      •  For most purposes, a backpack is a good packing solution.  There are many styles available for photo gear, but my favorites are these two:
        1.  For those times when you need to bring most or all of your gear on a trip, I like the Tamrac 5586 Expedition 6x Backpack.  It carries a lot of gear snugly and flexibly, and it doesn’t look like a camera bag so it’s less likely to invite the wrong kind of attention.  It is almost always accepted as carry-on, but it is a bit bulky and heavy for all-day, everyday use while traveling.  I’ll often use this bag to get all my gear to my first destination, then pack a day bag for just the gear I’ll need for each day of the trip.
        2. My current favorite bag for day use for nearly any shooting situation near home or while traveling is the Manfrotto MB MA-BP-TRV Advanced Travel Backpack.  It can fit a reasonable amount of gear while leaving room for non-photography items like a jacket or a water bottle (yes, even photographers occasionally have to drink or stay warm).  It disguises your gear pretty well, has good rain protection, and even sports a special sleeve for carrying the Manfrotto Be-Free Travel Tripod.
    2. What types of shooting will you be doing on the trip?
      • Will wildlife or astrophotography be involved?  If so, you’re going to have to strain your back, anger the airline staff, and enlist your travel partner to help, because there’s really no substitute for a long and heavy super-telephoto lens in this situation.  When I’m on safari or chasing a solar eclipse, I pack my massive 500mm lens into the larger of my two backpacks and accept my fate.  You’ll realize it was worth the effort when you get home and are able to share your amazing photos of a leopard in a tree or the sun’s corona on full display during a total solar eclipse.
      • For most other types of trips, you won’t need to pack a really long lens.  My general rule is to pack a range of zoom lenses that covers from fairly wide (about 16mm) through fairly long (about 300mm), including a couple of fast prime lenses for when the light is low and/or the very best optical quality is required.
    3. How much redundancy do you need on the trip?
      • Always bring a backup battery (or several) and a backup battery charger.  Murphy’s Rule as applied to travel photography guarantees that batteries will die just as you frame the shot of a lifetime.  Bring at least one extra.  And chargers are left in hotel rooms or in tented camps on the Serengeti with some regularity, and they tend to get fried when plugged into unusual power grids, so bring an extra one with you.
      • Don’t forget the little things.  Pack several power adapters of the type used in the countries where you’ll be traveling.  These get lost easily and can be hard to replace while traveling.  Bring twice as many memory cards as you think you’ll require; it’s easy to fill them up when you get to shooting a mountain gorilla or carnaval dancers.  If you plan to back up to a laptop or external hard drive, bring extra connecting cables.  While traveling, I back up to a second type of memory card using my camera’s second card slot, so I bring quite a few memory cards of both types with me.
      • Lenses are heavy and expensive, but they sometimes stop working, so if you’re on a particularly important trip you may want to bring several lenses in overlapping focal lengths.  That is, you could bring a wide-angle zoom lens and a wide-angle prime lens, plus a walkaround zoom lens and a “normal” prime lens (about 50mm for a full size sensor or about 35mm for a crop sensor), plus a telephoto zoom lens and a telephoto prime lens or two telephoto zooms with overlapping ranges.
      • If it’s a once-in-a-lifetime chance to build your portfolio with very special and irreplaceable images, I recommend bringing a backup camera in addition to your primary camera.  For a recent safari trip in East Africa, I brought two DSLR bodies as well as quite a few lenses so that I’d have a backup solution to any single point of failure.  The more exotic your destination, the more likely that dust, wind, salt, extreme heat or cold, and heavy shocks or drops will damage your gear, so for those amazing one-of-a-kind trips I suggest biting the bullet and carrying backups for any gear that could fail.
    4. What accessories do you need to accompany the rest of your gear?
      • Attach a UV filter to each of your lenses before you leave and keep it on to protect the front element of the lens throughout your trip.
      • Carry a polarizing filter and a range of neutral density filters in the correct diameters to fit at least your wide-angle lens and your walkaround lens.
      • For more on filters, read this post: Post on Filters
      • A flash unit is helpful to have on most trips, unless you’re sure there will be ample natural light or you’re willing to use your camera’s built-in flash.
      • A good lightweight travel tripod with a head and mounting plate that suit your needs is essential gear on many trips.
      • Don’t forget any special-purpose gear that you need for just this type of trip.  When I travel to see a solar eclipse, for example, I need to be sure I bring my solar filter that attaches to my super-telephoto lens.  I also need to bring my heavy-duty professional tripod instead of the lightweight one I typically carry on trips.
    5. How will you be shooting from day to day during the trip?
      • If you’ll have constant vehicle support or won’t be going far from your hotel, you may be able to make do with just the bag you brought on the plane.  Or you can bring along a small shoulder bag to carry just a few items for the day’s shoot.
      • Most of my trips involve considerable hiking and public transportation from day to day, so I either carry everything in my smaller backpack or bring it along in checked baggage during the flight.  Then I can transfer just the gear I need for each day’s shoot into the smaller pack, which makes life easier when hiking 10 or so miles per day.

For a safari you will need a long lens to capture small or distant wildlife.  I recommend bringing a beanbag for camera support instead of a tripod, as the latter cannot be used in a safari vehicle.  Be sure to bring an extra camera and lenses, and carry more batteries and memory cards than you think you’ll need.  Buy this photo

Of course, if you use a mirrorless camera with only a couple of compact lenses or an advanced point-and-shoot camera, you do not have to worry about many of these items, but still be sure to review the list above to ensure you bring all required accessories.

With an overall strategy tailored to your itinerary and shooting style, and careful attention to execution to ensure you don’t forget anything, it’s really not that difficult to pack just what gear you’ll need in a way that will allow you to enjoy your trip when you’re not shooting.  After all, travel is about gaining experiences, and not all of those experiences can or should be photographed.  Pack for your photography, but also for your overall travel enjoyment.

What are your hacks for packing your photo gear for a trip?  Please share your tips and tricks in the comments box here.

Photography as a Bridge to Local Culture [Encore Publication]: Your camera is a great tool for meeting local people and learning about culture

I’ve heard certain travelers grumble that photography inhibits deep cultural learning and interaction when we visit new places.  Our cameras, this line of reasoning goes, isolate us from the local people we’re trying to get to know.  The lens, they believe, acts as a distancing device to turn locals into subjects and travelers into tourists.

I disagree emphatically!  Your camera is a great tool for meeting local people and learning about culture, immersing yourself even more deeply in the spirit of the place and the lives of the people who live there.  But only if you use it in the right way.  Allow me to explain.

While the local customs and even the laws governing whom it is acceptable to photograph, and when or where it is okay to make an image of them, do vary from place to place, there are a few common-sense guidelines that will help us travelers engage in a friendly, curious manner instead of upsetting people and causing social discord.  Here are a few key guidelines to keep in mind.

    • The Golden Rule: If it’s not okay in your home country, it’s probably not okay in other parts of the world.  Would you appreciate a stranger running up to you on your front lawn and shoving a lens in your face?  I’m guessing, no.  So please don’t behave in that way toward people in other places.
    • Make a portrait, don’t take a portrait: Get to know your subject first as a person, even if just for a brief exchange.  While there are occasionally situations where the moment or the expression will be lost by approaching your subject before shooting, I find that most of the time I make better images as well as have more meaningful interactions, when I say hello and ask the person first.

USA

I chatted for a while with these samba dancers as they were celebrating just after San Francisco’s Carnaval parade.  Getting to know them first made it easy to ask permission for a portrait. Buy this photo

    • Approach children with sensitivity: Kids can be amazing photographic subjects!  They are often uninhibited in front of the camera and they portray cultural practices and lifestyle in a relatable, endearing way.  But it’s especially important to understand when it’s okay to make a portrait with them.  While traveling in South Africa, I saw first-hand what can happen when travelers misunderstand social norms.  A fellow traveler in my group saw a young boy playing near where we were waiting for a border crossing.  She shouted excitedly, “Soooo cute!,” and rushed up to the child, camera extended toward his face, to take his picture.  In an instant the boy’s father ran over, irate, and yelled at me (he mistakenly thought I was the fellow traveler’s father), “How would you like it if we came to your country and started taking pictures of your children?”  A few minutes later I explained privately to the offending traveler why her actions caused a negative reaction.  She had no idea this behavior wasn’t okay.  When in doubt, refer to the Golden Rule, above.

Kashgar, China

We visited the old town in Kashgar just before the Chinese government began demolishing the homes there and relocating the mostly ethnic Uighur people.  It was and remains a complicated social situation, but I was fortunate to be able to make this memorable portrait of a young Uighur girl in traditional clothing sitting in front of her soon-to-be-destroyed family house.  I approached her mother first to make sure it was okay to photograph the girl.  Her expression of pride mixed with apprehension is what I feel makes this image strong.  Buy this photo

    • Getting to know you: It may seem difficult to talk with a stranger from a very different culture who likely speaks a very different language from our own.  For us introverts, it seems like even more of a challenge.  But I’ve learned a few tricks and tips that make it much easier to get to know a person before photographing them.  Learn a few words of the local language.  Just saying “hello” or “good day” can be a great icebreaker.  It’s a fairly universal gesture to point to your camera and extend your arm gently toward your hopeful subject to inquire, “Is it okay if I take your picture?”  Just as happens in our home countries, a subject may say no, but most of the time people are happy to be photographed if you are polite, respectful, and try to interact with them first.  A trip leader, guide, or local friend can often be a great help by introducing you to the person you’d like to photograph.

Turkey

At the start of our trip through Turkey, I asked our trip leader to introduce me to people we felt would be good portrait subjects.  With his help I was able to overcome the language and cultural difference and capture this striking portrait of an employee at a carpet weaving cooperative.  Buy this photo

    • How close is too close?: In most situations it is fine to make an image that includes a large group of people, none of whom will be too prominent in the photo.  For close-up images, though, in which an individual person or small group of people will be the obvious subject, it is best to ask first.
    • Money matters: When there is a commercial transaction between you and your subject, it often paves the way to ask to make their portrait.  I’ve had good experiences photographing local street vendors, musicians, artisans, and shopkeepers after purchasing their wares or tipping them for their services.  And of course it is usually fine to photograph singers, dancers, and musicians in a performance you have paid to attend, as long as local rules about photography are obeyed (sometimes you will have to pay extra for a license to photograph, and frequently flash is not permitted).  But it can become a slippery slope when people begin to expect to be paid just for having travelers photograph them.  In Peru we had many people, including young children, dress in traditional costumes and approach us to pose in photos for money.  In an Argentinian mountain village we were even asked to pay to photograph a gentleman’s Saint Bernard dogs.  In these situations, you’ll have to exercise your best judgment.
    • When can you shoot first and ask questions later?: It’s rare, but on occasion you will encounter situations when the “decisive moment” will be lost if you ask for permission to shoot.  This is another judgment call.  Just like when shooting street photography at home, I consider several factors when deciding whether to make an image of a stranger in a different part of the world.  When I do see an amazing expression, gesture, or moment and decide to capture it before getting to know the subject, I will usually approach them and show them the image on the camera’s display, attempting to query whether it’s okay.  A smile and an easygoing, open gesture can help when approaching.  If the response is clearly negative, I delete the image on the spot and in front of the subject. Again, see the Golden Rule, above, and keep in mind that courtesy and respect make all the difference.

Cuba

This was one of those situations when I shot first and asked questions later.  The proprietor of Maria’s Cafe in an eco-village in Cuba’s rural Vinales Valley was standing on a balcony above the cafe surveying the activity below.  I loved the way her contemplative expression and relaxed gesture were framed by the saturated Caribbean colors of the doorway, so I made this image right from our table.  Later, when Maria came down to talk with customers, I showed her the photo and she was pleased with it.  Buy this photo

Beyond these general guidelines, there are local variations.  Do get to know the customs that prevail in the countries and regions you plan to visit.  For example, in some cultures it is acceptable to stand very close to others when conversing, while in other cultures the social boundaries are much more pronounced.  Sometimes it is fine to approach a child directly, but in other cases the first contact should be made with the parent or teacher.  There’s quite a bit of local variation in the amount of small-talk people engage in before getting down to business.  Knowing the local customs not only helps you make better portraits of the people you meet, but will also encourage deeper interactions and mutual respect.

In my experience, the camera is a wonderful bridge that enhances, rather than detracts from, making meaningful cultural connections with people while traveling.  Just try to do it the right way!

Want to read other posts about what to shoot during your travels?  Find them all here: http://www.to-travel-hopefully.com/category/travel/shoot/

Do you have a good story to share about your experiences, positive or otherwise, in photographing people you met during your travels?  What’s your approach to making portraits while abroad?  How has photography enhanced your cultural interactions?  Please post your thoughts in the comment box.

Top Tips for Great Travel Images [Encore Publication]: These five simple “hacks” will result in more professional images

Festivals and street fairs can be challenging to shoot due to backgrounds cluttered with people, buildings, and cars.  To make this portrait of grandmother and granddaughter at Carnaval San Francisco, I got down low so that most of the background was covered by the cloth of the costume, and I used a wide aperture to throw the hectic street scene into soft focus.  Buy this photo

The web is positively overflowing with “life hacks,” simple tips and tricks to save us all time and effort and to achieve better results.  Some lists are better than others, but it is in the spirit of these lists that I bring you this compilation of five simple travel photography hacks.  These techniques are not difficult and do not require expensive gear.  They work equally well for your photography whether traveling or at home.  And I promise that if you follow them, your images will improve.  The pros do these things almost automatically; to them, it’s hygiene, like tooth brushing.  If you read no other post about photography, read this one.

  1. Avoid cluttered backgrounds: So often the travel images of a professional stand out from those of amateurs simply because they took careful notice of what was in the background while composing the shot.  Try to frame your subject against a clean backdrop such as a dark-colored wall or the sky.  If there’s no way to avoid including some clutter in the background, at least use a wide aperture (low F-stop number) to throw the background into soft focus.
  2. Watch your horizon: Frequently, we’re so intent on composing the main subject within our viewfinder that we forget to check whether the camera is level before firing the shutter.  An uneven horizon can give the impression of vertigo, like the subject is going to fall out of the frame.  Some cameras have a virtual horizon function to show you whether the horizontal and vertical axes are level, but whether you use it or not, be sure to check visually that the edge of the image looks correct.
  3. Achieve sharp focus: The one characteristic of an image that even the most inexperienced viewer can identify immediately, and one that’s almost impossible to fix in post-processing, is poor focus.  Today’s cameras are so easy to use that we often overlook this most basic element.  The camera can’t know for sure what subject you intend to have in focus; it can only make its best guess.  So take the extra fraction of a second while composing your image to move the camera’s focus point onto the main subject.  Or use a small aperture (high F-stop number) to provide a wide depth of field so that essentially everything is in focus.
  4. Choose the correct exposure: Another very basic element of any photograph, exposure can only be correctly chosen by the photographer, not by the camera.  Your camera’s Auto mode can be fooled very easily by many tricky situations, most commonly by backlighting of the subject.  It’s fine to use the camera’s guess as a starting point, but nearly every camera (including smartphone cameras) have a way to manually override this guess, so learn how to do this and add in about a stop or so of extra exposure if your subject is backlit, more if the backlighting is severe.
  5. Turn off the darned flash: Nearly every camera has a mode where it fires the flash automatically if it determines the extra light is needed.  This is rarely a good thing.  Far better to turn off the auto flash setting and make your own decision about when to use the flash.  Otherwise, your low-light images could end up with an eerie, unnatural color cast or your far-away subject could be underexposed (a flash typically lights an object only a few feet away from the camera, so why fire the flash when you’re photographing an object hundreds of yards or even miles away?).  Worse, if you are shooting through glass or another reflective surface, your flash reflects off the surface, ruining your whole image.  Worse still, your flash may blind everyone else near you in a very dim setting, damage sensitive artwork, or scare or anger nearby wildlife.  I’ve seen countless visitors ejected from museums, zoos and aquariums, and other wonderful destinations because they hadn’t figured out how to override their camera’s auto flash setting.  Just turn off the darned flash, and use it manually when appropriate.

Learn these simple techniques and follow them whenever you shoot, and you’ll start making images that stand out from the crowd.  Remember, you, and not the technology inside your camera, are the creative force behind your images.

While this image of a yurt in the remote mountainous region between China and Tajikistan succeeds in spite of (or perhaps because of) the off-kilter horizon, it serves as a good reminder to check the horizons at the edge of our photos.  Buy this photo

What are your favorite tips and tricks to ensure you make the best images possible?  Please share here!

Want to read more posts about photographic techniques?  Find them all here: Posts on Techniques.

Focus on Edinburgh [Encore Publication]: Ancient and modern, Scotland’s capital city offers great architecture, museums, and more

At the end of our two-week hiking adventure in Ireland, we added a stop in Edinburgh for a family visit.  Ancient and modern at the same time, Scotland’s capital offers a wide range of experiences for the traveler, and a wide array of subjects for the travel photographer.  From architecture to museums, castles to palaces, glorious views and creative contemporary cuisine, this city has become a world-class destination.  Here is a brief photo essay capturing some of our experiences there.

The main attraction, dominating the city from its high central vantage point, is the ancient Edinburgh Castle.  It’s an easy walk from the center of town up the hill to tour the castle.  On the way up, a variety of interesting views of the castle unfold.  Try different lenses and compositions to take advantage of the many moods of this place.

Edinburgh Castle towers above the city center and offers a variety of different perspectives for the photographer.  Here I’ve shot from halfway up the hill using a telephoto lens and polarizing filter to isolate this one portion of the edifice and to enhance the stonework and the sky.  Buy this photo

Edinburgh’s Royal Mile stretches from the Castle down to the Palace at Holyrood House.  It’s easy to see this street as a shopping mall jammed with tourists, but it would be a shame to overlook the stately old architecture and the little closes (alleyways) off the main street.

To make this image along the Royal Mile, I chose an unusual perspective and used a medium telephoto lens to align the different colors, textures, and angles of the statue with the cathedral.  Buy this photo

Edinburgh is changing.  During several visits over the decades, I’ve heard many a bagpiper playing in the center of the city, but this is the first time I’ve met a female piper.  She was happy to pose for a portrait.  Buy this photo

Brightly painted façades lend a splash of color to the old stone architecture in this lovely neighborhood.  Buy this photo

Scottish food has also evolved a great deal in recent years, with several restaurants serving contemporary takes on traditional Scottish dishes.  Nowhere is the ambiance nicer than at the Witchery by the Castle, along the Royal Mile.

To capture the lovely interior of the Witchery, I used a fast normal lens and a high ISO setting.  This scene was lit entirely by candlelight and a few sconce lights in the ceiling.  Buy this photo

Revisiting Edinburgh Castle on our second day, I wanted to shoot it from a different perspective at a different time of day.  During post-processing I decided that a black-and-white rendering of the image would highlight the austere tone of the castle.  Buy this photo

Edinburgh has a proud literary tradition, from Burns to Scott to Stevenson.  The city’s literature museum, while small, is worth a visit.

I couldn’t resist capturing this display sign in the Writers’ Museum highlighting the Stevenson quote that graces the name of this website.  For more on the importance of this quote to the development of my passion for travel and photography, please see this page: About To Travel Hopefully.

At the other end of the Royal Mile from the Castle lies the Palace of Holyroodhouse.  This is the Queen’s official residence when she’s in Scotland, and its tour is first-rate.  While photography is not allowed inside the lovely palace, it is okay to photograph the stately and much older abbey adjacent to the palace.

Again here, I tried to seek out an unusual perspective in this shot of the abbey at Holyroodhouse.  I shot upward with a wide-angle lens, using spot metering to expose for the stonework and a small aperture to provide broader depth-of-field.  Buy this photo

I made this portrait of our daughter with two of her friends from university by stepping back and framing them using a medium portrait lens.  I chose a medium aperture to ensure sharp focus on the subjects while also keeping the façade of the abbey reasonably sharp.  Buy this photo

Behind Holyroodhouse is a hill towering above the city.  A short but fairly strenuous hike leads to Arthur’s Seat at the summit.  From the summit there are glorious views over the whole of the Edinburgh area.  This image of the Palace at Holyroodhouse was shot from partway up the hill.

A view of Holyroodhouse from partway up the hike to Arthur’s Seat.  A polarizer helped bring out the drama in the sky and the saturated green of the lawns.  Buy this photo

On our final evening in Edinburgh, we dined on exquisite contemporary Scottish cuisine at the Tower Restaurant.  Sitting atop the Scottish National Museum, this spot has marvelous views over the city to the castle.  The view shown in this image was just as marvelous.

To photograph the beautifully plated trio of smoked Scottish salmon accompanied by a glass of old single malt whisky, I shot from above using a touch of off-camera flash to balance the ambient light of the restaurant.  I used a diffuser on the flash and bounced the flash off the wall to soften its light.  To learn more about food photography, check out this post: Post on Food Photography     Buy this photo

Scottish traditional music is alive and well and performed almost every night at Sandy Bell’s Pub.  This portrait was made using my favorite portrait lens set to a wide aperture, with a high ISO setting on the camera.  The shallow depth of field throws the whistle player into soft focus, so the emphasis in the image is placed on the fiddler.  Buy this photo

Have you visited Edinburgh?  What are your favorite spots there?  What experiences should a photographer be sure to seek out?  Please leave your comments here.

Want to read more posts about travel photography destinations?  Find them all here: Posts on Destinations.

Focus on How Weird Street Faire: A case study on simple techniques to capture winning images of festivals

As a professional travel photographer, I shoot regularly in nearly all genres of photography.  A typical day on the road might include shooting landscapes, wildlife, cityscapes, portraits, action (sports, dance, performance), and nighttime photography.  While I enjoy all types of shooting, my great joy as a photographer is capturing portraits of the people I meet.  Whether close to home or halfway around the world, getting to know the people and learning about their culture through making portraits of them is a wonderful experience.  And there’s no better way to capture images of many amazing people in a short time than by attending local festivals.  People tend to be their best selves at special celebrations like festivals and street fairs.  They dress exuberantly, dance with abandon, make new friends quickly, and (nearly always) are overjoyed to pose for photos.

I shoot about a hundred festivals and other special events every year, so I’ve learned a few tips about how to make the best images during these occasions.  In today’s post I share some simple but effective techniques for capturing great portraits at festivals and other gatherings, using San Francisco’s recent How Weird Street Faire as a case study.  How Weird is a vibrant and colorful, only-in-SF, annual celebration of individuality, tolerance, music, art, and hula hoops.  Read on to see some of my favorite images from this year’s festival, presented along with some discussion of how they were made.  To view more of my images, or to buy some, check out this gallery: How Weird photo gallery.

I see a lot of fellow photographers at events like How Weird shooting with huge telephotos and even tripods, like they’re after images of wildlife on a Kenyan safari.  In my opinion, they are missing the point.  We’re making portraits of people here, so use a normal or moderate telephoto portrait lens, preferably a fast prime lens, ditch the tripod and monopod at home, and get in close to chat with and get to know the people you’re photographing.  When you interact with people, you get a sense of what makes them special, allowing both you and them to capture that special trait in your photos.  Random sniping from far away with a long telephoto will yield far more bland and generic photos.  All of my images at How Weird Street Faire were made with a single camera body and one lens, my trusty 85mm f/1.8 portrait lens.  Sometimes simple is better, especially when it comes to capturing people at fast-moving events.

Larger groups can be challenging to capture in portraits, particularly in bustling spaces like those of a festival.  When they couple I was chatting with suddenly ran into a friend and they had a group hug, I quickly stepped back a few paces and made this expressive and engaging portrait.  It’s okay to break the rules sometimes–here, one of the subject’s faces is completely obscured and another’s is partially obscured, yet the portrait works because it captures the energy and affection of the moment.

When photographers argue that the “street photography” approach (candidly sneaking images of people who aren’t aware they’re present) is the best for capturing people’s true essence, I show them images like this one.  This wholly genuine and unguarded moment of the girl dancing was made with her full knowledge and permission.  The trick is to chat with the subject and get their permission for photography first, then to lay back for a while and let them go back to what they were doing.  After a few minutes, they’ll nearly forget you’re there and they will reveal their true selves.  But unlike shots you sneak without permission, now you have a subject happy to have you photographing them, and you can take your time and not have to rush your work in order to hide your shooting from them.

Often we see only the most obvious subjects at crowded, chaotic events like festivals.  It’s easy to spend all our time shooting people dancing, partying, and displaying their costumes, but I try always to look for the more hidden people and infrastructure that support the event.  This DJ was partially hidden atop the big dance stage and behind the banks of speakers, but she made a fun subject for this portrait.

Don’t be afraid to get in close.  This portrait really pops because the tight composition allows us to focus our attention on the symmetry and color of the subject’s hair and costume.  

The interactions between people are at least as much fun to observe and capture as the individuals themselves.  I had chatted with and photographed a group of people for a few minutes when I observed this fun interaction, so I stepped back and framed some shots of the two young people together.

While post-processing my images after the shoot, I decided to render this one in monochrome to achieve a gritty urban street scene sort of feel.  Often color can distract from the power of an image, so always consider which of your images could benefit from conversion to black-and-white.

In ordinary daily life, I find that perhaps two-thirds of people are willing to have their portrait made if the photographer spends some time getting to know them first and then asks politely.  But at a festival, nearly everyone is excited about posing for portraits.  The trick is to capture scenes where they show you their underlying personalities a bit, rather than just striking a cliched pose for the camera.  To achieve that here, I spent a few minutes shooting, asking the couple to pose in different styles and have fun with it.

Putting it all together.  Here’s a summary of the basic techniques I use when shooting portraits at festivals:  1) Use a fast prime normal or portrait lens.  2) Set your camera for a fast shutter speed (1/500 second or faster is good for dancing and other fast action), wide aperture (f/2.5 or wider is ideal except for large groups) to isolate the subject, and an ISO appropriate to the lighting of the scene (I used ISO 100 the whole day due to the bright outdoor light).  3) Get to know your subject before shooting, let them relax, and capture them during an authentic moment.  4) Try to compose the portrait with as uncluttered a background as possible; of course, this is often difficult at crowded festivals.  5) During post-processing, crop to clean up the scene and then vignette just a touch to further clean up busy backgrounds.

I hope this discussion of techniques to capture portraits during festivals has been helpful.  The best way to learn these techniques and to find your own style is to shoot and shoot some more!

Please leave a comment with your own thoughts and tips about how to make great images of people at celebrations.

Want to read more posts about photographic techniques?  Find them all here: Posts about techniques.

In the Nik of Time [Encore Publication]: Google’s Nik Collection offers leading-edge image editing tools for free

Note: Google has announced that they will no longer provide support for the Nik suite of tools.  That means you can still download the latest version of Nik, but it may not work with the other software you are running; even if it works for you today, at some point in the future as you upgrade your other software, Nik will cease working for you.  This is regrettable, because I still have found no other similar tools that perform as well as the Nik collection for most of its purposes.  Please share your suggestions for replacement tools as a comment at the end of this post!

In 2012, Nik Software, a small company known for their image processing tools that emulated the look and feel of using old film, was quietly acquired by a somewhat larger company known as Google.  This past spring, Google announced they were making the entire suite of Nik tools available for free to all users.  I’m just getting around to testing this suite of image editing software now, and from what I’ve seen so far its capabilities are leading-edge and would be well worth spending hundreds of dollars to obtain.  It doesn’t do everything, but what it does, it does better than tools such as Photoshop and Lightroom, each of which costs a good deal of money.  That Nik’s great capabilities are available for download completely gratis is a wonderful gift from the folks at Google, and I strongly recommend you give them a try.

It’s important to note that the Nik Collection of software tools is not intended to be standalone image processing software.  It consists of a set of plugins, each specialized for a different specific purpose, that must be accessed by a general-purpose image editing application such as Photoshop, Lightroom, or Aperture.  I use Lightroom for nearly all of my post-processing, so I used that application to access the Nik Collection.

Once you have your general image editing application installed, then you can download the Nik Collection modules for free at this site: https://www.google.com/nikcollection/.  When you are working in your application of choice, you will then have access to the various Nik Collection tools in the editing menus.  For example, when I select an image in Lightroom, I can access six of the seven Nik modules by pulling down the “Photo” menu and then pulling down the “Edit In” sub-menu.  One of the Nik modules, the HDR Efex tool, is accessed instead under the “File” and “Export with Preset” menu choices.

These are the seven Nik Collection modules included in the free download:

Analog Efex Pro

Explore the look and feel of classic cameras, films, and lenses.

Color Efex Pro

A comprehensive set of filters for color correction, retouching, and creative effects.

Silver Efex Pro

Master the art of black-and-white photography with darkroom-inspired controls.

Viveza

Selectively adjust the color and tonality of your images without complicated masks or selections.

HDR Efex Pro

From natural to artistic, explore the full potential of HDR photography.

Sharpener Pro

Bring out hidden details consistently with the professional’s choice for image sharpening.

Dfine

Improve your images with noise reduction tailored to your camera.

So far, I’ve played around with just three of these tools.
Silver Efex Pro did a very good job of converting my test images to monochrome.  I’m pretty good at using Lightroom’s tools to convert color images to black-and-white, but they take a lot of practice to master.  In Nik’s Silver Efex module I was able to make some good choices very quickly.  For those who want to fine-tune their black-and-white conversions, there are very good tools for detailed control over the process.
I used Nik’s Dfine module to attempt to reduce noise in a favorite shot of the Milky Way over Yosemite Valley’s Half Dome.  The results of my quick trial looked comparable to what I had done in Lightroom, but I suspect if I took the time to learn the Nik tool more thoroughly, I could end up with even better results.
Finally, I tested Nik’s HDR Efex Pro tool.  This little gem is a joy to use.  Just select the series of shots from which you want to build an HDR (High Dynamic Range) image, export them to HDR Efex, and click a couple of buttons to generate the base HRD image there.  My default image looked pretty good, but the Nik tool has a wide range of presets that allow you to generate different HDR effects with the click of a button.  I tried several of these presets until I found one that perfectly suited the scene.  A few more small tweaks using the detailed adjustment sliders, and I was ready to save the HDR image back into Lightroom.  In the past I have been very disappointed with Lightroom’s built-in HDR tools, and only slightly more satisfied with Photoshop’s HDR module, but the Nik HDR Efex Pro plugin does an amazing job.  It’s both easier to use and generates better results than the other HDR software I’ve used.  Specifically, the Nik tool does a much better job than the other tools at producing natural-looking colors and at removing the “ghosting” effects from when the underlying images are just a little bit different from one another.  Now I’m eager to find the time to go back to some of my favorite HDR images and rebuild them using the Nik software!
For comparison, here is a favorite HDR image of mine, first shown after processing in Photoshop’s HDR tools and then shown after processing in Nik’s HDR Efex Pro tools.
lrwm-lowres-5884This HDR image of Lago Grey with its glacier and the peaks of Torres del Paine National Park in Chile was processed using Photoshop’s HDR tools.  The colors appear unnaturally saturated and parts of the image (especially the tops of the mountains and the brush in the foreground) show some ghosting effects.
lrwm-lowres-5880-5884-hdrnikThis version was processed using the Nik Collection’s HDR Efex Pro tools.  The colors look much more natural and all parts of the image appear sharp and free from ghosting.
I am looking forward to revisiting many of my favorite images and reprocessing them using the Nik Collection’s tools.  I highly recommend this versatile, easy-to-use, and powerful suite of image editing modules.  And the price can’t be beat.
Have you used the Nik Collection for your own photography?  What do you like and dislike?  Please share your thoughts here.
Want to read more posts about post-processing your images?  Find them all here: Posts on Post-Processing.