Brave New World [Encore Publication]: AI tools for photographers are improving

As a working professional photographer who also spent nearly 30 years as a technology manager/executive, I’ve long had an interest in the intersection between art/creativity and technology.  Recent attempts to marry photography with artificial intelligence have ranged from useful (facial recognition) to silly (Instagram filters) to hype (an expensive camera that several days after you shoot sends you only the images it deems worthy).  But as pattern matching algorithms improve and machine learning becomes more reliable, we are starting to see some amazing applications at the intersection of AI and photography.

I’ve recently been playing around with two good examples from Adobe.  Available only in the online version of Lightroom as “Technology Previews”, these tools enable you to search all your images for specific attributes and to have the AI automatically select what it determines to be your best photos.

To activate these new tools, go to https://lightroom.adobe.com, log in using your Adobe Creative Cloud credentials, and then click on the Lighroom logo in the upper left and select “Technology Previews” from the drop-down menu.  Click the check box next to “Best Photos”, and you’re good to go.

There are two main tools available at this time:

  1. Intelligent Photo Search: This is already very impressive technology.  You can search all or a subset of your images using any natural language term you want.  You could, for example, search all your images for photos of cats, or of mountains, or of dancers, or of waterfalls.  The more specific your search term is, the more accurate the results are likely to be.  When I searched for “waterfall” or for “dancer”, the AI seemed to get many or most of my photos featuring those themes, and only occasionally did it include photos that did not feature those themes.  When my search terms were broader, like “clouds” or “mountains”, the results were less accurate.  Aesthetic searches, say for the color “blue” or the effect of “motion” resulted in mostly accurate selections of images featuring these concepts.  While there are a few false matches, and likely quite a few more errors of omission of images that should have matched, this technology is quite useful in its current state.
  2. Best Photos Selection: This one is more of a work in process.  You can select any of your online galleries and ask the AI to select what it “thinks” the best photos are.  You can move a slider to increase or decrease how selective this tool is.  As a default, it shows you its picks for the top half of your photos, and then you can refine the selectivity to include more or fewer photos.  I tried this advanced technology using several of my recent photo galleries.  In most cases, it included my two or three favorite images in its initial selection of the top half of all the photos, but dropped them from its cut as I increased the selectivity.  In one gallery, for example, an image that was recently selected as a favorite by the editors of “National Geographic” was dropped by Adobe’s AI in the first cut of 10% of the images.  That image was quite artsy and abstract, and it’s not reasonable to expect that a machine could choose it as special.  Yet in another of my galleries, the AI included an image that recently won a major local competition in its final cut of just 1% of the images.  That image is a more traditional landscape that could reasonably be evaluated by a machine as a “good” photograph.

The bottom line here is that the applications of advanced technology to the art of photography are improving at an astonishing rate.  While neither of Adobe’s AI tools is as good as a human artist at selecting images by their features or their quality, both tools are off to an impressive start and one of them (Intelligent Photo Search) is already very usable.  I would not be surprised if, in a year or two, this technology advances to the point where machines can be making decisions about photography along with humans.  Both human and AI evaluations will have their strengths and weaknesses, and I can see them coexisting for the foreseeable future.  I recommend we all, as photographers, get steeped in this advanced technology and prepare for a future in which man and machine will both play a role in sophisticated evaluation of images.

Please Join Me for a Hands-on Portraiture Workshop: Learn to make beautiful portraits using natural light

Dear Readers,

If you’d like to learn how to make beautiful portraits using just natural light and a few simple techniques, then please join me for a 2-hour hands-on workshop/class that I’ll be teaching on Sunday, October 14.  Held in a scenic location in Mountain View, CA, this class will cover the basics of techniques and tools, and then we’ll practice by shooting in the field with a wonderful model. Learn more or register for a session here: Kyle’s workshop on portraiture using natural light.

In today’s post I am sharing a few favorite images that we shot during a recent session of this workshop.  Working with our wonderful model Roxy, I walked students through the entire process of creating stunning headshots, full-body and action portraits, and environmental portraits, all using only natural light and with a minimum of gear, fuss, and bother.  Students learned how to configure their cameras, what lenses to choose for different portrait situations, where to shoot, how to pose and direct the model, how to use light modifiers (reflectors and diffusers), and much more.

Learning to capture flattering and eye-catching headshots is a basic requirement for portrait photography.

We will also learn to make full-body and action shots that bring out our subject’s true personality.

Always be on the lookout for special and playful moments.

I emphasize the artistic as well as the technical aspects of portrait photography.

Roxy really went the extra mile by climbing a tree wearing heels and a red dress!  In my hands-on portrait workshops, we will collaborate with fun and creative models.  Students will gain skills and a comfort level in directing models, even if they have never worked with a model previously.

You can see more details and book your place in the class here: Kyle’s workshop on portraiture using natural light.


Focus on Yellowstone and Grand Teton [Enore Publication]: The oldest national park in the US remains one of the best photographic destinations

My last visit to Yellowstone National Park and its nearby cousin Grand Teton National Park was in June of 2011, and I am long overdue for a return trip.  These two gems of the US National Park system are among the world’s best photographic destinations.  Featuring an amazing array of mountain scenery, geothermal activity, wildlife, and human cultural records, Yellowstone and Grand Teton are, simply put, indispensable destinations for travel photographers.  In today’s post, let’s look at a few of my favorite images from the 2011 trip and discuss how they were made.  While the parks haven’t changed too much over the past six years, the state of the art of photographic gear certainly has changed a great deal.  Today’s cameras and lenses will afford photographers even more options for capturing the remarkable beauty of these parks.

Yellowstone N.P. has more geothermal activity than any other region of the world, and this activity manifests itself in many fascinating ways.  The Mammoth Terraces area of the park is known for its gloriously delicate and colorful silica terraces, including the one in this image.  For a great landscape image, it’s best to combine the main subject (here, the silica terraces) with striking foreground and/or background elements (here, the Teton Mountain Range, behind).  I used a circular polarizing filter to bring out the drama in the sky and the highlights in the mountain range, but I dialed back the polarizing effect a bit so as not to eliminate the gorgeous reflections in the pools.  Buy this photo

Yellowstone and Grand Teton N.P.’s are filled with fascinating wildlife, including American bison, elk, wolf, coyote, marmot, osprey, and many other mammal and bird species.  Here I’ve captured (in images, of course) an intrepid coyote that cut across our hiking trail.  For striking wildlife portraits, it’s best to use a medium to long telephoto lens so as not to have to get so close as to stress the animal (or risk your own safety).  Tack-sharp focus is important, and I always strive to frame the subject with as uncluttered a background as possible.  Buy this photo

Photographs that tell stories are perennial favorites.  I love the humor apparent in this image, which tells the story of a standoff between a large male bison and two park rangers attempting to shepherd a convoy of park visitors across the field to an interpretive nature program and barbecue dinner.  At the time this photo was made, the bison was winning.  Buy this photo

Just as in a portrait of a person, a wildlife portrait should capture the spirit of the subject.  This large marmot was sitting up as if to get a better look at us.  His expression is both comical and wise.  To maximize the chances of capturing just the right expression and position, frame the subject first, set the proper focus and exposure, and then shoot continuously for several seconds.  Buy this photo

The quaint Chapel of the Transfiguration, located amidst some of the world’s most lovely mountain scenery in Grand Teton N.P., is a wonderful photographic subject.  Here I framed the Tetons in the chapel’s window and fired an off-camera speedlight to illuminate the walls and altar of the church.  Buy this photo

The iconic Moulton Barn sits on a field in Grand Teton N.P. with the glory of the Teton Mountain Range arrayed behind it.  This landscape image was made with great care to ensure a pleasing composition including barn, mountains, and cloudy sky, as well as to expose for the wooden texture of the barn.  A small aperture (high F-stop number) was used to keep the entire scene in focus.  I used a polarizing filter to bring out the drama in the sky and mountains, as well as to concentrate the lovely green and blue colors.  The scene was further enhanced to achieve a pleasing balance through tone and saturation adjustments in post-processing.  Buy this photo

I was drawn to the texture and patterns of the cracked muddy ground in a geothermal area of Yellowstone N.P.  Composing the image to include just enough of the pattern as well as leading lines to draw the eye downrange, I converted it to black-and-white and made adjustments to contrast and tonal range in post-processing.  Buy this photo

Yellowstone’s Grand Prismatic Spring is a breathtaking feature that is almost impossible not to photograph well.  That said, there are techniques to capture it in all its glory.  Grand Prismatic Spring is one of the world’s few iconic subjects that is best photographed in the harsh light of mid-day, when the reflection from the direct sun most vibrantly brings out the array of colors.  Unless you can shoot it from above, looking directly down on the spring, it is best to include some foreground and background elements other than the spring itself, to provide context.  Here, I framed the spring through some lodgepole pine trees and included some forests and mountains in the background.  Buy this photo

Every visitor to Yellowstone N.P. will stop to observe some geyser eruptions.  But instead of just shooting straight on during mid-day into the eruption of a famous geyser like Old Faithful, seek out some of the lesser-known geysers at sunrise and sunset, and compose to include compositional elements other than the eruption itself.  This image, a favorite of mine, was made on a geyser basin at sunset.  I set up the camera on a steady tripod, set the exposure for a wide depth-of-field, and composed the scene to include the cracked earth and and the reflection of the sunset and eruption within the pools of sulfurous water.  Buy this photo

I can hardly wait to return to Yellowstone and Grand Teton National Parks!  I’m even more eager to visit during the winter than during the much more crowded summer months.  The rich array of scenery, wildlife, and otherworldly geothermal features elevate these parks to the pinnacle of travel photography destinations.

Have you visited Yellowstone and Grand Teton?  What did you find most remarkable?  What do you recommend your fellow travel photographers shoot while there, and what techniques do you use?  Please share your comments here.

Want to read other posts about travel photography destinations around the world?  Find them all here: Posts on Destinations.


Capturing a Sense of Place [Encore Publication]: A case study on how to integrate the natural surroundings into a creative photo shoot

Whether halfway around the world or in my own backyard, I strive to capture a strong sense of place in my work.  Most often we associate “sense of place” with images of indigenous people living close to the land, but this sensibility can be extended to incorporate the local natural surroundings into any creative images.  As I collaborate with local people close to my home in the San Francisco Bay Area, I’m always seeking ways to integrate the intense beauty of our landscapes into my work.  Today’s post is a case study on this theme based on a recent shoot I did with a favorite movement practitioner, mia.

mia is an amazingly intuitive artist who improvises her movement by sensing the energy of the space around her, so we chose a glorious and deserted stretch of the central California coastline near sunset for our shoot.  We built in plenty of time, more than two hours, and I gave mia lots of space to move with very little direction on my part.  I had all my gear ready and was wearing beach attire myself so I could just let her create her art while following her and capturing her expressive movement using my own creative approach.

In the following images, presented as a photo essay with just brief captions explaining how they were made, I share the results of this collaboration.  You can view or purchase all of these images and many more in this gallery: mia beach shoot photo gallery.

My gear was simple: two camera bodies, one with a fast prime normal lens (and occasionally with a fast prime portrait lens), the other with a wide-angle zoom lens.  Obviously, these optics were selected so that I could alternate between capturing mia up close and documenting her motion within the broader environment.  All images were made with natural light only and were handheld.  A general piece of advice is to shoot lots of frames to ensure capturing your model during the moments when they express just the right sensibility, gesture, or emotion.  Memory card storage space is cheap and abundant, so always shoot more images than you think you need.

Using the wide-angle lens, I captured images of mia interacting with the space around her.  This “environmental portrait” technique helps create a strong sense of place.

Even with the glorious color palette of a California coastline near sunset, there were times I chose to render the images in black-and-white to achieve a timeless graphics art look.

Environmental portraits, full-body shots, and head shots are not the only options when shooting creative portraits.  Here I chose to capture only mia’s legs as she traced a circle in the wet sand.  Sometimes the part can be more interesting than the whole.

Shooting from a low angle just above the water, I captured a powerful vision of mia interacting with the ocean.  Obviously one has to be careful of one’s gear when choosing to shoot so close to salt water, but I love the resulting image made from this perspective.

Not every image needs to be tack sharp.  I like to create a sense of motion by using a slow shutter speed to blur the movement.  Here I was able to achieve a slow enough shutter speed by using my camera’s slowest native ISO setting along with a very small aperture setting, but sometimes in very bright light a neutral density filter has to be used.

Note that when shooting a backlit subject it is crucial to choose an exposure based on the light coming from the model rather than allowing your camera’s meter to choose the exposure for you (unless you are trying to create a silhouette).  Two techniques suitable for this situation are spot-metering on your subject’s body or dialing in at least two stops of exposure compensation.

As sunset approached, I shot a series of images using both wide-angle and closeup perspectives.  This shot nicely captures mia from a medium distance, close enough to see some detail in her expression while far enough away to include some sense of place.

The setting sun can evoke very powerful emotions.  It can be risky to include the sun in your images, so tread carefully.  Careless shooting into the sun can cause permanent damage to both the photographer’s eyes and the camera’s sensor.  This image was made moments before sunset under conditions I assessed to be safe, but if in doubt do not ever shoot into the sun.  

A wide-angle capture suggests mia’s celebratory motion as the sun sets, but she appears relatively small within this awe-inspiring natural environment.

At the moment of sunset, a parting shot is made where mia bids farewell to the day.  I chose an exposure partway between silhouette and spot-metering on mia’s body so as to show some detail on her expression while allowing the ocean and sky to shine.

I hope you’ve found these images to be inspiring and the associated tips to be helpful.  Now go out in your own neck of the woods make some images that integrate a sense of place into your favorite subjects!

Do you have techniques you use to infuse your local images with a strong sense of place?  Please share them here.

Want to read more posts about what to shoot while near home or traveling?  Find them all here: Posts about what to shoot.

Focus on Edinburgh [Encore Publication]: Ancient and modern, Scotland’s capital city offers great architecture, museums, and more

At the end of our two-week hiking adventure in Ireland, we added a stop in Edinburgh for a family visit.  Ancient and modern at the same time, Scotland’s capital offers a wide range of experiences for the traveler, and a wide array of subjects for the travel photographer.  From architecture to museums, castles to palaces, glorious views and creative contemporary cuisine, this city has become a world-class destination.  Here is a brief photo essay capturing some of our experiences there.

The main attraction, dominating the city from its high central vantage point, is the ancient Edinburgh Castle.  It’s an easy walk from the center of town up the hill to tour the castle.  On the way up, a variety of interesting views of the castle unfold.  Try different lenses and compositions to take advantage of the many moods of this place.

Edinburgh Castle towers above the city center and offers a variety of different perspectives for the photographer.  Here I’ve shot from halfway up the hill using a telephoto lens and polarizing filter to isolate this one portion of the edifice and to enhance the stonework and the sky.  Buy this photo

Edinburgh’s Royal Mile stretches from the Castle down to the Palace at Holyrood House.  It’s easy to see this street as a shopping mall jammed with tourists, but it would be a shame to overlook the stately old architecture and the little closes (alleyways) off the main street.

To make this image along the Royal Mile, I chose an unusual perspective and used a medium telephoto lens to align the different colors, textures, and angles of the statue with the cathedral.  Buy this photo

Edinburgh is changing.  During several visits over the decades, I’ve heard many a bagpiper playing in the center of the city, but this is the first time I’ve met a female piper.  She was happy to pose for a portrait.  Buy this photo

Brightly painted façades lend a splash of color to the old stone architecture in this lovely neighborhood.  Buy this photo

Scottish food has also evolved a great deal in recent years, with several restaurants serving contemporary takes on traditional Scottish dishes.  Nowhere is the ambiance nicer than at the Witchery by the Castle, along the Royal Mile.

To capture the lovely interior of the Witchery, I used a fast normal lens and a high ISO setting.  This scene was lit entirely by candlelight and a few sconce lights in the ceiling.  Buy this photo

Revisiting Edinburgh Castle on our second day, I wanted to shoot it from a different perspective at a different time of day.  During post-processing I decided that a black-and-white rendering of the image would highlight the austere tone of the castle.  Buy this photo

Edinburgh has a proud literary tradition, from Burns to Scott to Stevenson.  The city’s literature museum, while small, is worth a visit.

I couldn’t resist capturing this display sign in the Writers’ Museum highlighting the Stevenson quote that graces the name of this website.  For more on the importance of this quote to the development of my passion for travel and photography, please see this page: About To Travel Hopefully.

At the other end of the Royal Mile from the Castle lies the Palace of Holyroodhouse.  This is the Queen’s official residence when she’s in Scotland, and its tour is first-rate.  While photography is not allowed inside the lovely palace, it is okay to photograph the stately and much older abbey adjacent to the palace.

Again here, I tried to seek out an unusual perspective in this shot of the abbey at Holyroodhouse.  I shot upward with a wide-angle lens, using spot metering to expose for the stonework and a small aperture to provide broader depth-of-field.  Buy this photo

I made this portrait of our daughter with two of her friends from university by stepping back and framing them using a medium portrait lens.  I chose a medium aperture to ensure sharp focus on the subjects while also keeping the façade of the abbey reasonably sharp.  Buy this photo

Behind Holyroodhouse is a hill towering above the city.  A short but fairly strenuous hike leads to Arthur’s Seat at the summit.  From the summit there are glorious views over the whole of the Edinburgh area.  This image of the Palace at Holyroodhouse was shot from partway up the hill.

A view of Holyroodhouse from partway up the hike to Arthur’s Seat.  A polarizer helped bring out the drama in the sky and the saturated green of the lawns.  Buy this photo

On our final evening in Edinburgh, we dined on exquisite contemporary Scottish cuisine at the Tower Restaurant.  Sitting atop the Scottish National Museum, this spot has marvelous views over the city to the castle.  The view shown in this image was just as marvelous.

To photograph the beautifully plated trio of smoked Scottish salmon accompanied by a glass of old single malt whisky, I shot from above using a touch of off-camera flash to balance the ambient light of the restaurant.  I used a diffuser on the flash and bounced the flash off the wall to soften its light.  To learn more about food photography, check out this post: Post on Food Photography     Buy this photo

Scottish traditional music is alive and well and performed almost every night at Sandy Bell’s Pub.  This portrait was made using my favorite portrait lens set to a wide aperture, with a high ISO setting on the camera.  The shallow depth of field throws the whistle player into soft focus, so the emphasis in the image is placed on the fiddler.  Buy this photo

Have you visited Edinburgh?  What are your favorite spots there?  What experiences should a photographer be sure to seek out?  Please leave your comments here.

Want to read more posts about travel photography destinations?  Find them all here: Posts on Destinations.

Nikon’s New Mirrorless Cameras [Encore Publication]: Impressive new technology catches and beats Sony, but issues remain

Update from 9/6/18: Canon joins Nikon in announcing its first full-frame mirrorless camera system.  Read more about Canon’s new EOS R system here: The Verge article on Canon EOS R.  Canon’s initial launch will include a more extensive and useful lens lineup than Nikon’s, but both manufacturers have a lot of work to do in order to catch up with Sony’s portfolio of lenses.  Canon’s initial feature set seems less advanced than that of Nikon’s high-end Z7 camera.  It’s unclear at this time whether either Canon or Nikon will have an edge in usability over Sony’s design, but, frankly, Sony has set the bar very low with a complicated menu system and a poor set of controls.  It is becoming increasingly clear that mirrorless is the future of professional and enthusiast photography, but for the next few years DSLR technology will retain some key advantages.  Read on to see my original post from a few weeks ago when the Nikon launch was announced.

=======

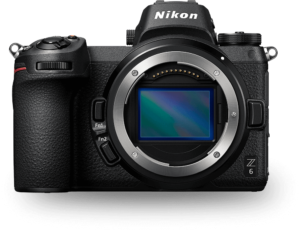
After months of teasing, Nikon has finally announced the details of their first-ever mirrorless camera launch.  The Nikon Z Series, with its first two models, the Z6 and Z7, represents the venerable company’s most ambitious new product launch in years.  Not surprisingly, the new full-frame Nikon models take aim squarely at Sony’s popular A7 III and A7R III models, with similar pricing and specs, respectively.  The Nikon Z6 will be priced at $1995.95 (body only) and the Z7 at $3399.95 (body only).  Initially only a 24-70mm f/4 “kit lens” and fast 35mm f/1.8 and 50mm f/1.8 prime lenses will be available, with more Z-mount lenses to launch in the future.  An adapter will also be available at additional cost to allow use of many existing F-mount lenses on the new Z Series bodies.

Details of the new cameras can be found on Nikon’s website: Nikon’s new mirrorless cameras.

While these new cameras offer very impressive technology and catch–and in many ways leapfrog–Sony’s mirrorless offerings, there are some disappointments specific to this Nikon launch as well as plenty of issues facing mirrorless cameras in general.
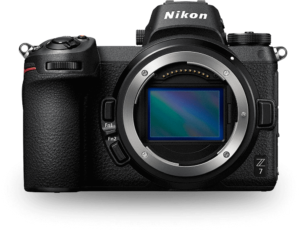
Regarding the shortfalls specific to the new Nikon Z6 and Z7, here are a few of my observations for how they fall short of my expectation:

  1. They lack a second memory card slot.  For pro shooters, this is a showstopper.
  2. The initial lens lineup will be very sparse, with only three lenses.  Over the next couple of years, Nikon will be rolling out additional lenses, but compared to the venerable F-mount glass lineup, the new Z-mount offerings will remain thin.
  3. The lens converter to enable use of existing F-mount lenses will have a considerable additional cost, won’t allow full auto focus and exposure on many existing lenses, and will likely cause the autofocus to perform slowly.

Mirrorless camera technology in general suffers relative to DSLR technology in substantial ways:

  1. They’re really not all that small and light relative to pro-level full-frame DSLR bodies.  And after the weight and bulk of the many lenses required by series shooters are factored in, the mirrorless kit ends up almost as heavy and bulky as a comparable DSRL system.  A related issue is that many shooters find the smaller mirrorless bodies to be unbalanced when fitted with a heavy and large professional lens.
  2. The electronic viewfinders (EVF) on mirrorless cameras have evolved quite a bit in recent years, but they remain difficult to use, in my opinion.  They suffer from flicker and slow refresh rates, and they just don’t provide a realistic view of the scene.  It’s like looking at the world through a miniature TV screen vs. seeing it through your own eyes.
  3. Replacing not only our existing camera bodies but also all of our lenses to make a full move to native mirrorless technology is a very expensive prospect.
  4. With no mirror to protect the sensor, it’s very easy to get dust and dirt on the sensor when changing lenses.
  5. The Sony A-series suffers from poor usability (most functionality is relegated to sub-menus that are difficult to navigate) and from scant weather sealing that doesn’t meet the needs of most professional travel photographers.  I’ll have to get the new Nikon Z-series in my hands to assess whether Nikon has resolved these issues for their new offering.

With Nikon now joining Sony in the pro-level full-frame mirrorless game, and with Canon gearing up to announce its own mirrorless offering, there is increasing evidence that mirrorless technology represents the future of photography.  That said, as of today there are plenty of good reasons to continue using DSRL technology for its robustness, better viewfinders, much fuller lens lineups, and investment protection.  I’ll be much quicker to upgrade my Nikon D810 bodies by buying a pair of Nikon D850 bodies than by purchasing Nikon’s Z6 or Z7 bodies.  Your mileage may vary, and I’m eager to hear feedback from “To Travel Hopefully” readers.

Please share your thoughts about the new Nikon Z-series and about mirrorless vs. DSLR technology in general!

Want to read more posts about travel photography gear?  Find them all here: Posts about Gear.