Getting Oriented: Shooting vertically as well as horizontally expands your artistic vision

Who says a portrait image has to be shot in portrait orientation, or that a landscape photo must be shot using landscape orientation?  Rules are meant to be broken, and they call it “artistic license” for a reason.  I would estimate that a third of my people images are shot in landscape (horizontal) orientation, and that a third of my landscape images are shot in portrait (vertical) orientation.  It’s always a good idea to shoot at least a few frames in both orientations so you can decide later which ones work best for your artistic vision.  Let’s take a look at a few examples.

Laura is one of my all-time favorite models (she also creates all her own costumes and does her own hair and makeup), and she looks great framed in any orientation, but I think her remarkable inventiveness is shown to good advantage in this composition using landscape orientation.  Buy this photo

It’s a cliché that people pictures should be composed vertically, so that we can fill the whole frame with the model’s head or full body.  A lot of the time this portrait orientation works well.  But there are some good reasons to shoot people images using landscape orientation as well as portrait orientation.

First, sometimes the model’s pose or the environmental elements around the model favor a horizontal image.  When traveling, I like to shoot environmental portraits that show us more than just the person by including elements of his or her home, livelihood, or lifestyle.

Second, we need to think about how the image will be used.  If I’m shooting publicity photos for musicians, for example, I know they need horizontal images at least as often as vertical images, so as to meet the requirements for the venues and promoters with whom they work.  Magazines and billboards often require landscape orientation, as well.  Even more prosaic uses of our photos, such as Facebook or LinkedIn cover photos, must be oriented horizontally.

Third, some portraits just cry out artistically to be framed in landscape orientation.  The image of the model Laura, above, for example, just works better to my eye in horizontal format, because the negative space behind her leads the viewer’s eye to admire her remarkably creative style, and leaving the lower part of her body and her dress out of the image allows us to focus on her expressive face.

By the same token, there are some good reasons to shoot landscape images in portrait orientation.

First, there could be some limitations to the left or right of the frame that, when shot horizontally, could distract from the power of the image we want to create.  Think about a coastal landscape with a glorious sunset sky and delightful foreground elements such as rocks with water flowing around them, but to the left of our vantage point there’s an unattractive pile of litter.  Frame the image in portrait orientation and avoid the problem.

Second, there are publication media where portrait orientation is required.  Knowing where the image is likely to be published will dictate the orientation in which we shoot.  A card or trifold brochure, for example, will likely require a vertical shot.

Third, again, consider your creative vision.  This night landscape of the Milky Way over Yosemite National Park’s Half Dome also worked beautifully in the more traditional landscape orientation, but here I shot the same scene using portrait orientation to frame the granite mountains with a circle of trees and to create a leading line using the Milky Way’s galactic core to bring the viewer’s eye around the valley’s landforms and the night sky.

This night shot of the Milky Way over Yosemite Valley works especially well in portrait orientation because the pine trees create a frame around the leading line of the galactic core.  Buy this photo

Whenever possible, remember to mix it up and shoot with the non-standard orientation for at least a few frames.  You may find your best shots–and the most marketable ones for placement in certain forums–are the ones you make using the unconventional orientation.

Do you have a favorite image that you shot using the opposite orientation from the expected one?  Please share your experiences here.

Want to learn some more photographic techniques?  Here’s a list of all my posts dealing with the technical aspects of travel photography: http://www.to-travel-hopefully.com/category/techniques/


When Someone Shows You Who They Are: How to make great portraits while traveling or near home

“When someone shows you who they are, believe them the first time.” ~Maya Angelou

I have long believed that travel equates to growth; that we cannot know our place in the world until we have experienced the lives of people in many different places.  Of all the joys of travel photography, to me the greatest is having the chance to meet people from very different backgrounds, to get to know them for a few minutes or for much longer, and to collaborate with them to make memorable images.

A recurring theme in this forum will be how to use our cameras as a bridge to learn about and to share insights into other cultures.  But the emphasis of this particular post is on the technical elements of creating portraits.  These techniques apply as well to shooting portraits across the street from our home as to making great people images halfway around the world.

Most portraits that we see published in magazines or photography books were made in the studio, where the photographer has complete control over the lighting and background, and often is working with a professional model.  But when we’re traveling, there’s often only a moment after getting to know a person and receiving their permission to photograph them, during which to set up our gear and shoot.  We have to live with whatever lighting is available and often must make do with a cluttered background.  To make this portrait of a woman enjoying a coffee break at a carpet-weaving collective in Turkey, I wanted to give the image a soft, flattering look and to bring out the rich, saturated colors of her clothing.  I chose a smaller than usual aperture to provide greater depth-of-field, so that the old house itself became part of the environment.  To accommodate the soft and dim natural indoor lighting, I used a higher ISO setting and a slower shutter speed.

Turkey This portrait set in a weaving collective in Turkey evokes a sense of place and a mood of quiet repose.  Buy this photo 

While trekking in Nepal, we stopped to rest at a teahouse where these two sisters were also taking a break along their journey.  I wished them “Namaste,” or well wishes, and they responded with a traditional hand gesture of greeting.  This image was made long before the digital era on a film camera with a normal lens and natural lighting only (had I had a flash unit handy, it would have helped to bring out the girls’ hair against the dark background).  I love the warmth of the girls’ expressions and the simple but bright colors of their dresses set off against the black background of the teahouse’s interior.

NepalA friendly welcome from these two young sisters at a rural teahouse in Nepal.  Buy this photo

Sometimes we want to tell the viewer more about our subject than what is possible in a simple close-up portrait.  An environmental portrait allows us to include more than just the subject by zooming out and bringing in other elements.  I photographed this maker of traditional Turkish instruments in his workshop while he tested a nearly-completed Bağlama, surrounded by other partially made instruments.  To my eye, the resulting portrait is more compelling than a close-up because it shows the subject in his environment.  To make this portrait, I used a wider focal-length and a narrower aperture so as to have more of the environmental elements in the frame and in focus.

TurkeyAn environmental portrait of a maker of traditional Turkish musical instruments.  Buy this photo

A portrait doesn’t have to portray a stock-still person posing for the camera.  Some of my favorite portraits evoke a strong sense of motion.  I made this portrait of a samba dancer during the Carnaval San Francisco annual parade by getting in close and shooting with a medium-length telephoto lens set to a small aperture to soften the background.  I used a fast shutter speed to freeze the action (although sometimes a slower shutter speed can be used to create a nice blurred effect).  In post-processing, I cropped the image to further isolate the dancer and emphasize the grace of the motion.

USA This dancer in a Brazilian Samba krewe was captured in a tight composition that was further cropped in post-processing to give a strong sense of motion.  Buy this photo

Keep an eye on the total composition when framing a portrait.  It’s more than just a matter of framing the subject within the image: other considerations include the background and the overall flow of the viewer’s eye across the image.  In this portrait of the proprietor of Maria’s Cafe in rural Cuba, I composed the image to use the brightly colored door, balcony, staircase, and tree to frame the subject herself.

CubaComposing a portrait involves thinking about the background and the viewer’s overall experience in looking across the image.  Buy this photo

A really good portrait should tell a story about the subject.  Here, Cuban tobacco farmer Benito relaxes in his drying barn with a cigar he just rolled from his tobacco harvest.  I got in close and used the natural light of his cigar lighter and the diffused sunlight within the barn, with no flash added.

CubaThis portrait of a Cuban tobacco farmer tells a story about who he is and what he does.  Buy this photo  

Consider the angle from which you shoot a portrait, as it has a strong influence on the emotional response of the viewer.  Most of the time we want to shoot a head shot or head-and-shoulders shot from a height midway between the top and bottom of the image, but to make this portrait of sisters on the outskirts of Arusha, Tanzania, I chose to shoot from slightly above.  It’s a fine line between giving a sense of vulnerability and causing the image to seem condescending, but I like this photo in part because I feel the unusual vantage point evokes a strong sense of emotion.

TanzaniaAn unusual shooting angle can enhance a portrait, but be careful not to overdo this effect.  Buy this photo

Another rule meant to be broken is freezing the action of a portrait’s subject.  During a fitness photoshoot with my friend Crystal, I shot mostly with a fast shutter speed to freeze her while she worked out.  But for this image, we wanted a blurred effect to create a sense of her forward motion while running, so I used a slower shutter speed.

A slower shutter speed can be used to give more sense of motion to a rapidly moving subject.  Buy this photo

Sometimes a perspective change can work wonders for a portrait.  In this image of the chief of a remote village in Swaziland, I got down low and shot with a wide-angle lens to portray her in the context of the hut behind her and the gourds she holds in her hands.  A wide view in a portrait can lead to less-flattering likenesses, so this effect should be used sparingly.

SwazilandA wide-angle lens and unusual perspective shooting from low to the ground lend this portrait of a Swaziland village leader a sense of connection to the place.  Buy this photo

A note on gear: My go-to portrait lens is the Nikon 85mm f/1.8G lens.  This is a classic portrait lens and provides a flattering perspective and great image quality when your subject is a human.  I use it for nearly all of my portrait work these days.  But this lens also shines for nature and action photography where you don’t need a really long focal length.  It renders really lovely “bokeh,” or the soft quality of the out-of-focus parts of the image.

Which of your portraits do you find most memorable, and why?  How did you create them?  Please share your thoughts here.


The Raw Truth: Why you should always shoot in RAW mode

For many years after I took the plunge into digital photography, I had my camera set to store image files in the JPEG format only.  I now realize that during those years I was throwing away a lot of very valuable information with every photo I made.  There are two main reasons for this information loss.  First, the JPEG format does not store the detailed data for each pixel in the camera’s sensor but instead does some processing according to your settings and then saves only stripped-down information from each area of your image.  Second, the JPEG standard is what’s referred to as a “lossy” format; every time it is opened and resaved, the image loses more detailed data.  Once your image data is thrown away, you cannot retrieve it.

By contrast, the RAW file format keeps all the data your camera’s sensor “sees” for every pixel in the image.  Yes, RAW files are bigger and take a bit longer to store on your camera’s memory card than JPEG files, and yes, they take up more space on the memory card and on your PC’s hard drive later.  For those early years of digital photography, I avoided shooting in RAW mode because I was concerned about having reduced shooting speed and storage space for these monster-sized files.  I also was concerned that it would be too much work to shoot in RAW mode because RAW images require post-processing in order to look their best.  I now realize that I had been making a big mistake.  Shooting in RAW all the time, even when high speed is needed for action shots, ensures that you’ll always have the most image data to work with later.  You will be able to crop your images more tightly, print them to larger sizes, and especially important, refine the exposure and color with far more control if they were shot in RAW format rather than in JPEG or other compressed formats.

I now shoot nearly exclusively using my camera’s setting to save files as both RAW and JPEG.  Having the JPEG version of each image can be helpful if I want to share the photo right out of the camera.  It will look pretty decent without any post-processing because the JPEG file is stored with all of the camera’s settings for white balance, sharpening, and so on.  But when I come home from a trip, I always do my post-processing on the best images using RAW files exclusively.  Because the RAW format stores so much more information about the color and brightness of every single pixel of the image, I have much more freedom in how I choose to develop the image using my editing software (typically Adobe Lightroom, but occasionally I also use Adobe Photoshop).

Below, I show two files of the same image of my wife and me by a “fairy chimney” rock formation in Cappadocia, Turkey, both processed in exactly same the same way in Lightroom, but the first one was originally saved by the camera as a JPEG while the second was originally saved in RAW mode.  While the differences may be subtle at the size and resolution shown in this post, you can still make out more details in the RAW file, especially in areas shrouded in shadow.  The color of the sky is deeper.  Colors and shapes are rendered with more accuracy.  And of course, if we needed to crop or enlarge these images to a much bigger size, the quality of the JPEG file would deteriorate much sooner than would the RAW file.

 The JPEG version of this image.

 The RAW version of the same image.

I recommend shooting in RAW+JPEG all the time, unless you know you will need the slightly faster shooting speed or extra storage space of JPEG alone.  Doing so will give you the best of both worlds: a quick and easy JPEG to share right out of the camera, and the much more detailed data in the RAW file from which to bring out the nuances in color, texture, and exposure later during post-processing.  If you use JPEG alone, you’ll be throwing away image information you may wish you had later.

Do you shoot in RAW mode?  If so, what do you like about it?  If not, why not?  Please share your thoughts here.

Under the Milky Way Tonight: How to make great images including our home galaxy

Not too long ago, making images of the Milky Way was not practical for most photo enthusiasts.  Only astronomers and a handful of professional astrophotographers had the expensive equipment required to capture sufficient light from the cluster of quite dim stars that we refer to as the Galactic Core in the night sky.  Shooting with a very long exposure didn’t do the trick for the Milky Way, because leaving the camera’s shutter open for more than about 15-30 seconds would blur each stars image due to rotation of the Earth.  These blurs, called star trails, could make for striking images with the stars appearing to streak in circles across the sky, but the subtle beauty of the Milky Way would be lost with these long exposures.

But in the last five years or so, camera sensors have become much more sensitive to light, and now it is possible–indeed quite easy–for photo enthusiasts to photograph our home galaxy without expensive specialized equipment.

Here’s how:

You will need a camera with a sensor that can gather a lot of light and with a shutter that can be kept open for a long time.  These requirements limit the range of suitable cameras to full-frame DSLRs and advanced interchangeable lens mirrorless cameras.  You will also need a fairly fast wide-angle lens: I recommend a zoom or prime (fixed focal length) lens with a focal length of 14-16mm on a full-frame camera, and a maximum aperture of f/4 or faster.  For astrophotography I most often use the Nikon 16-35mm f/4 lens.  It’s got great image quality and is well built, and of course it is wide enough and fast enough for the purposes of capturing the Milky Way.

You will also need a heavy, solid tripod.  I’ve been successful using a lighter weight tripod for Milky Way shots while traveling, but a good professional tripod is better.  I use the SLIK 615-315 with a ball head.

Finally, you’ll want to have a remote shutter release, either a hardwired cable release or a wireless remote release.  This is to trigger the camera without touching it, so as to avoid blurring the image from the vibration of your touch.

Once you have the right equipment, it’s fairly straightforward to photograph the Milky Way.  Choose a dark sky area, far away from the light pollution of any cities or other sources of stray nighttime light.  Shoot toward the Galactic Core where the stars of the Milky Way appear brightest and most colorful.  To plan for where the GC will be on any given date and time and at any given location, I use a smartphone app called PhotoPills: PhotoPills in App Store.  Try to include foreground and/or middle-ground subjects to add interest to your composition.  The image below, made at Yosemite National Park, is appealing because the Milky Way is seen rising above the iconic peak known as Half Dome.

The Milky Way is seen arched through the sky above Half Dome and other landforms in Yosemite Valley.  Careful composition adds drama to your Milky Way images by including Earth-based subjects as well as the sky.  Buy this photo on my website

With your fast wide-angle lens on your full-frame camera, all mounted on your stable tripod, you are ready to shoot.  Remove any filters on the lens, set your camera on full manual mode, select a fast ISO (I usually start at about 3200 and sometimes have to go even higher) and a wide aperture (f/4 or wider), and choose a shutter speed of 20-25 seconds (shorter if your lens is longer than about 18mm).  You can use the 500 Rule, which states that shutter speed should be approximately 500 divided by the focal length of the lens; for example, for a 16mm lens you can use a shutter speed of not longer than about 31 seconds.  Turn off your autofocus on your lens or camera, as it will not work in so dark a setting; instead, manually set your focus to a point near infinity where the stars appear sharp in your viewfinder (or better yet, on your live-view screen).  I like to tape my lens to this setting before it gets dark, so I know the focus won’t change while I’m out in the field in the dark.  It’s also a good idea to turn off your camera’s long-exposure noise reduction feature, if it has one, as this wastes time in the field and it’s equally effective to reduce the noise in Lightroom during post-processing.  Of course, you want to be sure you are shooting RAW files.

Go ahead and shoot a lot of frames, experimenting with different ISO settings and compositions.  It is often a good idea to get a very long exposure, sometimes several minutes long, so that your foreground subjects will be properly exposed.  The frames with the foreground well exposed can later be combined in Photoshop with the ones in which the night sky is properly exposed.

This image was made from several frames: one long exposure for the lake, trees, and mountain in the foreground and middle-ground, and several different 25-second exposures that each captured a different meteor during the peak of the Perseid Meteor Shower.  The resulting image shows all of these objects quite prominently, along with the Milky Way.

You may want to combine several different images to see all the features of the night sky and the terrestrial objects clearly. Buy this photo on my website


With practice, you’ll find that capturing the Milky Way is within your reach, so long as you have suitable equipment and the patience required to compile enough images that a few will turn out to be successful.  I believe it’s well worth the effort because a good Milky Way shot is so subtle, colorful, and strikingly beautiful.  Good shooting!

Have you created a Milky Way image that you love?  What were the key components to your success?  What were the challenges you faced?  Please share your thoughts and experiences here.


I See a Red Door and I Want to Paint It Black: When a black-and-white image is better than color, and how to convert to B&W

Back in the day, a photographer had to choose in advance whether to shoot with color film or black-and-white film.  Conversions from color to B&W were cumbersome and expensive, and conversions from B&W to color were essentially impossible.  During the film era, I typically shot exclusively using color transparency film while traveling, and reserved B&W photography for particularly artistic shoots near home.

Thankfully, in today’s digital world, we no longer have to commit ourselves in advance to monochrome vs. color images.  It’s now a simple procedure to convert our color images to B&W during post-processing.  And that’s a great blessing, because there are plenty of times when a black-and-white photo is better than a color photo.

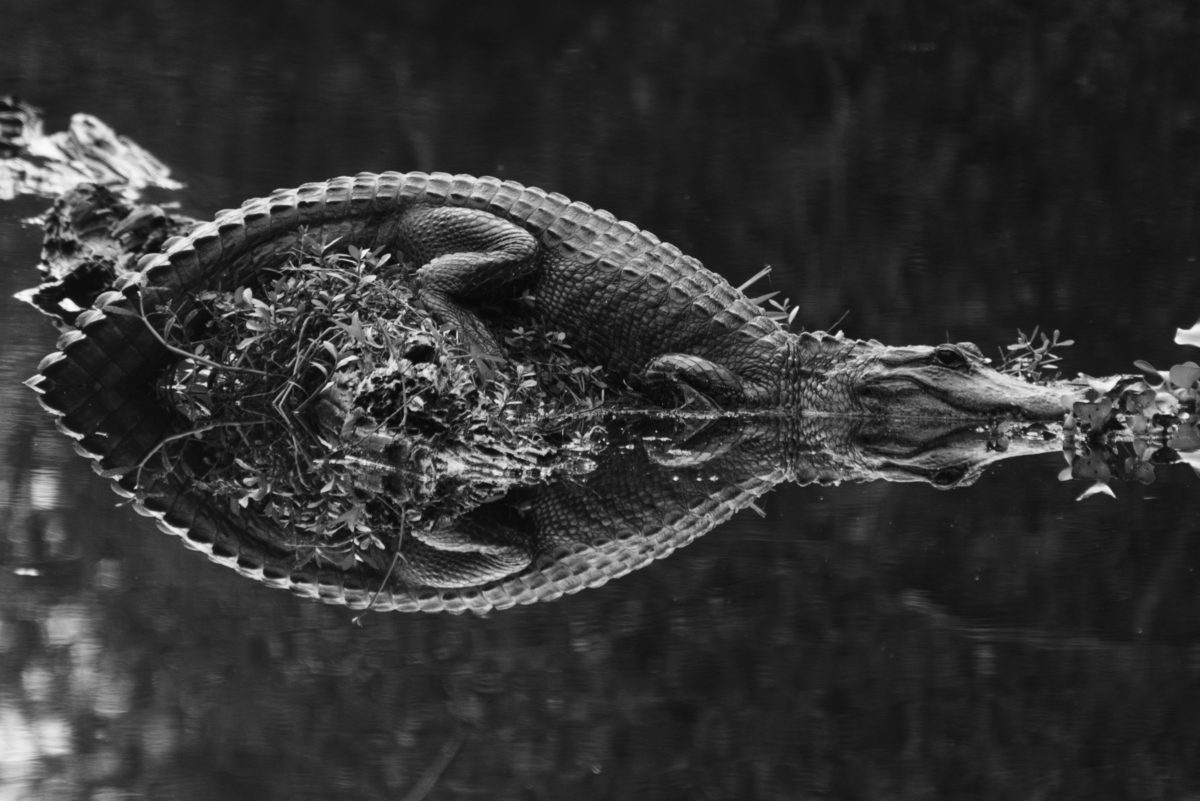
Consider the image of the alligator at the start of this post.  One of my favorite photos, this one works just fine in color, too.  But the real power of the image is revealed in B&W through the striking textures of the alligator’s skin as seen above the water and as reflected off the water’s surface.  The background above the water fades to a deep, nearly true, black, with the background of the water itself rendered slightly less darkly and showing some nice ripples of motion.  Black-and-white photography is especially powerful when there are contrasts of pattern, texture, and background as in this image.  Buy this photo on my website

When else might we want to render an image in B&W?

Portraits made in monochrome have a timeless look that evokes the earlier years of photography, and this rendering can also bring out the true nature of the subject.  There’s a lovely look to the skin tones and hair when displayed in B&W, and there are fewer distracting elements from the color of clothing or background objects.

This portrait takes on a vintage, timeless look when shown in B&W.  Our eye can focus on the model’s face and hair without the distractions of the colors in her sweater or the building.  There’s almost a street photography kind of documentary quality to this image in monochrome that is lost when viewed in color.  Buy this photo on my website

Color can be distracting in an image where we want to emphasize the essence of a person or place.  In this portrait I made recently for a couple who are fellow musicians and friends of mine, we had beautiful “golden hour” light to work with, and the background and clothing worked well in color.  But converted to B&W, this image really places the emphasis on the couple without the distractions of the color cast in the reflections off the eyeglasses or of the mixed lighting in the background.

In this portrait, black-and-white presentation places the viewer’s attention squarely on the the couple and their instruments, without distractions from the multiple colors of the clothing and background components.  (Client photo not available for purchase.)

When you’re shooting under “mixed lighting”, which means there are multiple light sources with different color temperatures (i.e., some light sources are warmer and others are cooler), converting the image to B&W can be a real problem solver.  Consider the image below, made in Bruges at night.  The light from the street lamps was warmer than the light coming from the spotlights on various buildings, and there was also a bright moon that night, so when seen in color the photo would look less appealing due to the contrasting of the color temperatures in the different parts of the image.  But viewed in B&W, it brings out the grandeur of the old buildings and the beauty of the reflections in the waters of the canal, without the distractions of the color casts.

This image of Bruges at night, when processed in B&W, removes the contrasting color temperatures of the multiple different light sources and allows the viewer to enjoy the stately old buildings with consistent tone and texture.  Buy this photo on my website

Now that we’ve covered a few of the many situations in which a black-and-white image is preferable over a color image, let’s look at how to convert from color to B&W.  There are many ways to perform this conversion, but I recommend it be done using the Color Adjustments settings in the Develop module of Adobe Lightroom.  Here’s how:

Click on the “B&W” tab above the individual color channel sliders, and then adjust the mix of how the colors are blended by increasing or decreasing each color’s slider to see how the black-and-white image looks.  I find that I often have to readjust the contrast slider at this point to get the image looking its best in black-and-white.


For more on using Lightroom to post-process your images, check out my previous post: Previous post on using Lightroom to post-process images.

I do not recommend using your camera’s built-in black-and-white mode, as you will then lose the color information in the image file.  I also do not suggest using the settings some cameras have to make a copy of the image in B&W, because in most cases the camera’s built-in software will not do a very good job of rendering the image in monochrome.  For the best results, either use Lightroom or a dedicated black-and-white conversion application such as Silver Efex Pro 2 from Nik Software, which is available as a plug-in for Lightroom or Photoshop.

What do you love about a black-and-white image?  When do you convert an image to B&W rather than share it in color?  Any tips or tricks for how to make great B&W photos?  Please share your thoughts in the comment box!


Beyond the Auto Mode: Take control of your images by learning to manually set exposure, focus, and more

Travel photography is so exciting and satisfying in part because it requires us to capture every kind of image in all kinds of shooting environments.  You could be heading out to shoot landscapes when suddenly a rare sighting of an animal transforms your activity into a wildlife shoot.  Or you may be on the road for your next destination when you stumble upon a colorful local festival, and now you’re shooting portraits of the revelers.  This rich diversity of subjects also creates one of the biggest challenges for travel photographers: how to be prepared for anything that comes our way.  For beginning photographers there is some comfort in using the Auto mode that nearly every camera offers.  After all, we’re more likely to get an acceptable shot this way, when the subject turns quickly from fast action to landscapes to the low light of evening, or to an indoor performance.  But in most cases, your camera’s Auto mode, which attempts to make its best guesses as to what settings to use given existing conditions, will yield only acceptable photos and not the striking and memorable images we’re after.

There is a better way.  Take control of your images by learning how to manually set your exposure, focus, and other aspects of your photo.  All advanced point-and-shoot cameras and all mirrorless and DSLR cameras allow you to set most functions manually.  Even some basic point-and-shoot models have a way to go manual, but often this will involve options buried deep in a menu somewhere.  And there are apps available for both iOS and Android smart phones that allow you to take manual control over your phone’s camera.  I use an iPhone 6S, and I’ve found the “Manual” app to work very nicely for providing control over the phone’s camera setting for exposure, focus, and flash.  You can find it for less than $2 on the Apple App Store: https://itunes.apple.com/us/app/manual-custom-exposure-camera/id917146276?mt=8.  Even without using an app, most smart phone cameras do allow you to override the automatic settings by clicking on the part of the image you want to be in focus and used for the exposure setting; usually you can also set the exposure based on a different area of the image from the area that you want to be in focus.  But the dedicated apps will give you greater control, as they allow you to choose the shutter speed, aperture, and ISO for each shot.

For this image of a whirling dervish in Goreme, Turkey, I wanted to blur the dancer so as to give a sense of the continual turning motion in the ceremony, so I used my camera’s shutter-priority exposure mode and selected a slower shutter speed.  Buy this photo on my website

The key to successfully using your camera’s manual settings is to learn how they work and to practice at home, long before you actually take a trip.  Like anything else, selecting the settings we want on a camera takes practice.  In this digital era, it’s easier to learn because you can see the results of each setting immediately on your camera’s screen.  So dig out that camera user guide, or find it online, or search for a good tutorial.  But do learn how to adjust the key settings manually.

The first manual setting every photographer should learn is how to turn off your camera’s flash.  This sounds very basic, but I’m always amazed to see so many flashes going off in inappropriate places: museums that don’t allow flash photography, cultural performances, sports stadiums where the subject is thousands of feet away from the camera (the flash will only provide acceptable lighting for a few dozen feet, at most), and even the shy octopus exhibit at our local aquarium.  Believe me, you do not want to flash the octopus.  So learn how to turn your flash off, and be sure you actually do turn it off when you’re in a venue where flash is inappropriate or won’t help your image be better exposed.  Remember that glass reflects light, so you don’t want your flash on when shooting through windows of a vehicle or the glass windows of animal enclosures at zoos or aquariums.

Next, learn how to set your camera’s exposure manually.  The light meters built into today’s cameras are very smart, but they are also easily fooled by tricky lighting conditions.  The most common problem is backlighting.  If your subject is lit from behind, as many outdoor subjects are, your camera’s auto mode will likely expose for the brighter background and will leave your main subject underexposed.  You can adjust for this is several ways.  It may be good enough to just use your camera’s exposure compensation button to dial in, say, one extra stop of exposure.  Use your camera’s LCD screen and (if it has one) the histogram, to see how the subject is exposed with varying levels of compensation.  In some cases, you can use fill flash to fix backlighting problems.  To do so, manually turn on your camera’s flash, or attach a separate flash unit, and choose the setting for “fill flash” or “balanced TTL” (through the lens) flash mode.  Again, check exposure using your camera’s screen and histogram.  I find I usually get good results in tricky lighting conditions by using my camera’s spot metering mode, which tells the camera’s meter to use only the very center (or whatever area I select) of the image when choosing the exposure.

Other than allowing you to properly expose your main subject, manually setting the exposure also gives you control over what combination of shutter speed (how long the exposure lasts), aperture (how wide the lens is open), and ISO (how sensitive the camera is to light) you want for each shot.  If you’re shooting fast moving action like sports or wildlife, you will likely want to choose a fast shutter speed to freeze the motion (unless you want a blur effect as an artistic choice).  If you’re photographing a waterfall or sky and want to get some nice blurring of the water and/or clouds, you will probably want to choose a slower shutter speed.  Many times you want only certain parts of the image to be in focus.  A wide aperture (low F-stop number such as f/1.8) will give you a shallow depth-of-field, allowing only one part of the image to be in focus and blurring the other parts.  Conversely, a narrow aperture (high F-stop number such as f/16) will allow all parts of the photo to be in focus.  The final element determining exposure is the sensitivity of the camera’s sensor, measured by an ISO number.  Select a higher ISO (such as 1600 or above) only when you really need the extra sensitivity for very low-light subjects when a longer shutter speed or wider aperture is not suitable.  When you use very high ISO settings, the image will tend to have a lot of noise.  Today’s cameras are getting better at limiting noise at high ISO settings, and there are ways to reduce some of the effects of the noise using post-processing software, so my approach is to use as high an ISO as is required after considering the range of available shutter speeds and apertures.

To capture these professional beach volleyball players in sharp focus and to freeze the moment, I selected single-focus-point focus mode and chose the exact spot in the viewfinder where the players would be positioned, and also used my camera’s shutter-priority exposure mode to select a very fast shutter speed.  Buy this photo on my website

The other major type of manual setting that you need to know how to use is focus.  Most cameras today do a pretty good job of choosing the right part of the image to focus on, but they often need some help from the photographer.  From simple smart phone cameras through professional DSLRs, the autofocus function almost always lets the photographer select what part of the image they want to be in focus.  If you keep your camera in fully autofocus mode and don’t help by selecting where your main subject is, it may very well guess incorrectly and put another part of the image as the center of focus.  So, learn how to select the focus point even while letting your camera’s autofocus mechanism actually choose the focus distance.  Sometimes a camera’s autofocus capability may not work for the conditions under which you’re shooting, and in these cases you need to turn off autofocus completely, and focus in manual mode.  Some instances when this is necessary are when shooting in very low light conditions, or when shooting in poor contrast environments (for example, your subject’s texture looks a lot like that of its background, or you’re shooting into the bright sun).  In these cases, turn off the autofocus function and adjust focus manually until the subject looks sharp.

It’s still fine to walk around during your travels with your camera set in fully Auto mode, just in case something very unexpected comes up.  But do know how to set the main functions manually so you’ll get the best possible images in the 95% of the shooting situations when you do have time to set up first.

Do you have tips and tricks you can share on manually adjusting the camera’s settings to get great shots?  How about a time you kept the camera on Auto mode and got disappointing results?  Please share your thoughts using the comment box at the end of this post.