My wife and I recently returned from an amazing 2.5-week adventure traveling through Myanmar. Our itinerary took us from the main city of Yangon to the vast plains gleaming with ancient pagodas in Bagan; then to the former imperial capital and cultural hub of Mandalay; on to Kalaw, the gateway to many hill tribes of the region; and finally to Inle Lake, well known for its picturesque floating gardens and for the Inthe people with their unique traditional style of fishing. While it was wonderful to view Myanmar’s gorgeous landscapes and fabled temples, what made this adventure truly unforgettable for us was its many opportunities to interact with Burmese people from many ethnic groups and all walks of life: Buddhist monks and nuns, villagers displaced by a typhoon 10 years ago who are still living in temporary bamboo huts with no running water, the Paduang hill tribe whose women traditionally wear heavy brass plates on their necks, an octogenarian master of the dying art form of Burmese marionette theater, young boys celebrating their initiation as novice monks, and the delightful girls who have found a caring home at an orphanage in Mandalay. Burma is a photographer’s dream, filled with glorious pagodas, gorgeous vistas, and friendly, diverse cultures.
Yesterday’s and today’s posts showcase some of my favorite portraits, some of them not yet previously published, featuring a wide range of people we met during our adventure. The portraits will be presented as a photo essay, but I will include brief descriptions of each and occasionally some commentary about how they were made. You can click on any of these images to view or purchase them and many more from the Myanmar trip. Yesterday’s post featured Part I, and today’s post comprises Part II.
 A fascinating visit to Myawaddy Nunnery, where we had the opportunity to meet some of the more than 200 novice nuns who study there. I composed this image to include the contrasting colors of the novices’ pink robes against the painted carved teak facade of the building.
 Portrait of the abbess at Myawaddy Nunnery. The lovely “bokeh”, or soft quality of the out-of-focus background elements, is created by using a very wide aperture on a lens known for having this property (in this case, an 85mm f/1.8 prime lens). Even when traveling, it’s important to have the right lens for the right job.
 The Mingun Bell, 13 feet high and weighing 90 tons, is the world’s second largest functioning bell.
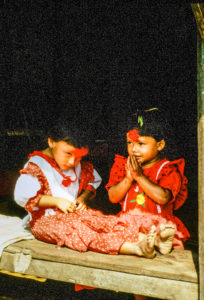
 A delightful visit to the Aye Yeik Mon Girls’ Orphanage. We were heartbroken to learn the stories of some of the abandoned girls who live here, but were uplifted to see the wonderful care and guidance they are receiving there now.
 I had the opportunity to get to know 15-year-old Phyu Phyu at the Aye Yeik Mon Girls’ Orphanage. Abandoned by her mother at an early age, Phyu Phyu’s early life was challenging, but she has flourished under the care of the nuns at Aye Yeik Mon and is planning to continue her education and to enter a professional career.
 We were invited into the Mandalay home of Oma and his family. His mother was a restaurant owner and chef for many years, so we were treated to an amazing Burmese meal. It can be challenging to make portraits of groups, especially when young children are involved. I shot several frames and chose one where the young boys are looking (nearly) directly at the lens, settling for some of the other family members to be looking elsewhere.
 Kuthodaw Paya is called the world’s largest book because the entire canon of early Buddhist scripture is recorded on carved stone tablets housed in its hundreds of pagodas. These young local women wanted me to pose for a selfie with them, so I asked them to return the favor. Their brightly colored longyis (traditional Burmese attire) stand out nicely against the drab background of the pagoda behind them.
 A quiet moment at the entrance to Shwenandaw Kyaung Monastery. I used spot-metering based on the woman’s clothing so as to achieve proper exposure given the much brighter background.
 A stop at the Kalaw morning market to purchase the produce for our visit to Myin Ma Htie village.
 We visited the village monastery in Myin Ma Htie and met with the monk there.
 On arrival at Myin Ma Htie, we are greeted by villagers who will be our hosts. This portrait was carefully composed to provide nice soft natural lighting on the girl and to frame her in a pleasing way within the surrounding area.
 Traditional spinning methods to create yarn from lotus plant fiber. I was struck by the symmetry and the bright color of the yarn in this scene.
 A worker in a cheroot workshop demonstrates her craft. She makes about 1000 of these small and inexpensive cigars every day. To make this portrait, I used my go-to 85mm portrait lens at a wide aperture and added just a small amount of balanced fill flash to evenly expose the subject’s face.
 The Phaung Daw Oo Paya is one of Burma’s most sacred sites. Dating to the 11th century, this pagoda houses the four remaining Buddha statues that enclose relics from the body of the Buddha. Worshipers add a little gold leaf to these statues when they visit, so that today the shape cannot even be recognized as that of the Buddha.
 A fisherman on Inle Lake demonstrates the ancient style of fishing with a netted basket. I framed the shot through the fabric of the net to add texture and visual interest.
 Meeting members of the Padaung ethnic minority, whose women are famous for wearing heavy brass coils to make their necks look longer. This 18-year-old Padaung girl proudly wears the brass coils on her neck as a symbol of ethnic identity. She told us her younger sister chooses not to wear the ornaments as she goes to a Burman school where most of the other students are not Padaung. The tradition was often scorned as backwards during the military regime, but now young Padaung women are again often choosing to practice it.
Have you visited Myanmar? What were your favorite photographic subjects? Please leave your thoughts here.
Want to read more posts about what to shoot while traveling? Find them all here: Posts about what to shoot.
All of these photos and many more from Myanmar are available for viewing or purchase here: Myanmar image gallery.
Missed Part I of this story in yesterday’s post? You can read it here: Part I of this story.


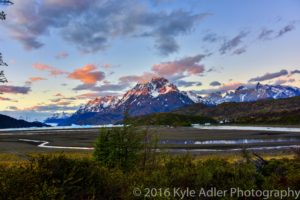 This HDR image of Lago Grey with its glacier and the peaks of Torres del Paine National Park in Chile was processed using Photoshop’s HDR tools. The colors appear unnaturally saturated and parts of the image (especially the tops of the mountains and the brush in the foreground) show some ghosting effects.
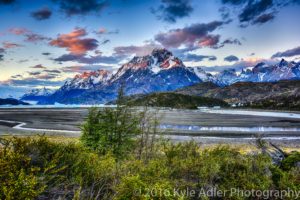 This version was processed using the Nik Collection’s HDR Efex Pro tools. The colors look much more natural and all parts of the image appear sharp and free from ghosting.