You may want to share some of your favorite images with friends and family right out of the camera while you’re still traveling, and as long as you’re not sharing so broadly that potential thieves may be alerted to your absence from home, that’s a fine thing to do. To enable immediate and easy sharing, you can choose the setting available on many cameras to shoot both RAW and JPG files; the JPG images will often look pretty decent for sharing when they come straight from the camera, and you still have your much more detailed image data saved in the RAW files.
But when you get home from your trip, it’s worth making the effort to catalog and post-process the RAW files of your favorite images so that they will look their very best and so you will be organized for finding them in the future. I’ll cover how to organize your catalog of images in a later post, but for now let’s take a look at the essentials of post-processing.
There are many software applications available to perform these tasks, but I strongly encourage you to check out Adobe Lightroom. I use this tool, and nearly all professional and enthusiast photographers I know also use it. You can license it along with other Adobe software on a pay-per-month basis as part of Adobe’s Creative Cloud, but it can also be purchased with a perpetual license (i.e., you purchase the software once and can use it forever), which is how I acquired it.
Once you have Lightroom installed on your PC, it’s easy to import your images from your camera’s memory card or from your PC’s hard drive and to organize your catalog of images using the software’s Library module. When your images are in your Lightroom catalog, the software allows you to perform all post-processing you desire using its Develop module. After shooting the image, my second-favorite part of the digital photography process is enhancing the the image in the Develop module. The software package even gets its name, Lightroom, as the new digital equivalent of the work we older photographers formerly had to do in the darkroom, such as dodging, burning, and cropping our film negatives to get the images looking their best.
As an example of how a little post-processing can dramatically enhance an image, let’s take a look at a night shot I made of Copenhagen’s Christiansborg Palace, the seat of the Danish Parliament. Here’s the “Before” picture:

Lightroom’s Develop module
The beauty of Lightroom’s method is that it doesn’t actually change your original image files as you edit them. Instead Lightroom saves a roadmap of the various edits you make and stores this list of adjustments along with a pointer to the original file. This is called “non-destructive editing”, and it allows you to edit your images to your heart’s content without overwriting or changing the originals at all. You can go back as many times as you want later to revisit your edits and change them again and again.
Let’s look at this process in more detail. Here is the basic Lightroom Develop module screen:
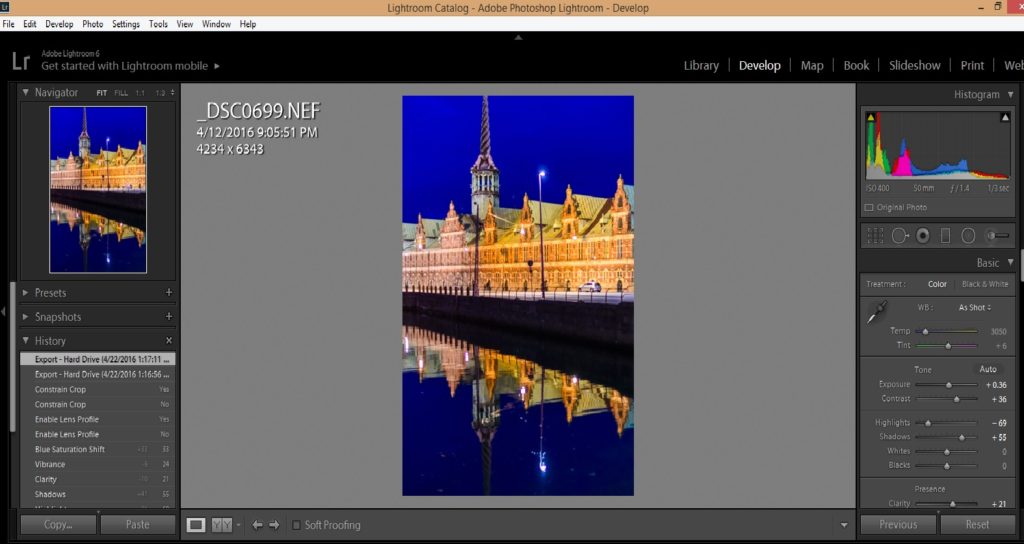
The left bar shows a thumbnail of the image you’re working on and a list of the most recent edits you have made. The central part of the screen shows a larger version of your image and this can be zoomed in and out to work on details or the whole image. The right bar has a histogram (a graph showing how many pixels in the image are at each brightness level from totally black to totally white) at the top, then a toolbar from which you can choose some of the editing tools quickly, and then a large area with sliders (only some of which are shown in this screenshot) that you move left or right to adjust various elements of your image. The editing tools in Lightroom are comprehensive enough that I find I very rarely need to import an image into Adobe Photoshop to make really sophisticated edits; nearly all of the time, I can perform all of my post-processing using only Lightroom.
Some photographers spend a lot of time making major enhancements to their images, but I like to try to adjust my camera’s settings precisely enough that the image is made in the camera the way I envisioned it when shooting, so that I need to make only minor adjustments in post-processing. While the exact steps of post-processing will be different for every image, here is my basic workflow (note that for the most part, I work from the top to the bottom of the adjustment tools found in the right bar):
- Adjust the white balance as needed. Remember my advice to always shoot in RAW mode. One of the advantages of RAW files is that you can adjust the white balance in post-processing, regardless of what your camera’s white balance controls were set for while you were shooting the image. In JPG files you have much less control over the white balance after the fact. Just choose a different preset white balance type (such as Daylight, Shade, or Flash) from Lightroom’s menu, or create a custom white balance yourself.
- Adjust the exposure as needed. Use the histogram and the image preview pane to lighten or darken the whole image until it looks best.
- Adjust the contrast as needed. Increasing contrast gives more separation between the darkest and lightest portions of the image, while decreasing contrast does the opposite. I find that most images require the contrast to be increased slightly to moderately.
- Adjust the highlights and shadows as needed. Highlights are the brighter parts of the image, and I find that often these need to be reduced in brightness to regain some detail that may have been lost in the camera. Shadows are the darker parts of the image, and often these need to be made brighter to bring out lost shadow detail. After the highlights and shadows have been adjusted, you may need to adjust the whites and blacks (very brightest and very darkest points in your image) if there are extremes of contrast present. Most of the time I do not need to change the white and black points.
- Adjust the clarity as needed. The clarity slider changes the contrast of the middle tones (neither the darker nor the lighter parts) of the image. Usually images need a subtle increase in clarity to bring out the details in the texture. Don’t overuse this tool or the image can become unnatural looking.
- Adjust the vibrance and/or saturation as needed. Both of these sliders will change the concentration of the colors in your image, but vibrance tries to avoid changing the color of skin tones so images with people will often look more natural after increasing the vibrance than after increasing saturation. Occasionally you might need to make adjustments to both vibrance and saturation, but usually I find a subtle increase in vibrance is sufficient. Again, don’t overuse these tools or your image will start to look exaggerated and surreal (unless you’re going for those effects).
- Adjust the concentration of individual colors as needed. Each color channel has its own slider to increase or decrease its saturation. I don’t use these sliders often, but occasionally you may want to increase or decrease the saturation of just a single color. For example, when shooting a landscape with sky or water, you may want to increase the blue saturation to bring out those parts of the image.
- If you want to work on your image in black-and-white, the color channels area is the tool I use to do the conversion from color to monochrome. Click on the “B&W” tab above the individual color channel sliders, and then adjust the mix of how the colors are blended by increasing or decreasing each color’s slider to see how the black-and-white image looks. I find that I often have to readjust the contrast slider at this point to get the image looking its best in black-and-white.
- There is some sharpening already applied to your image file by default, but if it looks too soft in the important areas, you can dial in some additional sharpening.
- When the image you’re editing was shot at a high ISO (sensitivity) and/or a very long shutter speed, there will likely be some noise in the image. This can be managed somewhat in Lightroom’s noise reduction tool.
- Under basic lens corrections I will usually select all three of the check box items. Lightroom knows how most camera and lens combinations work and can eliminate many of the optical glitches that would otherwise show up in the image. Under manual lens corrections, I may need to rotate the image if the horizon wasn’t level when it was shot.
- All of the above adjustments affect the entire image. After completing these adjustments, it’s time to make any selective adjustments that affect only a selected part of the image. These selective adjustment tools can be found in the toolbar just below the histogram.
- Of these selective adjustment tools, the most generally useful is the cropping tool, which of course allows you to remove unwanted portions of the image on the sides, top, or bottom. It’s always best to try to compose the image correctly in the camera, but cropping is often still needed in post-processing.
- The spot removal, filters, and adjustment brush are more complicated selective adjustment tools that can easily be subjects of additional posts in their own right.
These steps usually won’t all be needed for any one image. If you have several images that were shot under similar conditions, you can select them all in the Library module and turn on Auto Sync, which then allows you to make the adjustments only once and apply them to all the selected images. Another big time saver is creating your own presets, which are saved routines that you can call at the click of a button to automate tasks that would otherwise have taken multiple steps. Unlike Photoshop, Lightroom was designed by Adobe specifically for photographers to use, so it is set up in such a way as to make life much easier for us to organize, edit, and share our images.
Here is the “After” version of our sample image of Copenhagen by night. You can see how a few simple edits during post-processing can really make an image pop.

Buy this photo
I hope you’ve found this very basic introduction to the essentials of post-processing to be helpful. Now it’s your turn. What are your go-to techniques in editing your images? Do you have tips and tricks that you’ve found make your life easier after you return from a trip? Please share your thoughts in the comment box at the end of this post.
Want to read more posts about post-processing your images? Find them all here: Posts on Post-Processing.


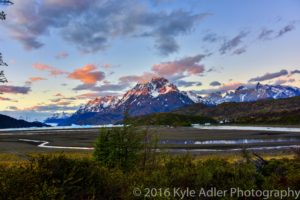 This HDR image of Lago Grey with its glacier and the peaks of Torres del Paine National Park in Chile was processed using Photoshop’s HDR tools. The colors appear unnaturally saturated and parts of the image (especially the tops of the mountains and the brush in the foreground) show some ghosting effects.
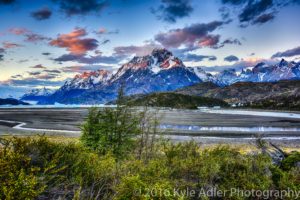 This version was processed using the Nik Collection’s HDR Efex Pro tools. The colors look much more natural and all parts of the image appear sharp and free from ghosting.