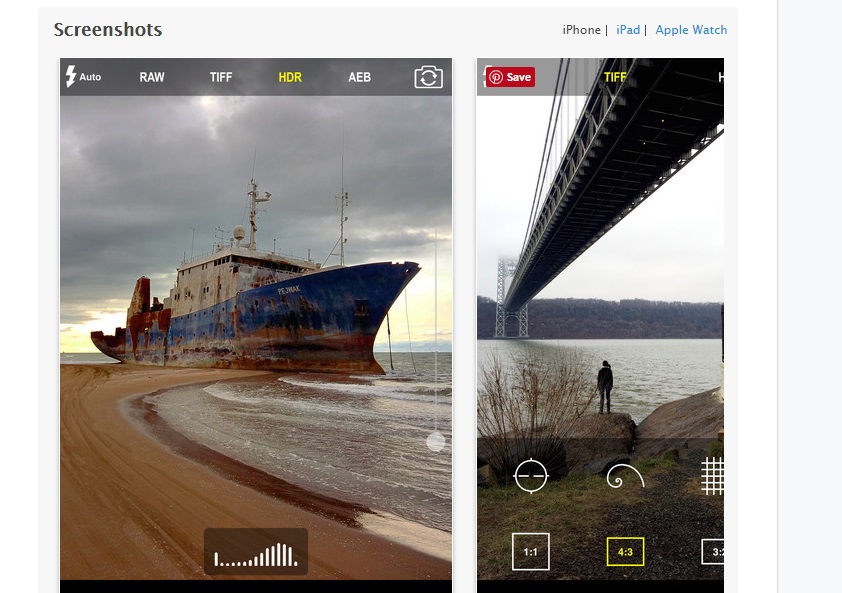
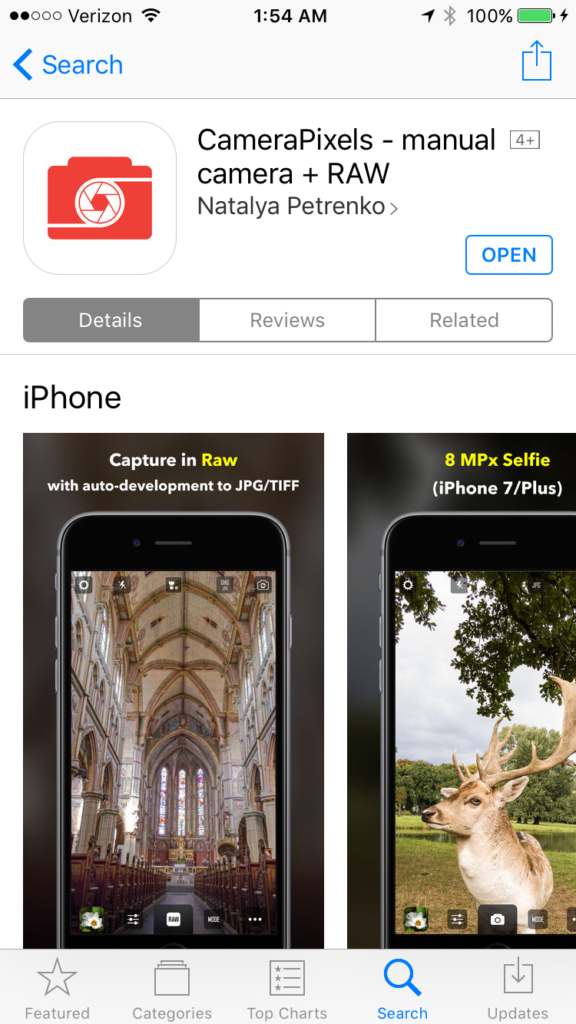
Camera Pixels App (Updated Review): Significant improvements in the new version make this a best-in-class app

I’ve posted repeatedly about the importance of understanding how to take manual control of your camera in order to make images that are properly exposed and focused.  Whether you are using a professional DSLR, an advanced full-frame mirrorless ILC, a compact point-and-shoot, or the camera built into your smart phone, there is no way you will get consistently acceptable results if you leave the camera’s settings to its auto mode.  See this post for an overview: Post on Beyond the Auto Mode.

About three months ago, I posted a review of an early version of an iPhone app called “Camera Pixels”.  In that review, I found the app to be a very promising concept due to its advanced DSLR-like features and intuitive controls, but I couldn’t fully endorse it in the earlier version because I found several bugs and interface quirks.  You can read that earlier review here: Previous review of early version of Camera Pixels app.  Since that review was published, I have had several discussions with the Camera Pixels support team to detail my concerns about the various issues I found.

For the past two days I have been testing a new version of the Camera Pixels app, and I can now recommend it wholeheartedly.  The new release preserves the advanced features and (relatively) simple interface of the earlier version, but it has addressed all of the significant issues I outlined in my review of the previous release.  Specifically:

  • the image flicker in the “viewfinder” area of the screen has been eliminated,
  • the bracketing of exposures now retains the proper requested spacing (unless at a physical limit of a setting),
  • there is a new “Pro View” mode that keeps the manual settings toolbar always on the screen so any manual overrides are immediately apparent, and
  • the controls to separate the exposure point from the focus point are now more intuitive.

Like the “Manual” camera app that I’ve been using for years and the “ProCam 4” app that has been my go-to camera control app for the past several months, the new “Camera Pixels” app allows the manual selection of ISO, shutter speed, exposure compensation, and focus distance (note that the iPhone camera’s lens has a fixed aperture, so F-stop cannot be manually set).  Also like the Manual app and the ProCam 4 app, Camera Pixels allows images to be captured using RAW mode, which has a great many advantages over capture in JPEG format (see this post for more information: Post on RAW Capture).  And all three of these camera apps display a histogram to assist in setting exposure properly.  

In addition, both Camera Pixels and ProCam 4 (but not Manual) offer some very useful advanced camera control capabilities, including the following:

  • Shutter Priority: You can choose an exposure mode in which you select the shutter speed first and the app will set the appropriate ISO.
  • Exposure Bracketing: You can shoot a series of four shots at different exposures to increase the likelihood that one of them will be at the best exposure for the lighting conditions.  The series of shots can also be combined using HDR tools found in Lightroom, Photoshop, and other editing software into a single image with a higher range of tones from very dark to very bright.
  • White Balance: You can adjust white balance in the app, which is often preferable to having to adjust it in your RAW files during post-processing.
  • Virtual Horizon: The display can show you when the horizon is level.
  • Slow Shutter Options: You can select long fixed shutter speeds as well as bulb mode to keep the shutter open for as long as you’d like.
  • RAW+JPEG: You can choose to store the image in both RAW and JPEG formats.

With all this incremental functionality, your little phone’s camera begins to behave a lot like a more advanced standalone camera.  While the iPhone’s camera, with its small sensor and its tiny fixed-aperture non-interchangeable lens, still cannot compare to a professional or enthusiast DSLR or ILC camera, the results using an advanced manual camera control app such as Camera Pixels or ProCam 4 are vastly improved compared to using the phone’s native camera app.  At iTunes App Store pricing of $2.99 for Camera Pixels or $4.99 (temporarily reduced to $1.99) for ProCam 4, either of these apps is a great buy and a serious enhancement to the iPhone’s built-in camera.

There are some significant differences between Camera Pixels and ProCam 4.  ProCam 4 offers advanced image editing capabilities, while Camera Pixels does not.  However, Camera Pixels offers more flexible exposure bracketing options, the ability to separate exposure point from focus point, a better histogram, and more advanced RAW and video shooting options.  And a significant advantage of the new Camera Pixels app over ProCam 4 is its simple and intuitive user interface for setting and resetting the manual camera control features such as exposure compensation, shutter priority, and ISO priority.  In fact, the Camera Pixels app comes the closest I’ve ever found to the user interface of an advanced DSLR or mirrorless camera.

One note to enhance the usability of the Camera Pixels app: As far as I can tell, there is no built-in help content in the app itself, but there is a very useful online user guide available from the app’s developers.  You can find the user guide here: Camera Pixels app user guide.

In summary, the new Camera Pixels app is a great concept that comes closest of any camera control app I’ve found to the look-and-feel of an advanced standalone camera.  With the greatly improved new release, Camera Pixels has become the best option I’ve found for iPhone users wishing to control the phone’s built-in camera like an advanced DSLR or mirrorless standalone camera.  I now fully recommend this app, and I plan to use it as my first choice for advanced control of my iPhone’s camera.

Here’s the link to the Camera Pixels app on the Apple App Store: Camera Pixels app.

What app do you use to control your phone’s camera?  What do you like and dislike about it?  Please share your thoughts here.

Want to read more posts about photography gear?  Find them all here: Posts on Gear.


Camera Pixels App Review: A great concept but still needs work

I’ve posted repeatedly about the importance of understanding how to take manual control of your camera in order to make images that are properly exposed and focused.  Whether you are using a professional DSLR, an advanced full-frame mirrorless ILC, a compact point-and-shoot, or the camera built into your smart phone, there is no way you will get consistently acceptable results if you leave the camera’s settings to its auto mode.  See this post for an overview: Post on Beyond the Auto Mode.

For the past two days I have been testing an iPhone app called “Camera Pixels”.  Full Disclosure: The developer of Camera Pixels requested I test their new app and offered me a free download for trial, but to preserve my independence I paid for the download myself.

Like the “Manual” camera app that I’ve been using for years and the “ProCam 4” app that has been my go-to camera control app for the past several months, the new “Camera Pixels” app allows the manual selection of ISO, shutter speed, exposure compensation, and focus distance (note that the iPhone camera’s lens has a fixed aperture, so F-stop cannot be manually set).  Also like the Manual app, ProCam 4 allows images to be captured using RAW mode, which has a great many advantages over capture in JPEG format (see this post for more information: Post on RAW Capture).  And all three of these camera apps display a histogram to assist in setting exposure properly.  

In addition, both Camera Pixels and ProCam 4 (but not Manual) offer some very useful advanced camera control capabilities, including the following:

  • Shutter Priority: You can choose an exposure mode in which you select the shutter speed first and the app will set the appropriate ISO.
  • Exposure Bracketing: You can shoot a series of four shots at different exposures to increase the likelihood that one of them will be at the best exposure for the lighting conditions.  The series of shots can also be combined using HDR tools found in Lightroom, Photoshop, and other editing software into a single image with a higher range of tones from very dark to very bright.
  • White Balance: You can adjust white balance in the app, which is often preferable to having to adjust it in your RAW files during post-processing.
  • Virtual Horizon: The display can show you when the horizon is level.
  • Slow Shutter Options: You can select long fixed shutter speeds as well as bulb mode to keep the shutter open for as long as you’d like.
  • RAW+JPEG: You can choose to store the image in both RAW and JPEG formats.

With all this incremental functionality, your little phone’s camera begins to behave a lot like a more advanced standalone camera.  While the iPhone’s camera, with its small sensor and its tiny fixed-aperture non-interchangeable lens, still cannot compare to a professional or enthusiast DSLR or ILC camera, the results using an advanced manual camera control app such as Camera Pixels or ProCam 4 are vastly improved compared to using the phone’s native camera app.  At iTunes Store pricing of $3.99 for Camera Pixels or $4.99 for ProCam 4, either of these apps is a great buy and a serious enhancement to the iPhone’s built-in camera.

There are some significant differences between Camera Pixels and ProCam 4.  ProCam 4 offers advanced image editing capabilities, while Camera Pixels does not.  However, Camera Pixels offers more flexible exposure bracketing options, the ability to separate exposure point from focus point, a better histogram, and more advanced RAW and video shooting options.  And a significant advantage of the new Camera Pixels app over ProCam 4 is its user interface for setting and resetting the manual camera control features such as exposure compensation, shutter priority, and ISO priority.  In fact, the Camera Pixels app comes the closest I’ve ever found to the user interface of an advanced DSLR or mirrorless camera.

Unfortunately, in its current state I cannot unreservedly recommend the Camera Pixels app.  I encountered too many glitches during my brief testing to be able to give this app a glowing review at this time.  Here are a few of the issues I noted:

  • The “viewfinder” (image preview on the screen) flickers intermittently, which can be very distracting when trying to compose images.
  • The bracketing exposure settings are sometimes incorrectly spaced, i.e., instead of being exposed at -3, -2, -1, 0, +1, +2, and +3; the sequence may be exposed at -3, -2, -1, 0, +1, +1, and +1.
  • It can be hard to tell if manual overrides are set, leading to incorrect exposures.
  • The very useful feature to separate the exposure point from the focus point doesn’t always work.

In summary, the new Camera Pixels app is a great concept that comes closest of any camera control app I’ve found to the look-and-feel of an advanced standalone camera; however, there are significant bugs in the current version that hamper the shooting experience.  With further development to fix the problems, Camera Pixels could become an excellent option for iPhone users wishing to control the phone’s built-in camera like an advanced DSLR or mirrorless standalone camera.  I will eagerly await the next revision of this app.

Here’s the link to the Camera Pixels app on the Apple App Store: Camera Pixels app.

You can find the ProCam 4 app here: ProCam 4 app.

What app do you use to control your phone’s camera?  What do you like and dislike about it?  Please share your thoughts here.

Want to read more posts about photography gear?  Find them all here: Posts on Gear.

Camera Pixels App Review: A great concept but still needs work


I’ve posted repeatedly about the importance of understanding how to take manual control of your camera in order to make images that are properly exposed and focused.  Whether you are using a professional DSLR, an advanced full-frame mirrorless ILC, a compact point-and-shoot, or the camera built into your smart phone, there is no way you will get consistently acceptable results if you leave the camera’s settings to its auto mode.  See this post for an overview: Post on Beyond the Auto Mode.

For the past two days I have been testing an iPhone app called “Camera Pixels”.  Full Disclosure: The developer of Camera Pixels requested I test their new app and offered me a free download for trial, but to preserve my independence I paid for the download myself.

Like the “Manual” camera app that I’ve been using for years and the “ProCam 4” app that has been my go-to camera control app for the past several months, the new “Camera Pixels” app allows the manual selection of ISO, shutter speed, exposure compensation, and focus distance (note that the iPhone camera’s lens has a fixed aperture, so F-stop cannot be manually set).  Also like the Manual app, ProCam 4 allows images to be captured using RAW mode, which has a great many advantages over capture in JPEG format (see this post for more information: Post on RAW Capture).  And all three of these camera apps display a histogram to assist in setting exposure properly.  

In addition, both Camera Pixels and ProCam 4 (but not Manual) offer some very useful advanced camera control capabilities, including the following:

  • Shutter Priority: You can choose an exposure mode in which you select the shutter speed first and the app will set the appropriate ISO.
  • Exposure Bracketing: You can shoot a series of four shots at different exposures to increase the likelihood that one of them will be at the best exposure for the lighting conditions.  The series of shots can also be combined using HDR tools found in Lightroom, Photoshop, and other editing software into a single image with a higher range of tones from very dark to very bright.
  • White Balance: You can adjust white balance in the app, which is often preferable to having to adjust it in your RAW files during post-processing.
  • Virtual Horizon: The display can show you when the horizon is level.
  • Slow Shutter Options: You can select long fixed shutter speeds as well as bulb mode to keep the shutter open for as long as you’d like.
  • RAW+JPEG: You can choose to store the image in both RAW and JPEG formats.

With all this incremental functionality, your little phone’s camera begins to behave a lot like a more advanced standalone camera.  While the iPhone’s camera, with its small sensor and its tiny fixed-aperture non-interchangeable lens, still cannot compare to a professional or enthusiast DSLR or ILC camera, the results using an advanced manual camera control app such as Camera Pixels or ProCam 4 are vastly improved compared to using the phone’s native camera app.  At iTunes Store pricing of $3.99 for Camera Pixels or $4.99 for ProCam 4, either of these apps is a great buy and a serious enhancement to the iPhone’s built-in camera.

There are some significant differences between Camera Pixels and ProCam 4.  ProCam 4 offers advanced image editing capabilities, while Camera Pixels does not.  However, Camera Pixels offers more flexible exposure bracketing options, the ability to separate exposure point from focus point, a better histogram, and more advanced RAW and video shooting options.  And a significant advantage of the new Camera Pixels app over ProCam 4 is its user interface for setting and resetting the manual camera control features such as exposure compensation, shutter priority, and ISO priority.  In fact, the Camera Pixels app comes the closest I’ve ever found to the user interface of an advanced DSLR or mirrorless camera.

Unfortunately, in its current state I cannot unreservedly recommend the Camera Pixels app.  I encountered too many glitches during my brief testing to be able to give this app a glowing review at this time.  Here are a few of the issues I noted:

  • The “viewfinder” (image preview on the screen) flickers intermittently, which can be very distracting when trying to compose images.
  • The bracketing exposure settings are sometimes incorrectly spaced, i.e., instead of being exposed at -3, -2, -1, 0, +1, +2, and +3; the sequence may be exposed at -3, -2, -1, 0, +1, +1, and +1.
  • It can be hard to tell if manual overrides are set, leading to incorrect exposures.
  • The very useful feature to separate the exposure point from the focus point doesn’t always work.

In summary, the new Camera Pixels app is a great concept that comes closest of any camera control app I’ve found to the look-and-feel of an advanced standalone camera; however, there are significant bugs in the current version that hamper the shooting experience.  With further development to fix the problems, Camera Pixels could become an excellent option for iPhone users wishing to control the phone’s built-in camera like an advanced DSLR or mirrorless standalone camera.  I will eagerly await the next revision of this app.

Here’s the link to the Camera Pixels app on the Apple App Store: Camera Pixels app.

You can find the ProCam 4 app here: ProCam 4 app.

What app do you use to control your phone’s camera?  What do you like and dislike about it?  Please share your thoughts here.

Want to read more posts about photography gear?  Find them all here: Posts on Gear.
Decent Exposure [Encore Publication]: Mastering exposure is key to getting great images

Of all the primary elements a photographer controls–composition, focus, the moment the shutter is released, and of course the choice of the subject–none is more critical to making a great image than setting a proper exposure.  Some corrections to a poorly exposed image can be made in post-processing, and there are occasionally good artistic reasons to override the norms of exposure in order to evoke a certain mood in an image by making it darker or brighter than usual, but before we can effectively make these exceptional choices it is necessary to learn the basics of setting an appropriate exposure.

Let’s begin by defining exposure and the elements that comprise it.  Simply put, exposure refers to the amount of light that reaches the camera’s sensor and therefore how light or dark the resulting image will appear.  Four components together determine the exposure: 1) the brightness of the light reflecting off the subject and reaching the front of the lens, 2) the aperture setting on the lens (how wide or narrow is the opening of the lens), 3) the shutter speed setting (how long is the camera’s shutter open to allow light to strike the sensor), and 4) the sensitivity setting of the camera’s sensor.  We don’t always have control over the first component, but the other three are within our control using our camera’s settings.

Many photographers simply set their camera on Auto mode and let the camera’s built-in meter make its best guess as to how the image should be exposed.  That method can work well under certain conditions, but it is highly prone to errors.  For example, if your main subject is strongly backlit, the camera’s meter will expose for the average brightness in the scene and will underexpose the subject.  This is why so often we see underexposed photos of people standing outside in bright sunlight.

Although I compensated for the strong backlighting in this image of a Tibetan family enjoying a midday picnic, their faces are still quite shadowy, indicating a bit brighter exposure would have been better still.  Buy this photo

Fortunately, there are several easy methods to achieve a correct exposure even under challenging lighting conditions.  Here are a few that I use frequently:

  1. Set the camera’s metering mode to Spot Metering: By default most cameras’ metering systems use a sophisticated pattern-matching algorithm that measures how bright or dark each area of the image is and makes its best guess about a workable exposure based on similar scenes in the camera’s database.  Most cameras allow you to select a simpler metering mode called Spot Metering, that just measures the light at the central point in the image or another point that you select.  If you choose Spot Metering and select the measuring point to be right where your main subject is, you should get just the right exposure.
  2. Dial in some exposure compensation: Most cameras let you override the meter’s exposure setting by dialing in a compensation setting to lighten or darken the image.  If your subject is backlit, you will likely want to increase the exposure by one to two stops (each “stop” of additional exposure represents a doubling of the amount of light reaching the sensor).  The camera’s display should show something like “+1 EV” to alert you that you’ve dialed in 1 extra stop of exposure, and the number changes as you change the compensation setting.  Just be sure to set the exposure compensation back to zero when you’re done using it.
  3. Go fully manual: To gain complete control over your camera’s exposure settings, choose the meter’s Manual mode.  Then you can change all three exposure elements (shutter speed, aperture, and ISO) until the image appears properly exposed when you review it on your camera’s display.
  4. Use flash to increase the lighting on your main subject: One good way to achieve proper exposure with a backlit subject is to increase lighting on the subject itself, so that there is no longer such a difference in brightness between the subject and the background.  Your camera’s built-in flash may be strong enough to pull off this trick, but it often helps to have a more powerful flash unit with you.  There are some other reasons why you may not want to use flash as a main source of light on your subject, so this method should be used sparingly.  A reflector can be used instead of flash to reflect some of the sun’s light onto the front of your subject.

For this photo shoot with a musician friend, I shot into the light so she wouldn’t have to squint into the sun and also so that we’d have a beautiful rim light from the sun around her hair.  To pull this off, I used manual mode and selected the proper exposure for her face.  I employed a reflector to bounce some sunlight back onto her face and trumpet.  [Client image not for sale.]

Similar methods can be used for other challenging lighting conditions besides backlighting.  If the subject is a brighter or darker color than the “neutral gray” your camera’s meter uses for a standard, then you need to dial in more or less exposure as appropriate.  My black cat Dragonfly, for example, requires an especially dark exposure to override the meter from thinking he’s a gray cat and choosing too bright an exposure.  Similarly, a white polar bear will need additional exposure to stop the meter from underexposing what it assumes to be a gray bear.

When photographing a black subject, reduce the exposure to compensate for the light meter’s mistaken assumption that the subject is a neutral gray color.  Buy this photo

Whatever method you use to choose your exposure, be sure to take a look at the resulting image using your camera’s monitor.  Does the main subject appear to be properly exposed, or is it still too dark or perhaps too bright?  If your camera offers a histogram display, learn how it works and use it to check your exposure in tricky lighting conditions.  I’ll write a future post specifically about the histogram, as it is a very useful and often overlooked feature.

With some attention to the exposure of your images and use of some of the techniques described here, you can achieve a correctly exposed image nearly all of the time.  After mastering the essentials of exposure, you will have more keepers and fewer images in the virtual trash can, and you can even begin to break the rules for artistic effect.

Want to see more posts on photographic techniques?  You can find them all here: Posts on Techniques.

What lighting situations do you find the trickiest?  What techniques do you use to ensure properly exposed images?  Please share your thoughts in the comments box.

ProCam 4 Update: Still the best iOS camera app I’ve ever used

I’ve been using the ProCam 4 iOS app for nearly two months now, and today’s post provides a brief update to my previous product review.  My original review can be found just after the quick update.

My already high opinion of ProCam 4 has only been enhanced further after spending several weeks using it in the field.  It’s rare to find an app that combines such a high degree of functionality with such an easy-to-use interface.  While I don’t use the in-app editing features, preferring to use Adobe Lightroom for my post-processing whenever possible, I’ve been using most of ProCam 4’s other powerful features including the manual control over ISO, shutter speed, white balance, and flash; capture in RAW+JPEG formats; exposure bracketing; and the different shutter release options.  Everything is pretty intuitive to use and it’s a joy to shoot with because all the main features are readily accessible “on the fly”.  The resulting images are higher quality than those I’ve been able to obtain with the same iPhone 6S camera hardware controlled by other apps.  Overall, I continue to believe ProCam 4 is the best iOS camera app I’ve seen.

Note to Android users: As far as I know, ProCam 4 still is not available for Android devices.

One more note: With this week’s release of iOS 10.2, there is some enhanced support for RAW capture, but the built-in Apple Camera app still does not support RAW mode, so you will continue to need to use a third-party iOS camera app to capture images in RAW.  I recommend ProCam, but there are many choices out there.

My original product review of the ProCam 4 app follows:

I’ve posted repeatedly about the importance of understanding how to take manual control of your camera in order to make images that are properly exposed and focused.  Whether you are using a professional DSLR, an advanced full-frame mirrorless ILC, a compact point-and-shoot, or the camera built into your smart phone, there is no way you will get consistently acceptable results if you leave the camera’s settings to its auto mode.  See this post for an overview: Post on Beyond the Auto Mode.

For the past two days I have been testing an iPhone app called “ProCam 4”, which is by far the best iOS camera app I’ve ever used.  Like the “Manual” camera app that I’ve been using for years, ProCam 4 allows the manual selection of ISO, shutter speed, exposure compensation, and focus distance (note that the iPhone camera’s lens has a fixed aperture, so F-stop cannot be manually set).  Also like the Manual app, ProCam 4 allows images to be captured using RAW mode, which has a great many advantages over capture in JPEG format (see this post for more information: Post on Raw Mode).  And both of these camera apps display a histogram to assist in setting exposure properly.  

But ProCam 4 offers far more functionality than does the Manual app or any other iOS camera app I’ve tried.  Here is a partial list of some of my favorite additional features:

  • Shutter Priority: You can choose an exposure mode in which you select the shutter speed first and the app will set the appropriate ISO.
  • Exposure Bracketing: You can shoot a series of four shots at different exposures to increase the likelihood that one of them will be at the best exposure for the lighting conditions.  The series of shots can also be combined using HDR tools found in Lightroom, Photoshop, and other editing software into a single image with a higher range of tones from very dark to very bright.
  • White Balance: You can adjust white balance in the app, which is often preferable to having to adjust it in your RAW files during post-processing.
  • Virtual Horizon: The display can show you when the horizon is level.
  • Slow Shutter Options: You can select long fixed shutter speeds as well as bulb mode to keep the shutter open for as long as you’d like.
  • RAW+JPEG: You can choose to store the image in both RAW and JPEG formats.
  • Editing Options: This app provides many advanced in-camera editing tools and filters.

With all this incremental functionality, your little phone’s camera begins to behave a lot like a more advanced standalone camera.  While the iPhone’s camera, with its small sensor and its tiny fixed-aperture non-interchangeable lens, still cannot compare to a professional or enthusiast DSLR or ILC camera, the results using ProCam 4 are vastly improved compared to using the phone’s native camera app.  At $4.99 to purchase via the iTunes Store, this app is a great buy and a serious enhancement to the iPhone’s built-in camera.

You can find the ProCam 4 app here: ProCam 4 app.

What app do you use to control your phone’s camera?  What do you like and dislike about it?  Please share your thoughts here.

Want to read more posts about photography gear?  Find them all here: Posts on Gear.

Decent Exposure [Encore Publication]: Mastering exposure is key to getting great images

Of all the primary elements a photographer controls–composition, focus, the moment the shutter is released, and of course the choice of the subject–none is more critical to making a great image than setting a proper exposure.  Some corrections to a poorly exposed image can be made in post-processing, and there are occasionally good artistic reasons to override the norms of exposure in order to evoke a certain mood in an image by making it darker or brighter than usual, but before we can effectively make these exceptional choices it is necessary to learn the basics of setting an appropriate exposure.

Let’s begin by defining exposure and the elements that comprise it.  Simply put, exposure refers to the amount of light that reaches the camera’s sensor and therefore how light or dark the resulting image will appear.  Four components together determine the exposure: 1) the brightness of the light reflecting off the subject and reaching the front of the lens, 2) the aperture setting on the lens (how wide or narrow is the opening of the lens), 3) the shutter speed setting (how long is the camera’s shutter open to allow light to strike the sensor), and 4) the sensitivity setting of the camera’s sensor.  We don’t always have control over the first component, but the other three are within our control using our camera’s settings.

Many photographers simply set their camera on Auto mode and let the camera’s built-in meter make its best guess as to how the image should be exposed.  That method can work well under certain conditions, but it is highly prone to errors.  For example, if your main subject is strongly backlit, the camera’s meter will expose for the average brightness in the scene and will underexpose the subject.  This is why so often we see underexposed photos of people standing outside in bright sunlight.

Although I compensated for the strong backlighting in this image of a Tibetan family enjoying a midday picnic, their faces are still quite shadowy, indicating a bit brighter exposure would have been better still.  Buy this photo

Fortunately, there are several easy methods to achieve a correct exposure even under challenging lighting conditions.  Here are a few that I use frequently:

  1. Set the camera’s metering mode to Spot Metering: By default most cameras’ metering systems use a sophisticated pattern-matching algorithm that measures how bright or dark each area of the image is and makes its best guess about a workable exposure based on similar scenes in the camera’s database.  Most cameras allow you to select a simpler metering mode called Spot Metering, that just measures the light at the central point in the image or another point that you select.  If you choose Spot Metering and select the measuring point to be right where your main subject is, you should get just the right exposure.
  2. Dial in some exposure compensation: Most cameras let you override the meter’s exposure setting by dialing in a compensation setting to lighten or darken the image.  If your subject is backlit, you will likely want to increase the exposure by one to two stops (each “stop” of additional exposure represents a doubling of the amount of light reaching the sensor).  The camera’s display should show something like “+1 EV” to alert you that you’ve dialed in 1 extra stop of exposure, and the number changes as you change the compensation setting.  Just be sure to set the exposure compensation back to zero when you’re done using it.
  3. Go fully manual: To gain complete control over your camera’s exposure settings, choose the meter’s Manual mode.  Then you can change all three exposure elements (shutter speed, aperture, and ISO) until the image appears properly exposed when you review it on your camera’s display.
  4. Use flash to increase the lighting on your main subject: One good way to achieve proper exposure with a backlit subject is to increase lighting on the subject itself, so that there is no longer such a difference in brightness between the subject and the background.  Your camera’s built-in flash may be strong enough to pull off this trick, but it often helps to have a more powerful flash unit with you.  There are some other reasons why you may not want to use flash as a main source of light on your subject, so this method should be used sparingly.  A reflector can be used instead of flash to reflect some of the sun’s light onto the front of your subject.

For this photo shoot with a musician friend, I shot into the light so she wouldn’t have to squint into the sun and also so that we’d have a beautiful rim light from the sun around her hair.  To pull this off, I used manual mode and selected the proper exposure for her face.  I employed a reflector to bounce some sunlight back onto her face and trumpet.  [Client image not for sale.]

Similar methods can be used for other challenging lighting conditions besides backlighting.  If the subject is a brighter or darker color than the “neutral gray” your camera’s meter uses for a standard, then you need to dial in more or less exposure as appropriate.  My black cat Dragonfly, for example, requires an especially dark exposure to override the meter from thinking he’s a gray cat and choosing too bright an exposure.  Similarly, a white polar bear will need additional exposure to stop the meter from underexposing what it assumes to be a gray bear.

When photographing a black subject, reduce the exposure to compensate for the light meter’s mistaken assumption that the subject is a neutral gray color.  Buy this photo

Whatever method you use to choose your exposure, be sure to take a look at the resulting image using your camera’s monitor.  Does the main subject appear to be properly exposed, or is it still too dark or perhaps too bright?  If your camera offers a histogram display, learn how it works and use it to check your exposure in tricky lighting conditions.  I’ll write a future post specifically about the histogram, as it is a very useful and often overlooked feature.

With some attention to the exposure of your images and use of some of the techniques described here, you can achieve a correctly exposed image nearly all of the time.  After mastering the essentials of exposure, you will have more keepers and fewer images in the virtual trash can, and you can even begin to break the rules for artistic effect.

Want to see more posts on photographic techniques?  You can find them all here: Posts on Techniques.

What lighting situations do you find the trickiest?  What techniques do you use to ensure properly exposed images?  Please share your thoughts in the comments box.

ProCam 4 Review: The best iOS camera app I’ve ever used

I’ve posted repeatedly about the importance of understanding how to take manual control of your camera in order to make images that are properly exposed and focused.  Whether you are using a professional DSLR, an advanced full-frame mirrorless ILC, a compact point-and-shoot, or the camera built into your smart phone, there is no way you will get consistently acceptable results if you leave the camera’s settings to its auto mode.  See this post for an overview: Post on Beyond the Auto Mode.

For the past two days I have been testing an iPhone app called “ProCam 4”, which is by far the best iOS camera app I’ve ever used.  Like the “Manual” camera app that I’ve been using for years, ProCam 4 allows the manual selection of ISO, shutter speed, exposure compensation, and focus distance (note that the iPhone camera’s lens has a fixed aperture, so F-stop cannot be manually set).  Also like the Manual app, ProCam 4 allows images to be captured using RAW mode, which has a great many advantages over capture in JPEG format (see this post for more information: Post on RAW Capture).  And both of these camera apps display a histogram to assist in setting exposure properly.  

But ProCam 4 offers far more functionality than does the Manual app or any other iOS camera app I’ve tried.  Here is a partial list of some of my favorite additional features:

  • Shutter Priority: You can choose an exposure mode in which you select the shutter speed first and the app will set the appropriate ISO.
  • Exposure Bracketing: You can shoot a series of four shots at different exposures to increase the likelihood that one of them will be at the best exposure for the lighting conditions.  The series of shots can also be combined using HDR tools found in Lightroom, Photoshop, and other editing software into a single image with a higher range of tones from very dark to very bright.
  • White Balance: You can adjust white balance in the app, which is often preferable to having to adjust it in your RAW files during post-processing.
  • Virtual Horizon: The display can show you when the horizon is level.
  • Slow Shutter Options: You can select long fixed shutter speeds as well as bulb mode to keep the shutter open for as long as you’d like.
  • RAW+JPEG: You can choose to store the image in both RAW and JPEG formats.
  • Editing Options: This app provides many advanced in-camera editing tools and filters.

With all this incremental functionality, your little phone’s camera begins to behave a lot like a more advanced standalone camera.  While the iPhone’s camera, with its small sensor and its tiny fixed-aperture non-interchangeable lens, still cannot compare to a professional or enthusiast DSLR or ILC camera, the results using ProCam 4 are vastly improved compared to using the phone’s native camera app.  At $4.99 to purchase via the iTunes Store, this app is a great buy and a serious enhancement to the iPhone’s built-in camera.

You can find the ProCam 4 app here: ProCam 4 app.

What app do you use to control your phone’s camera?  What do you like and dislike about it?  Please share your thoughts here.

Want to read more posts about photography gear?  Find them all here: Posts on Gear.


Decent Exposure: Mastering exposure is key to getting great images

Of all the primary elements a photographer controls–composition, focus, the moment the shutter is released, and of course the choice of the subject–none is more critical to making a great image than setting a proper exposure.  Some corrections to a poorly exposed image can be made in post-processing, and there are occasionally good artistic reasons to override the norms of exposure in order to evoke a certain mood in an image by making it darker or brighter than usual, but before we can effectively make these exceptional choices it is necessary to learn the basics of setting an appropriate exposure.

Let’s begin by defining exposure and the elements that comprise it.  Simply put, exposure refers to the amount of light that reaches the camera’s sensor and therefore how light or dark the resulting image will appear.  Four components together determine the exposure: 1) the brightness of the light reflecting off the subject and reaching the front of the lens, 2) the aperture setting on the lens (how wide or narrow is the opening of the lens), 3) the shutter speed setting (how long is the camera’s shutter open to allow light to strike the sensor), and 4) the sensitivity setting of the camera’s sensor.  We don’t always have control over the first component, but the other three are within our control using our camera’s settings.

Many photographers simply set their camera on Auto mode and let the camera’s built-in meter make its best guess as to how the image should be exposed.  That method can work well under certain conditions, but it is highly prone to errors.  For example, if your main subject is strongly backlit, the camera’s meter will expose for the average brightness in the scene and will underexpose the subject.  This is why so often we see underexposed photos of people standing outside in bright sunlight.

Although I compensated for the strong backlighting in this image of a Tibetan family enjoying a midday picnic, their faces are still quite shadowy, indicating a bit brighter exposure would have been better still.  Buy this photo

Fortunately, there are several easy methods to achieve a correct exposure even under challenging lighting conditions.  Here are a few that I use frequently:

  1. Set the camera’s metering mode to Spot Metering: By default most cameras’ metering systems use a sophisticated pattern-matching algorithm that measures how bright or dark each area of the image is and makes its best guess about a workable exposure based on similar scenes in the camera’s database.  Most cameras allow you to select a simpler metering mode called Spot Metering, that just measures the light at the central point in the image or another point that you select.  If you choose Spot Metering and select the measuring point to be right where your main subject is, you should get just the right exposure.
  2. Dial in some exposure compensation: Most cameras let you override the meter’s exposure setting by dialing in a compensation setting to lighten or darken the image.  If your subject is backlit, you will likely want to increase the exposure by one to two stops (each “stop” of additional exposure represents a doubling of the amount of light reaching the sensor).  The camera’s display should show something like “+1 EV” to alert you that you’ve dialed in 1 extra stop of exposure, and the number changes as you change the compensation setting.  Just be sure to set the exposure compensation back to zero when you’re done using it.
  3. Go fully manual: To gain complete control over your camera’s exposure settings, choose the meter’s Manual mode.  Then you can change all three exposure elements (shutter speed, aperture, and ISO) until the image appears properly exposed when you review it on your camera’s display.
  4. Use flash to increase the lighting on your main subject: One good way to achieve proper exposure with a backlit subject is to increase lighting on the subject itself, so that there is no longer such a difference in brightness between the subject and the background.  Your camera’s built-in flash may be strong enough to pull off this trick, but it often helps to have a more powerful flash unit with you.  There are some other reasons why you may not want to use flash as a main source of light on your subject, so this method should be used sparingly.  A reflector can be used instead of flash to reflect some of the sun’s light onto the front of your subject.

For this photo shoot with a musician friend, I shot into the light so she wouldn’t have to squint into the sun and also so that we’d have a beautiful rim light from the sun around her hair.  To pull this off, I used manual mode and selected the proper exposure for her face.  I employed a reflector to bounce some sunlight back onto her face and trumpet.  [Client image not for sale.]

Similar methods can be used for other challenging lighting conditions besides backlighting.  If the subject is a brighter or darker color than the “neutral gray” your camera’s meter uses for a standard, then you need to dial in more or less exposure as appropriate.  My black cat Dragonfly, for example, requires an especially dark exposure to override the meter from thinking he’s a gray cat and choosing too bright an exposure.  Similarly, a white polar bear will need additional exposure to stop the meter from underexposing what it assumes to be a gray bear.

When photographing a black subject, reduce the exposure to compensate for the light meter’s mistaken assumption that the subject is a neutral gray color.  Buy this photo

Whatever method you use to choose your exposure, be sure to take a look at the resulting image using your camera’s monitor.  Does the main subject appear to be properly exposed, or is it still too dark or perhaps too bright?  If your camera offers a histogram display, learn how it works and use it to check your exposure in tricky lighting conditions.  I’ll write a future post specifically about the histogram, as it is a very useful and often overlooked feature.

With some attention to the exposure of your images and use of some of the techniques described here, you can achieve a correctly exposed image nearly all of the time.  After mastering the essentials of exposure, you will have more keepers and fewer images in the virtual trash can, and you can even begin to break the rules for artistic effect.

Want to see more posts on photographic techniques?  You can find them all here: Posts on Techniques.

What lighting situations do you find the trickiest?  What techniques do you use to ensure properly exposed images?  Please share your thoughts in the comments box.