Black-and-White to the Rescue [Encore Publication]: Converting a noisy or strangely colored image to monochrome can save the day

In a recent post (Post on Circus Automatic), I shared several practical tips for shooting fast-moving indoor performances, using a circus performance as an example.  While I was happy with many of my images from that evening’s shoot, I discussed how the single-colored LED lights now used at many indoor performances can impart an unnatural color cast to photos that can be hard to correct in post-processing.  In today’s post, I show how converting these images to black-and-white can overcome some of the limitations of shooting under these adverse lighting conditions, with the added bonus that the noise imparted to the images (from having to shoot at a very high ISO setting) can also be less noticeable in black-and-white conversions.

First, a little background explanation on why these LED lights are so troublesome for the photographer to work with.  When we refer to the resolution, or number of pixels, in our camera’s sensor, that number is actually the total count of three different kinds of pixels, each kind sensitive to only one of the three primary colors (red, blue, and green).  Without going into the nitty-gritty technical details, suffice it to say that in most camera sensors, about 50% of the pixels record only green data, about 25% only red data, and about 25% only blue data.  My camera (the Nikon D810) is said to have a resolution of 36.3 megapixels (MP), but if my subject is lit by a single-colored red LED, in reality only about 9 MP of resolution is recorded.  The other two color channels will essentially contain no data.  This is bad for several reasons, most notably because the image will be cast unnaturally toward the red color channel and because its effective resolution will be low.

There’s very little we can do in post-processing to recover from the loss of resolution during capture, but we can adjust the color temperature to try to correct a little bit of the strange color cast.  Converting the image to black-and-white, though, can restore the image to a more natural appearance by masking the color cast.  This can be aided by using Lightroom’s contrast and color control sliders to adjust the balance of the black-and-white version until it appears closest to a normal tone.

Consider the following two versions of the same shot.  The first version is in color, and even after adjusting the color temperature and contrast, there is still a distracting red color cast.  There is also some noise apparent in the image as a result of the high ISO setting required to freeze the acrobats’ motion.

The color version of this image appears unnatural even after adjusting color temperature, due to the lighting which consisted of a red-colored LED array.

Now, take a look at the black-and-white version of the same image.  Creating this version required careful attention to the balance of each color and contrast setting to make the final image.  The good news: the monochrome image appears much more natural to the eye than does the color version.  The skin tones seem less artificial, and the curtain in the background does not distract as much.  Furthermore, there is less noise apparent in the black-and-white version.
The same shot appears more natural and less noisy when converted to a black-and-white photo.  Buy this photo

This next shot appears much more acceptable in its color version.  During a live performance, the lighting often changes drastically from one moment to the next, and in this image the LED lights didn’t impart as harsh a red cast as in the previous image.  Furthermore, the aerialist was dressed entirely in red and was working with red ropes, so what red color cast was present does not appear as unnatural.

This image is highly effective when presented in full color.  Buy this photo

While I like this image for its dramatic power and strikingly vibrant red colors, let’s take a look at a black-and-white conversion for comparison.  The monochrome version lacks the visceral impact of the strident red color, but it benefits from a more natural tone, a quasi-documentary look and feel, and a nice clean black background.  In this case, the black-and-white conversion doesn’t so much rescue the image as change the kind of feeling it elicits.  I like both versions.
The black-and-white version is cleaner and evokes a very different set of emotions than does the color version.  Buy this photo

When you are forced to shoot under very difficult lighting conditions, try converting to black-and-white during post-processing.  It just might rescue some of your images and can evoke a very different feel in other images.

For a refresher on the black-and-white conversion process and when you may want to use it, read this post: Post on B&W Conversion.

During post-processing, have you been able to rescue or improve images shot under challenging lighting conditions?  Did you convert to black-and-white, or use different techniques?  Please share your experiences here.

In the Nik of Time [Updated]: Nik Collection 2 offers enhanced image editing tools

Note: DxO recently announced a new release of the Nik suite of image processing tools.  Nik Collection 2 is now available for initial purchase ($99) or for upgrading ($59).  Highlights of the new version include the addition of many new creative presets, as well as bundling with DxO’s PhotoLab photo editing platform.  This latter enhancement means that Nik users who don’t wish to run it as a plugin on top of Adobe Photoshop or Adobe Lightroom now have the option of running the Nik suite on top of PhotoLab instead.  I have not yet upgraded to the new version, but have been using the Nik Collection 1 for several years with great utility.  Read on for my review of that original release.

In 2012, Nik Software, a small company known for their image processing tools that emulated the look and feel of using old film, was quietly acquired by a somewhat larger company known as Google.  Google announced they were making the entire suite of Nik tools available for free to all users.  As mentioned above, Google ceased supporting the Nik suite as of 2017, but the software was quickly purchased by DxO who just announced their first release.  The good news is that with this new release the photography community now has a reasonable assurance that these industry-leading image editing tools will be supported well into the future.  The bad news is that the Nik suite is no longer free; DxO is charging $69 to download the software.  That’s still less than the $150 that Google charged users for this software prior to 2016, and it’s a very reasonable price for software of this scope and quality.

For photographers who wish to access the Nik tool set and don’t already own it, or for photographers for whom the tool set has ceased working, I recommend downloading the new release from DxO’s website now, as the introductory price of $50 will increase to $69 at the end of June, 2018.  For those of us who already have the software installed and for whom it’s still working just fine, I don’t see a need to upgrade to the paid version right now  That’s because the new release, while more stable and better documented than the free older version from Google, does contain the same tools with the same functionality.  Personally, I will choose to wait until a new O/S or Lightroom upgrade forces my hand.  But I am very pleased to know that these wonderful editing tools will continue to be supported and developed into the future!

Here are my notes from the past two years of using the Nik suite of image editing software tools.  Its capabilities are leading-edge and would be well worth spending hundreds of dollars to obtain.  It doesn’t do everything, but what it does, it does better than tools such as Photoshop and Lightroom, each of which costs a good deal of money.  That Nik’s great capabilities are available for download for less than $70 is a wonderful value, and I strongly recommend you give them a try.

It’s important to note that the Nik Collection of software tools is not intended to be standalone image processing software.  It consists of a set of plugins, each specialized for a different specific purpose, that must be accessed by a general-purpose image editing application such as Photoshop, Lightroom, or Aperture.  I use Lightroom for nearly all of my post-processing, so I used that application to access the Nik Collection.

Once you have your general image editing application installed, then you can download the Nik Collection modules at the DxO website listed above.  When you are working in your application of choice, you will then have access to the various Nik Collection tools in the editing menus.  For example, when I select an image in Lightroom, I can access six of the seven Nik modules by pulling down the “Photo” menu and then pulling down the “Edit In” sub-menu.  One of the Nik modules, the HDR Efex tool, is accessed instead under the “File” and “Export with Preset” menu choices.

These are the seven Nik Collection modules included in the download:

Analog Efex Pro

Explore the look and feel of classic cameras, films, and lenses.

Color Efex Pro

A comprehensive set of filters for color correction, retouching, and creative effects.

Silver Efex Pro

Master the art of black-and-white photography with darkroom-inspired controls.

Viveza

Selectively adjust the color and tonality of your images without complicated masks or selections.

HDR Efex Pro

From natural to artistic, explore the full potential of HDR photography.

Sharpener Pro

Bring out hidden details consistently with the professional’s choice for image sharpening.

Dfine

Improve your images with noise reduction tailored to your camera.

So far, I’ve played around with just three of these tools.
Silver Efex Pro did a very good job of converting my test images to monochrome.  I’m pretty good at using Lightroom’s tools to convert color images to black-and-white, but they take a lot of practice to master.  In Nik’s Silver Efex module I was able to make some good choices very quickly.  For those who want to fine-tune their black-and-white conversions, there are very good tools for detailed control over the process.
I used Nik’s Dfine module to attempt to reduce noise in a favorite shot of the Milky Way over Yosemite Valley’s Half Dome.  The results of my quick trial looked comparable to what I had done in Lightroom, but I suspect if I took the time to learn the Nik tool more thoroughly, I could end up with even better results.
Finally, I tested Nik’s HDR Efex Pro tool.  This little gem is a joy to use.  Just select the series of shots from which you want to build an HDR (High Dynamic Range) image, export them to HDR Efex, and click a couple of buttons to generate the base HRD image there.  My default image looked pretty good, but the Nik tool has a wide range of presets that allow you to generate different HDR effects with the click of a button.  I tried several of these presets until I found one that perfectly suited the scene.  A few more small tweaks using the detailed adjustment sliders, and I was ready to save the HDR image back into Lightroom.  In the past I have been very disappointed with Lightroom’s built-in HDR tools, and only slightly more satisfied with Photoshop’s HDR module, but the Nik HDR Efex Pro plugin does an amazing job.  It’s both easier to use and generates better results than the other HDR software I’ve used.  Specifically, the Nik tool does a much better job than the other tools at producing natural-looking colors and at removing the “ghosting” effects from when the underlying images are just a little bit different from one another.  Now I’m eager to find the time to go back to some of my favorite HDR images and rebuild them using the Nik software!
For comparison, here is a favorite HDR image of mine, first shown after processing in Photoshop’s HDR tools and then shown after processing in Nik’s HDR Efex Pro tools.
lrwm-lowres-5884This HDR image of Lago Grey with its glacier and the peaks of Torres del Paine National Park in Chile was processed using Photoshop’s HDR tools.  The colors appear unnaturally saturated and parts of the image (especially the tops of the mountains and the brush in the foreground) show some ghosting effects.
lrwm-lowres-5880-5884-hdrnikThis version was processed using the Nik Collection’s HDR Efex Pro tools.  The colors look much more natural and all parts of the image appear sharp and free from ghosting.
I am looking forward to revisiting many of my favorite images and reprocessing them using the Nik Collection’s tools.  I highly recommend this versatile, easy-to-use, and powerful suite of image editing modules.
Have you used the Nik Collection for your own photography?  What do you like and dislike?  Please share your thoughts here.
Want to read more posts about post-processing your images?  Find them all here: Posts on Post-Processing.

Black-and-White to the Rescue [Encore Publication]: Converting a noisy or strangely colored image to monochrome can save the day

In a recent post (Post on Circus Automatic), I shared several practical tips for shooting fast-moving indoor performances, using a circus performance as an example.  While I was happy with many of my images from that evening’s shoot, I discussed how the single-colored LED lights now used at many indoor performances can impart an unnatural color cast to photos that can be hard to correct in post-processing.  In today’s post, I show how converting these images to black-and-white can overcome some of the limitations of shooting under these adverse lighting conditions, with the added bonus that the noise imparted to the images (from having to shoot at a very high ISO setting) can also be less noticeable in black-and-white conversions.

First, a little background explanation on why these LED lights are so troublesome for the photographer to work with.  When we refer to the resolution, or number of pixels, in our camera’s sensor, that number is actually the total count of three different kinds of pixels, each kind sensitive to only one of the three primary colors (red, blue, and green).  Without going into the nitty-gritty technical details, suffice it to say that in most camera sensors, about 50% of the pixels record only green data, about 25% only red data, and about 25% only blue data.  My camera (the Nikon D810) is said to have a resolution of 36.3 megapixels (MP), but if my subject is lit by a single-colored red LED, in reality only about 9 MP of resolution is recorded.  The other two color channels will essentially contain no data.  This is bad for several reasons, most notably because the image will be cast unnaturally toward the red color channel and because its effective resolution will be low.

There’s very little we can do in post-processing to recover from the loss of resolution during capture, but we can adjust the color temperature to try to correct a little bit of the strange color cast.  Converting the image to black-and-white, though, can restore the image to a more natural appearance by masking the color cast.  This can be aided by using Lightroom’s contrast and color control sliders to adjust the balance of the black-and-white version until it appears closest to a normal tone.

Consider the following two versions of the same shot.  The first version is in color, and even after adjusting the color temperature and contrast, there is still a distracting red color cast.  There is also some noise apparent in the image as a result of the high ISO setting required to freeze the acrobats’ motion.

The color version of this image appears unnatural even after adjusting color temperature, due to the lighting which consisted of a red-colored LED array.

Now, take a look at the black-and-white version of the same image.  Creating this version required careful attention to the balance of each color and contrast setting to make the final image.  The good news: the monochrome image appears much more natural to the eye than does the color version.  The skin tones seem less artificial, and the curtain in the background does not distract as much.  Furthermore, there is less noise apparent in the black-and-white version.
The same shot appears more natural and less noisy when converted to a black-and-white photo.  Buy this photo

This next shot appears much more acceptable in its color version.  During a live performance, the lighting often changes drastically from one moment to the next, and in this image the LED lights didn’t impart as harsh a red cast as in the previous image.  Furthermore, the aerialist was dressed entirely in red and was working with red ropes, so what red color cast was present does not appear as unnatural.

This image is highly effective when presented in full color.  Buy this photo

While I like this image for its dramatic power and strikingly vibrant red colors, let’s take a look at a black-and-white conversion for comparison.  The monochrome version lacks the visceral impact of the strident red color, but it benefits from a more natural tone, a quasi-documentary look and feel, and a nice clean black background.  In this case, the black-and-white conversion doesn’t so much rescue the image as change the kind of feeling it elicits.  I like both versions.
The black-and-white version is cleaner and evokes a very different set of emotions than does the color version.  Buy this photo

When you are forced to shoot under very difficult lighting conditions, try converting to black-and-white during post-processing.  It just might rescue some of your images and can evoke a very different feel in other images.

For a refresher on the black-and-white conversion process and when you may want to use it, read this post: Post on B&W Conversion.

During post-processing, have you been able to rescue or improve images shot under challenging lighting conditions?  Did you convert to black-and-white, or use different techniques?  Please share your experiences here.

In the Nik of Time [Updated]: Now owned by DxO, the Nik Collection offers leading-edge image editing tools

Note: In 2017 Google announced that they would no longer provide support for the Nik suite of tools.  That meant you can still download the latest version of Nik, but it may not work with the other software you are running.  Many in the photography community were concerned because sooner or later as we upgrade our other software, Nik will cease working for us.  Fortunately, a company called DxO purchased the Nik suite of tools from Google a few months after Google ceased supporting the software, and just this month DxO announced their first Nik release.  Read on for more details about the Nik tools and DxO’s new release.

In 2012, Nik Software, a small company known for their image processing tools that emulated the look and feel of using old film, was quietly acquired by a somewhat larger company known as Google.  Google announced they were making the entire suite of Nik tools available for free to all users.  As mentioned above, Google ceased supporting the Nik suite as of 2017, but the software was quickly purchased by DxO who just announced their first release.  The good news is that with this new release the photography community now has a reasonable assurance that these industry-leading image editing tools will be supported well into the future.  The bad news is that the Nik suite is no longer free; DxO is charging $69 to download the software.  That’s still less than the $150 that Google charged users for this software prior to 2016, and it’s a very reasonable price for software of this scope and quality.

For photographers who wish to access the Nik tool set and don’t already own it, or for photographers for whom the tool set has ceased working, I recommend downloading the new release from DxO’s website now, as the introductory price of $50 will increase to $69 at the end of June, 2018.  For those of us who already have the software installed and for whom it’s still working just fine, I don’t see a need to upgrade to the paid version right now  That’s because the new release, while more stable and better documented than the free older version from Google, does contain the same tools with the same functionality.  Personally, I will choose to wait until a new O/S or Lightroom upgrade forces my hand.  But I am very pleased to know that these wonderful editing tools will continue to be supported and developed into the future!

Here are my notes from the past two years of using the Nik suite of image editing software tools.  Its capabilities are leading-edge and would be well worth spending hundreds of dollars to obtain.  It doesn’t do everything, but what it does, it does better than tools such as Photoshop and Lightroom, each of which costs a good deal of money.  That Nik’s great capabilities are available for download for less than $70 is a wonderful value, and I strongly recommend you give them a try.

It’s important to note that the Nik Collection of software tools is not intended to be standalone image processing software.  It consists of a set of plugins, each specialized for a different specific purpose, that must be accessed by a general-purpose image editing application such as Photoshop, Lightroom, or Aperture.  I use Lightroom for nearly all of my post-processing, so I used that application to access the Nik Collection.

Once you have your general image editing application installed, then you can download the Nik Collection modules at the DxO website listed above.  When you are working in your application of choice, you will then have access to the various Nik Collection tools in the editing menus.  For example, when I select an image in Lightroom, I can access six of the seven Nik modules by pulling down the “Photo” menu and then pulling down the “Edit In” sub-menu.  One of the Nik modules, the HDR Efex tool, is accessed instead under the “File” and “Export with Preset” menu choices.

These are the seven Nik Collection modules included in the download:

Analog Efex Pro

Explore the look and feel of classic cameras, films, and lenses.

Color Efex Pro

A comprehensive set of filters for color correction, retouching, and creative effects.

Silver Efex Pro

Master the art of black-and-white photography with darkroom-inspired controls.

Viveza

Selectively adjust the color and tonality of your images without complicated masks or selections.

HDR Efex Pro

From natural to artistic, explore the full potential of HDR photography.

Sharpener Pro

Bring out hidden details consistently with the professional’s choice for image sharpening.

Dfine

Improve your images with noise reduction tailored to your camera.

So far, I’ve played around with just three of these tools.
Silver Efex Pro did a very good job of converting my test images to monochrome.  I’m pretty good at using Lightroom’s tools to convert color images to black-and-white, but they take a lot of practice to master.  In Nik’s Silver Efex module I was able to make some good choices very quickly.  For those who want to fine-tune their black-and-white conversions, there are very good tools for detailed control over the process.
I used Nik’s Dfine module to attempt to reduce noise in a favorite shot of the Milky Way over Yosemite Valley’s Half Dome.  The results of my quick trial looked comparable to what I had done in Lightroom, but I suspect if I took the time to learn the Nik tool more thoroughly, I could end up with even better results.
Finally, I tested Nik’s HDR Efex Pro tool.  This little gem is a joy to use.  Just select the series of shots from which you want to build an HDR (High Dynamic Range) image, export them to HDR Efex, and click a couple of buttons to generate the base HRD image there.  My default image looked pretty good, but the Nik tool has a wide range of presets that allow you to generate different HDR effects with the click of a button.  I tried several of these presets until I found one that perfectly suited the scene.  A few more small tweaks using the detailed adjustment sliders, and I was ready to save the HDR image back into Lightroom.  In the past I have been very disappointed with Lightroom’s built-in HDR tools, and only slightly more satisfied with Photoshop’s HDR module, but the Nik HDR Efex Pro plugin does an amazing job.  It’s both easier to use and generates better results than the other HDR software I’ve used.  Specifically, the Nik tool does a much better job than the other tools at producing natural-looking colors and at removing the “ghosting” effects from when the underlying images are just a little bit different from one another.  Now I’m eager to find the time to go back to some of my favorite HDR images and rebuild them using the Nik software!
For comparison, here is a favorite HDR image of mine, first shown after processing in Photoshop’s HDR tools and then shown after processing in Nik’s HDR Efex Pro tools.
lrwm-lowres-5884This HDR image of Lago Grey with its glacier and the peaks of Torres del Paine National Park in Chile was processed using Photoshop’s HDR tools.  The colors appear unnaturally saturated and parts of the image (especially the tops of the mountains and the brush in the foreground) show some ghosting effects.
lrwm-lowres-5880-5884-hdrnikThis version was processed using the Nik Collection’s HDR Efex Pro tools.  The colors look much more natural and all parts of the image appear sharp and free from ghosting.
I am looking forward to revisiting many of my favorite images and reprocessing them using the Nik Collection’s tools.  I highly recommend this versatile, easy-to-use, and powerful suite of image editing modules.
Have you used the Nik Collection for your own photography?  What do you like and dislike?  Please share your thoughts here.
Want to read more posts about post-processing your images?  Find them all here: Posts on Post-Processing.

In the Nik of Time [Encore Publication]: Now owned by DxO, the Nik Collection offers leading-edge image editing tools

Update: Recently I updated to a new PC for my post-processing work and found that, not unexpectedly, the original free Google version of the Nik suite no longer worked with my new configuration.  Finally, my hand was tipped and it was time to upgrade to the paid version from DxO.  I’m pleased to report that this invaluable suite of image editing tools now works better than ever.  From my limited testing, it appears to run faster and with fewer issues than before.  The interface is also cleaner.  And of course we can now expect better support and more frequent fixes than when the tools were given away for free.

In 2017 Google announced that they would no longer provide support for the Nik suite of tools.  That meant you can still download the latest version of Nik, but it may not work with the other software you are running.  Many in the photography community were concerned because sooner or later as we upgrade our other software, Nik will cease working for us.  Fortunately, a company called DxO purchased the Nik suite of tools from Google a few months after Google ceased supporting the software, and just this month DxO announced their first Nik release.  Read on for more details about the Nik tools and DxO’s new release.

In 2012, Nik Software, a small company known for their image processing tools that emulated the look and feel of using old film, was quietly acquired by a somewhat larger company known as Google.  Google announced they were making the entire suite of Nik tools available for free to all users.  As mentioned above, Google ceased supporting the Nik suite as of 2017, but the software was quickly purchased by DxO who just announced their first release.  The good news is that with this new release the photography community now has a reasonable assurance that these industry-leading image editing tools will be supported well into the future.  The bad news is that the Nik suite is no longer free; DxO is charging $69 to download the software.  That’s still less than the $150 that Google charged users for this software prior to 2016, and it’s a very reasonable price for software of this scope and quality.

For photographers who wish to access the Nik tool set and don’t already own it, or for photographers for whom the tool set has ceased working, I recommend downloading the new release from DxO’s website now, as the introductory price of $50 will increase to $69 at the end of June, 2018.  For those of us who already have the software installed and for whom it’s still working just fine, I don’t see a need to upgrade to the paid version right now.  That’s because the new release, while more stable and better documented than the free older version from Google, does contain the same tools with the same functionality.  Personally, I will choose to wait until a new O/S or Lightroom upgrade forces my hand.  But I am very pleased to know that these wonderful editing tools will continue to be supported and developed into the future!

Here are my notes from the past two years of using the Nik suite of image editing software tools.  Its capabilities are leading-edge and would be well worth spending hundreds of dollars to obtain.  It doesn’t do everything, but what it does, it does better than tools such as Photoshop and Lightroom, each of which costs a good deal of money.  That Nik’s great capabilities are available for download for less than $70 is a wonderful value, and I strongly recommend you give them a try.

It’s important to note that the Nik Collection of software tools is not intended to be standalone image processing software.  It consists of a set of plugins, each specialized for a different specific purpose, that must be accessed by a general-purpose image editing application such as Photoshop, Lightroom, or Aperture.  I use Lightroom for nearly all of my post-processing, so I used that application to access the Nik Collection.

Once you have your general image editing application installed, then you can download the Nik Collection modules at the DxO website listed above.  When you are working in your application of choice, you will then have access to the various Nik Collection tools in the editing menus.  For example, when I select an image in Lightroom, I can access six of the seven Nik modules by pulling down the “Photo” menu and then pulling down the “Edit In” sub-menu.  One of the Nik modules, the HDR Efex tool, is accessed instead under the “File” and “Export with Preset” menu choices.

These are the seven Nik Collection modules included in the download:

Analog Efex Pro

Explore the look and feel of classic cameras, films, and lenses.

Color Efex Pro

A comprehensive set of filters for color correction, retouching, and creative effects.

Silver Efex Pro

Master the art of black-and-white photography with darkroom-inspired controls.

Viveza

Selectively adjust the color and tonality of your images without complicated masks or selections.

HDR Efex Pro

From natural to artistic, explore the full potential of HDR photography.

Sharpener Pro

Bring out hidden details consistently with the professional’s choice for image sharpening.

Dfine

Improve your images with noise reduction tailored to your camera.

So far, I’ve played around with just three of these tools.
Silver Efex Pro did a very good job of converting my test images to monochrome.  I’m pretty good at using Lightroom’s tools to convert color images to black-and-white, but they take a lot of practice to master.  In Nik’s Silver Efex module I was able to make some good choices very quickly.  For those who want to fine-tune their black-and-white conversions, there are very good tools for detailed control over the process.
I used Nik’s Dfine module to attempt to reduce noise in a favorite shot of the Milky Way over Yosemite Valley’s Half Dome.  The results of my quick trial looked comparable to what I had done in Lightroom, but I suspect if I took the time to learn the Nik tool more thoroughly, I could end up with even better results.
Finally, I tested Nik’s HDR Efex Pro tool.  This little gem is a joy to use.  Just select the series of shots from which you want to build an HDR (High Dynamic Range) image, export them to HDR Efex, and click a couple of buttons to generate the base HRD image there.  My default image looked pretty good, but the Nik tool has a wide range of presets that allow you to generate different HDR effects with the click of a button.  I tried several of these presets until I found one that perfectly suited the scene.  A few more small tweaks using the detailed adjustment sliders, and I was ready to save the HDR image back into Lightroom.  In the past I have been very disappointed with Lightroom’s built-in HDR tools, and only slightly more satisfied with Photoshop’s HDR module, but the Nik HDR Efex Pro plugin does an amazing job.  It’s both easier to use and generates better results than the other HDR software I’ve used.  Specifically, the Nik tool does a much better job than the other tools at producing natural-looking colors and at removing the “ghosting” effects from when the underlying images are just a little bit different from one another.  Now I’m eager to find the time to go back to some of my favorite HDR images and rebuild them using the Nik software!
For comparison, here is a favorite HDR image of mine, first shown after processing in Photoshop’s HDR tools and then shown after processing in Nik’s HDR Efex Pro tools.
lrwm-lowres-5884This HDR image of Lago Grey with its glacier and the peaks of Torres del Paine National Park in Chile was processed using Photoshop’s HDR tools.  The colors appear unnaturally saturated and parts of the image (especially the tops of the mountains and the brush in the foreground) show some ghosting effects.
lrwm-lowres-5880-5884-hdrnikThis version was processed using the Nik Collection’s HDR Efex Pro tools.  The colors look much more natural and all parts of the image appear sharp and free from ghosting.
I am looking forward to revisiting many of my favorite images and reprocessing them using the Nik Collection’s tools.  I highly recommend this versatile, easy-to-use, and powerful suite of image editing modules.
Have you used the Nik Collection for your own photography?  What do you like and dislike?  Please share your thoughts here.
Want to read more posts about post-processing your images?  Find them all here: Posts on Post-Processing.

In the Nik of Time [Encore Publication]: Now owned by DxO, the Nik Collection offers leading-edge image editing tools

Note: In 2017 Google announced that they would no longer provide support for the Nik suite of tools.  That meant you can still download the latest version of Nik, but it may not work with the other software you are running.  Many in the photography community were concerned because sooner or later as we upgrade our other software, Nik will cease working for us.  Fortunately, a company called DxO purchased the Nik suite of tools from Google a few months after Google ceased supporting the software, and just this month DxO announced their first Nik release.  Read on for more details about the Nik tools and DxO’s new release.

In 2012, Nik Software, a small company known for their image processing tools that emulated the look and feel of using old film, was quietly acquired by a somewhat larger company known as Google.  Google announced they were making the entire suite of Nik tools available for free to all users.  As mentioned above, Google ceased supporting the Nik suite as of 2017, but the software was quickly purchased by DxO who just announced their first release.  The good news is that with this new release the photography community now has a reasonable assurance that these industry-leading image editing tools will be supported well into the future.  The bad news is that the Nik suite is no longer free; DxO is charging $69 to download the software.  That’s still less than the $150 that Google charged users for this software prior to 2016, and it’s a very reasonable price for software of this scope and quality.

For photographers who wish to access the Nik tool set and don’t already own it, or for photographers for whom the tool set has ceased working, I recommend downloading the new release from DxO’s website now, as the introductory price of $50 will increase to $69 at the end of June, 2018.  For those of us who already have the software installed and for whom it’s still working just fine, I don’t see a need to upgrade to the paid version right now.  That’s because the new release, while more stable and better documented than the free older version from Google, does contain the same tools with the same functionality.  Personally, I will choose to wait until a new O/S or Lightroom upgrade forces my hand.  But I am very pleased to know that these wonderful editing tools will continue to be supported and developed into the future!

Here are my notes from the past two years of using the Nik suite of image editing software tools.  Its capabilities are leading-edge and would be well worth spending hundreds of dollars to obtain.  It doesn’t do everything, but what it does, it does better than tools such as Photoshop and Lightroom, each of which costs a good deal of money.  That Nik’s great capabilities are available for download for less than $70 is a wonderful value, and I strongly recommend you give them a try.

It’s important to note that the Nik Collection of software tools is not intended to be standalone image processing software.  It consists of a set of plugins, each specialized for a different specific purpose, that must be accessed by a general-purpose image editing application such as Photoshop, Lightroom, or Aperture.  I use Lightroom for nearly all of my post-processing, so I used that application to access the Nik Collection.

Once you have your general image editing application installed, then you can download the Nik Collection modules at the DxO website listed above.  When you are working in your application of choice, you will then have access to the various Nik Collection tools in the editing menus.  For example, when I select an image in Lightroom, I can access six of the seven Nik modules by pulling down the “Photo” menu and then pulling down the “Edit In” sub-menu.  One of the Nik modules, the HDR Efex tool, is accessed instead under the “File” and “Export with Preset” menu choices.

These are the seven Nik Collection modules included in the download:

Analog Efex Pro

Explore the look and feel of classic cameras, films, and lenses.

Color Efex Pro

A comprehensive set of filters for color correction, retouching, and creative effects.

Silver Efex Pro

Master the art of black-and-white photography with darkroom-inspired controls.

Viveza

Selectively adjust the color and tonality of your images without complicated masks or selections.

HDR Efex Pro

From natural to artistic, explore the full potential of HDR photography.

Sharpener Pro

Bring out hidden details consistently with the professional’s choice for image sharpening.

Dfine

Improve your images with noise reduction tailored to your camera.

So far, I’ve played around with just three of these tools.
Silver Efex Pro did a very good job of converting my test images to monochrome.  I’m pretty good at using Lightroom’s tools to convert color images to black-and-white, but they take a lot of practice to master.  In Nik’s Silver Efex module I was able to make some good choices very quickly.  For those who want to fine-tune their black-and-white conversions, there are very good tools for detailed control over the process.
I used Nik’s Dfine module to attempt to reduce noise in a favorite shot of the Milky Way over Yosemite Valley’s Half Dome.  The results of my quick trial looked comparable to what I had done in Lightroom, but I suspect if I took the time to learn the Nik tool more thoroughly, I could end up with even better results.
Finally, I tested Nik’s HDR Efex Pro tool.  This little gem is a joy to use.  Just select the series of shots from which you want to build an HDR (High Dynamic Range) image, export them to HDR Efex, and click a couple of buttons to generate the base HRD image there.  My default image looked pretty good, but the Nik tool has a wide range of presets that allow you to generate different HDR effects with the click of a button.  I tried several of these presets until I found one that perfectly suited the scene.  A few more small tweaks using the detailed adjustment sliders, and I was ready to save the HDR image back into Lightroom.  In the past I have been very disappointed with Lightroom’s built-in HDR tools, and only slightly more satisfied with Photoshop’s HDR module, but the Nik HDR Efex Pro plugin does an amazing job.  It’s both easier to use and generates better results than the other HDR software I’ve used.  Specifically, the Nik tool does a much better job than the other tools at producing natural-looking colors and at removing the “ghosting” effects from when the underlying images are just a little bit different from one another.  Now I’m eager to find the time to go back to some of my favorite HDR images and rebuild them using the Nik software!
For comparison, here is a favorite HDR image of mine, first shown after processing in Photoshop’s HDR tools and then shown after processing in Nik’s HDR Efex Pro tools.
lrwm-lowres-5884This HDR image of Lago Grey with its glacier and the peaks of Torres del Paine National Park in Chile was processed using Photoshop’s HDR tools.  The colors appear unnaturally saturated and parts of the image (especially the tops of the mountains and the brush in the foreground) show some ghosting effects.
lrwm-lowres-5880-5884-hdrnikThis version was processed using the Nik Collection’s HDR Efex Pro tools.  The colors look much more natural and all parts of the image appear sharp and free from ghosting.
I am looking forward to revisiting many of my favorite images and reprocessing them using the Nik Collection’s tools.  I highly recommend this versatile, easy-to-use, and powerful suite of image editing modules.
Have you used the Nik Collection for your own photography?  What do you like and dislike?  Please share your thoughts here.
Want to read more posts about post-processing your images?  Find them all here: Posts on Post-Processing.

In the Nik of Time [Updated]: Now owned by DxO, the Nik Collection offers leading-edge image editing tools

Note: In 2017 Google announced that they would no longer provide support for the Nik suite of tools.  That meant you can still download the latest version of Nik, but it may not work with the other software you are running.  Many in the photography community were concerned because sooner or later as we upgrade our other software, Nik will cease working for us.  Fortunately, a company called DxO purchased the Nik suite of tools from Google a few months after Google ceased supporting the software, and just this month DxO announced their first Nik release.  Read on for more details about the Nik tools and DxO’s new release.

In 2012, Nik Software, a small company known for their image processing tools that emulated the look and feel of using old film, was quietly acquired by a somewhat larger company known as Google.  Google announced they were making the entire suite of Nik tools available for free to all users.  As mentioned above, Google ceased supporting the Nik suite as of 2017, but the software was quickly purchased by DxO who just announced their first release.  The good news is that with this new release the photography community now has a reasonable assurance that these industry-leading image editing tools will be supported well into the future.  The bad news is that the Nik suite is no longer free; DxO is charging $69 to download the software.  That’s still less than the $150 that Google charged users for this software prior to 2016, and it’s a very reasonable price for software of this scope and quality.

For photographers who wish to access the Nik tool set and don’t already own it, or for photographers for whom the tool set has ceased working, I recommend downloading the new release from DxO’s website now, as the introductory price of $50 will increase to $69 at the end of June, 2018.  For those of us who already have the software installed and for whom it’s still working just fine, I don’t see a need to upgrade to the paid version right now  That’s because the new release, while more stable and better documented than the free older version from Google, does contain the same tools with the same functionality.  Personally, I will choose to wait until a new O/S or Lightroom upgrade forces my hand.  But I am very pleased to know that these wonderful editing tools will continue to be supported and developed into the future!

Here are my notes from the past two years of using the Nik suite of image editing software tools.  Its capabilities are leading-edge and would be well worth spending hundreds of dollars to obtain.  It doesn’t do everything, but what it does, it does better than tools such as Photoshop and Lightroom, each of which costs a good deal of money.  That Nik’s great capabilities are available for download for less than $70 is a wonderful value, and I strongly recommend you give them a try.

It’s important to note that the Nik Collection of software tools is not intended to be standalone image processing software.  It consists of a set of plugins, each specialized for a different specific purpose, that must be accessed by a general-purpose image editing application such as Photoshop, Lightroom, or Aperture.  I use Lightroom for nearly all of my post-processing, so I used that application to access the Nik Collection.

Once you have your general image editing application installed, then you can download the Nik Collection modules at the DxO website listed above.  When you are working in your application of choice, you will then have access to the various Nik Collection tools in the editing menus.  For example, when I select an image in Lightroom, I can access six of the seven Nik modules by pulling down the “Photo” menu and then pulling down the “Edit In” sub-menu.  One of the Nik modules, the HDR Efex tool, is accessed instead under the “File” and “Export with Preset” menu choices.

These are the seven Nik Collection modules included in the download:

Analog Efex Pro

Explore the look and feel of classic cameras, films, and lenses.

Color Efex Pro

A comprehensive set of filters for color correction, retouching, and creative effects.

Silver Efex Pro

Master the art of black-and-white photography with darkroom-inspired controls.

Viveza

Selectively adjust the color and tonality of your images without complicated masks or selections.

HDR Efex Pro

From natural to artistic, explore the full potential of HDR photography.

Sharpener Pro

Bring out hidden details consistently with the professional’s choice for image sharpening.

Dfine

Improve your images with noise reduction tailored to your camera.

So far, I’ve played around with just three of these tools.
Silver Efex Pro did a very good job of converting my test images to monochrome.  I’m pretty good at using Lightroom’s tools to convert color images to black-and-white, but they take a lot of practice to master.  In Nik’s Silver Efex module I was able to make some good choices very quickly.  For those who want to fine-tune their black-and-white conversions, there are very good tools for detailed control over the process.
I used Nik’s Dfine module to attempt to reduce noise in a favorite shot of the Milky Way over Yosemite Valley’s Half Dome.  The results of my quick trial looked comparable to what I had done in Lightroom, but I suspect if I took the time to learn the Nik tool more thoroughly, I could end up with even better results.
Finally, I tested Nik’s HDR Efex Pro tool.  This little gem is a joy to use.  Just select the series of shots from which you want to build an HDR (High Dynamic Range) image, export them to HDR Efex, and click a couple of buttons to generate the base HRD image there.  My default image looked pretty good, but the Nik tool has a wide range of presets that allow you to generate different HDR effects with the click of a button.  I tried several of these presets until I found one that perfectly suited the scene.  A few more small tweaks using the detailed adjustment sliders, and I was ready to save the HDR image back into Lightroom.  In the past I have been very disappointed with Lightroom’s built-in HDR tools, and only slightly more satisfied with Photoshop’s HDR module, but the Nik HDR Efex Pro plugin does an amazing job.  It’s both easier to use and generates better results than the other HDR software I’ve used.  Specifically, the Nik tool does a much better job than the other tools at producing natural-looking colors and at removing the “ghosting” effects from when the underlying images are just a little bit different from one another.  Now I’m eager to find the time to go back to some of my favorite HDR images and rebuild them using the Nik software!
For comparison, here is a favorite HDR image of mine, first shown after processing in Photoshop’s HDR tools and then shown after processing in Nik’s HDR Efex Pro tools.
lrwm-lowres-5884This HDR image of Lago Grey with its glacier and the peaks of Torres del Paine National Park in Chile was processed using Photoshop’s HDR tools.  The colors appear unnaturally saturated and parts of the image (especially the tops of the mountains and the brush in the foreground) show some ghosting effects.
lrwm-lowres-5880-5884-hdrnikThis version was processed using the Nik Collection’s HDR Efex Pro tools.  The colors look much more natural and all parts of the image appear sharp and free from ghosting.
I am looking forward to revisiting many of my favorite images and reprocessing them using the Nik Collection’s tools.  I highly recommend this versatile, easy-to-use, and powerful suite of image editing modules.
Have you used the Nik Collection for your own photography?  What do you like and dislike?  Please share your thoughts here.
Want to read more posts about post-processing your images?  Find them all here: Posts on Post-Processing.

Black-and-White to the Rescue [Encore Publication]: Converting a noisy or strangely colored image to monochrome can save the day

In a recent post (Post on Circus Automatic), I shared several practical tips for shooting fast-moving indoor performances, using a circus performance as an example.  While I was happy with many of my images from that evening’s shoot, I discussed how the single-colored LED lights now used at many indoor performances can impart an unnatural color cast to photos that can be hard to correct in post-processing.  In today’s post, I show how converting these images to black-and-white can overcome some of the limitations of shooting under these adverse lighting conditions, with the added bonus that the noise imparted to the images (from having to shoot at a very high ISO setting) can also be less noticeable in black-and-white conversions.

First, a little background explanation on why these LED lights are so troublesome for the photographer to work with.  When we refer to the resolution, or number of pixels, in our camera’s sensor, that number is actually the total count of three different kinds of pixels, each kind sensitive to only one of the three primary colors (red, blue, and green).  Without going into the nitty-gritty technical details, suffice it to say that in most camera sensors, about 50% of the pixels record only green data, about 25% only red data, and about 25% only blue data.  My camera (the Nikon D810) is said to have a resolution of 36.3 megapixels (MP), but if my subject is lit by a single-colored red LED, in reality only about 9 MP of resolution is recorded.  The other two color channels will essentially contain no data.  This is bad for several reasons, most notably because the image will be cast unnaturally toward the red color channel and because its effective resolution will be low.

There’s very little we can do in post-processing to recover from the loss of resolution during capture, but we can adjust the color temperature to try to correct a little bit of the strange color cast.  Converting the image to black-and-white, though, can restore the image to a more natural appearance by masking the color cast.  This can be aided by using Lightroom’s contrast and color control sliders to adjust the balance of the black-and-white version until it appears closest to a normal tone.

Consider the following two versions of the same shot.  The first version is in color, and even after adjusting the color temperature and contrast, there is still a distracting red color cast.  There is also some noise apparent in the image as a result of the high ISO setting required to freeze the acrobats’ motion.

The color version of this image appears unnatural even after adjusting color temperature, due to the lighting which consisted of a red-colored LED array.

Now, take a look at the black-and-white version of the same image.  Creating this version required careful attention to the balance of each color and contrast setting to make the final image.  The good news: the monochrome image appears much more natural to the eye than does the color version.  The skin tones seem less artificial, and the curtain in the background does not distract as much.  Furthermore, there is less noise apparent in the black-and-white version.
The same shot appears more natural and less noisy when converted to a black-and-white photo.  Buy this photo

This next shot appears much more acceptable in its color version.  During a live performance, the lighting often changes drastically from one moment to the next, and in this image the LED lights didn’t impart as harsh a red cast as in the previous image.  Furthermore, the aerialist was dressed entirely in red and was working with red ropes, so what red color cast was present does not appear as unnatural.

This image is highly effective when presented in full color.  Buy this photo

While I like this image for its dramatic power and strikingly vibrant red colors, let’s take a look at a black-and-white conversion for comparison.  The monochrome version lacks the visceral impact of the strident red color, but it benefits from a more natural tone, a quasi-documentary look and feel, and a nice clean black background.  In this case, the black-and-white conversion doesn’t so much rescue the image as change the kind of feeling it elicits.  I like both versions.
The black-and-white version is cleaner and evokes a very different set of emotions than does the color version.  Buy this photo

When you are forced to shoot under very difficult lighting conditions, try converting to black-and-white during post-processing.  It just might rescue some of your images and can evoke a very different feel in other images.

For a refresher on the black-and-white conversion process and when you may want to use it, read this post: Post on B&W Conversion.

During post-processing, have you been able to rescue or improve images shot under challenging lighting conditions?  Did you convert to black-and-white, or use different techniques?  Please share your experiences here.

In the Nik of Time [Encore Publication]: Google’s Nik Collection offers leading-edge image editing tools for free

Note: Google has announced that they will no longer provide support for the Nik suite of tools.  That means you can still download the latest version of Nik, but it may not work with the other software you are running; even if it works for you today, at some point in the future as you upgrade your other software, Nik will cease working for you.  This is regrettable, because I still have found no other similar tools that perform as well as the Nik collection for most of its purposes.  Please share your suggestions for replacement tools as a comment at the end of this post!

In 2012, Nik Software, a small company known for their image processing tools that emulated the look and feel of using old film, was quietly acquired by a somewhat larger company known as Google.  This past spring, Google announced they were making the entire suite of Nik tools available for free to all users.  I’m just getting around to testing this suite of image editing software now, and from what I’ve seen so far its capabilities are leading-edge and would be well worth spending hundreds of dollars to obtain.  It doesn’t do everything, but what it does, it does better than tools such as Photoshop and Lightroom, each of which costs a good deal of money.  That Nik’s great capabilities are available for download completely gratis is a wonderful gift from the folks at Google, and I strongly recommend you give them a try.

It’s important to note that the Nik Collection of software tools is not intended to be standalone image processing software.  It consists of a set of plugins, each specialized for a different specific purpose, that must be accessed by a general-purpose image editing application such as Photoshop, Lightroom, or Aperture.  I use Lightroom for nearly all of my post-processing, so I used that application to access the Nik Collection.

Once you have your general image editing application installed, then you can download the Nik Collection modules for free at this site: https://www.google.com/nikcollection/.  When you are working in your application of choice, you will then have access to the various Nik Collection tools in the editing menus.  For example, when I select an image in Lightroom, I can access six of the seven Nik modules by pulling down the “Photo” menu and then pulling down the “Edit In” sub-menu.  One of the Nik modules, the HDR Efex tool, is accessed instead under the “File” and “Export with Preset” menu choices.

These are the seven Nik Collection modules included in the free download:

Analog Efex Pro

Explore the look and feel of classic cameras, films, and lenses.

Color Efex Pro

A comprehensive set of filters for color correction, retouching, and creative effects.

Silver Efex Pro

Master the art of black-and-white photography with darkroom-inspired controls.

Viveza

Selectively adjust the color and tonality of your images without complicated masks or selections.

HDR Efex Pro

From natural to artistic, explore the full potential of HDR photography.

Sharpener Pro

Bring out hidden details consistently with the professional’s choice for image sharpening.

Dfine

Improve your images with noise reduction tailored to your camera.

So far, I’ve played around with just three of these tools.
Silver Efex Pro did a very good job of converting my test images to monochrome.  I’m pretty good at using Lightroom’s tools to convert color images to black-and-white, but they take a lot of practice to master.  In Nik’s Silver Efex module I was able to make some good choices very quickly.  For those who want to fine-tune their black-and-white conversions, there are very good tools for detailed control over the process.
I used Nik’s Dfine module to attempt to reduce noise in a favorite shot of the Milky Way over Yosemite Valley’s Half Dome.  The results of my quick trial looked comparable to what I had done in Lightroom, but I suspect if I took the time to learn the Nik tool more thoroughly, I could end up with even better results.
Finally, I tested Nik’s HDR Efex Pro tool.  This little gem is a joy to use.  Just select the series of shots from which you want to build an HDR (High Dynamic Range) image, export them to HDR Efex, and click a couple of buttons to generate the base HRD image there.  My default image looked pretty good, but the Nik tool has a wide range of presets that allow you to generate different HDR effects with the click of a button.  I tried several of these presets until I found one that perfectly suited the scene.  A few more small tweaks using the detailed adjustment sliders, and I was ready to save the HDR image back into Lightroom.  In the past I have been very disappointed with Lightroom’s built-in HDR tools, and only slightly more satisfied with Photoshop’s HDR module, but the Nik HDR Efex Pro plugin does an amazing job.  It’s both easier to use and generates better results than the other HDR software I’ve used.  Specifically, the Nik tool does a much better job than the other tools at producing natural-looking colors and at removing the “ghosting” effects from when the underlying images are just a little bit different from one another.  Now I’m eager to find the time to go back to some of my favorite HDR images and rebuild them using the Nik software!
For comparison, here is a favorite HDR image of mine, first shown after processing in Photoshop’s HDR tools and then shown after processing in Nik’s HDR Efex Pro tools.
lrwm-lowres-5884This HDR image of Lago Grey with its glacier and the peaks of Torres del Paine National Park in Chile was processed using Photoshop’s HDR tools.  The colors appear unnaturally saturated and parts of the image (especially the tops of the mountains and the brush in the foreground) show some ghosting effects.
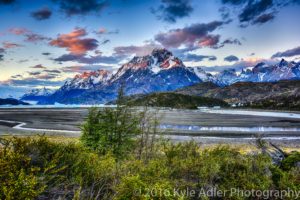
lrwm-lowres-5880-5884-hdrnikThis version was processed using the Nik Collection’s HDR Efex Pro tools.  The colors look much more natural and all parts of the image appear sharp and free from ghosting.
I am looking forward to revisiting many of my favorite images and reprocessing them using the Nik Collection’s tools.  I highly recommend this versatile, easy-to-use, and powerful suite of image editing modules.  And the price can’t be beat.
Have you used the Nik Collection for your own photography?  What do you like and dislike?  Please share your thoughts here.
Want to read more posts about post-processing your images?  Find them all here: Posts on Post-Processing.

Black-and-White to the Rescue [Encore Publication]: Converting a noisy or strangely colored image to monochrome can save the day

In a recent post (Post on Circus Automatic), I shared several practical tips for shooting fast-moving indoor performances, using a circus performance as an example.  While I was happy with many of my images from that evening’s shoot, I discussed how the single-colored LED lights now used at many indoor performances can impart an unnatural color cast to photos that can be hard to correct in post-processing.  In today’s post, I show how converting these images to black-and-white can overcome some of the limitations of shooting under these adverse lighting conditions, with the added bonus that the noise imparted to the images (from having to shoot at a very high ISO setting) can also be less noticeable in black-and-white conversions.

First, a little background explanation on why these LED lights are so troublesome for the photographer to work with.  When we refer to the resolution, or number of pixels, in our camera’s sensor, that number is actually the total count of three different kinds of pixels, each kind sensitive to only one of the three primary colors (red, blue, and green).  Without going into the nitty-gritty technical details, suffice it to say that in most camera sensors, about 50% of the pixels record only green data, about 25% only red data, and about 25% only blue data.  My camera (the Nikon D810) is said to have a resolution of 36.3 megapixels (MP), but if my subject is lit by a single-colored red LED, in reality only about 9 MP of resolution is recorded.  The other two color channels will essentially contain no data.  This is bad for several reasons, most notably because the image will be cast unnaturally toward the red color channel and because its effective resolution will be low.

There’s very little we can do in post-processing to recover from the loss of resolution during capture, but we can adjust the color temperature to try to correct a little bit of the strange color cast.  Converting the image to black-and-white, though, can restore the image to a more natural appearance by masking the color cast.  This can be aided by using Lightroom’s contrast and color control sliders to adjust the balance of the black-and-white version until it appears closest to a normal tone.

Consider the following two versions of the same shot.  The first version is in color, and even after adjusting the color temperature and contrast, there is still a distracting red color cast.  There is also some noise apparent in the image as a result of the high ISO setting required to freeze the acrobats’ motion.

The color version of this image appears unnatural even after adjusting color temperature, due to the lighting which consisted of a red-colored LED array.

Now, take a look at the black-and-white version of the same image.  Creating this version required careful attention to the balance of each color and contrast setting to make the final image.  The good news: the monochrome image appears much more natural to the eye than does the color version.  The skin tones seem less artificial, and the curtain in the background does not distract as much.  Furthermore, there is less noise apparent in the black-and-white version.
The same shot appears more natural and less noisy when converted to a black-and-white photo.  Buy this photo

This next shot appears much more acceptable in its color version.  During a live performance, the lighting often changes drastically from one moment to the next, and in this image the LED lights didn’t impart as harsh a red cast as in the previous image.  Furthermore, the aerialist was dressed entirely in red and was working with red ropes, so what red color cast was present does not appear as unnatural.

This image is highly effective when presented in full color.  Buy this photo

While I like this image for its dramatic power and strikingly vibrant red colors, let’s take a look at a black-and-white conversion for comparison.  The monochrome version lacks the visceral impact of the strident red color, but it benefits from a more natural tone, a quasi-documentary look and feel, and a nice clean black background.  In this case, the black-and-white conversion doesn’t so much rescue the image as change the kind of feeling it elicits.  I like both versions.
The black-and-white version is cleaner and evokes a very different set of emotions than does the color version.  Buy this photo

When you are forced to shoot under very difficult lighting conditions, try converting to black-and-white during post-processing.  It just might rescue some of your images and can evoke a very different feel in other images.

For a refresher on the black-and-white conversion process and when you may want to use it, read this post: Post on B&W Conversion.

During post-processing, have you been able to rescue or improve images shot under challenging lighting conditions?  Did you convert to black-and-white, or use different techniques?  Please share your experiences here.

In the Nik of Time [Encore Publication]: Google’s Nik Collection offers leading-edge image editing tools for free

In 2012, Nik Software, a small company known for their image processing tools that emulated the look and feel of using old film, was quietly acquired by a somewhat larger company known as Google.  This past spring, Google announced they were making the entire suite of Nik tools available for free to all users.  I’m just getting around to testing this suite of image editing software now, and from what I’ve seen so far its capabilities are leading-edge and would be well worth spending hundreds of dollars to obtain.  It doesn’t do everything, but what it does, it does better than tools such as Photoshop and Lightroom, each of which costs a good deal of money.  That Nik’s great capabilities are available for download completely gratis is a wonderful gift from the folks at Google, and I strongly recommend you give them a try.

It’s important to note that the Nik Collection of software tools is not intended to be standalone image processing software.  It consists of a set of plugins, each specialized for a different specific purpose, that must be accessed by a general-purpose image editing application such as Photoshop, Lightroom, or Aperture.  I use Lightroom for nearly all of my post-processing, so I used that application to access the Nik Collection.

Once you have your general image editing application installed, then you can download the Nik Collection modules for free at this site: https://www.google.com/nikcollection/.  When you are working in your application of choice, you will then have access to the various Nik Collection tools in the editing menus.  For example, when I select an image in Lightroom, I can access six of the seven Nik modules by pulling down the “Photo” menu and then pulling down the “Edit In” sub-menu.  One of the Nik modules, the HDR Efex tool, is accessed instead under the “File” and “Export with Preset” menu choices.

These are the seven Nik Collection modules included in the free download:

Analog Efex Pro

Explore the look and feel of classic cameras, films, and lenses.

Color Efex Pro

A comprehensive set of filters for color correction, retouching, and creative effects.

Silver Efex Pro

Master the art of black-and-white photography with darkroom-inspired controls.

Viveza

Selectively adjust the color and tonality of your images without complicated masks or selections.

HDR Efex Pro

From natural to artistic, explore the full potential of HDR photography.

Sharpener Pro

Bring out hidden details consistently with the professional’s choice for image sharpening.

Dfine

Improve your images with noise reduction tailored to your camera.

So far, I’ve played around with just three of these tools.
Silver Efex Pro did a very good job of converting my test images to monochrome.  I’m pretty good at using Lightroom’s tools to convert color images to black-and-white, but they take a lot of practice to master.  In Nik’s Silver Efex module I was able to make some good choices very quickly.  For those who want to fine-tune their black-and-white conversions, there are very good tools for detailed control over the process.
I used Nik’s Dfine module to attempt to reduce noise in a favorite shot of the Milky Way over Yosemite Valley’s Half Dome.  The results of my quick trial looked comparable to what I had done in Lightroom, but I suspect if I took the time to learn the Nik tool more thoroughly, I could end up with even better results.
Finally, I tested Nik’s HDR Efex Pro tool.  This little gem is a joy to use.  Just select the series of shots from which you want to build an HDR (High Dynamic Range) image, export them to HDR Efex, and click a couple of buttons to generate the base HRD image there.  My default image looked pretty good, but the Nik tool has a wide range of presets that allow you to generate different HDR effects with the click of a button.  I tried several of these presets until I found one that perfectly suited the scene.  A few more small tweaks using the detailed adjustment sliders, and I was ready to save the HDR image back into Lightroom.  In the past I have been very disappointed with Lightroom’s built-in HDR tools, and only slightly more satisfied with Photoshop’s HDR module, but the Nik HDR Efex Pro plugin does an amazing job.  It’s both easier to use and generates better results than the other HDR software I’ve used.  Specifically, the Nik tool does a much better job than the other tools at producing natural-looking colors and at removing the “ghosting” effects from when the underlying images are just a little bit different from one another.  Now I’m eager to find the time to go back to some of my favorite HDR images and rebuild them using the Nik software!
For comparison, here is a favorite HDR image of mine, first shown after processing in Photoshop’s HDR tools and then shown after processing in Nik’s HDR Efex Pro tools.
lrwm-lowres-5884This HDR image of Lago Grey with its glacier and the peaks of Torres del Paine National Park in Chile was processed using Photoshop’s HDR tools.  The colors appear unnaturally saturated and parts of the image (especially the tops of the mountains and the brush in the foreground) show some ghosting effects.
lrwm-lowres-5880-5884-hdrnikThis version was processed using the Nik Collection’s HDR Efex Pro tools.  The colors look much more natural and all parts of the image appear sharp and free from ghosting.
I am looking forward to revisiting many of my favorite images and reprocessing them using the Nik Collection’s tools.  I highly recommend this versatile, easy-to-use, and powerful suite of image editing modules.  And the price can’t be beat.
Have you used the Nik Collection for your own photography?  What do you like and dislike?  Please share your thoughts here.
Want to read more posts about post-processing your images?  Find them all here: Posts on Post-Processing.

Black-and-White to the Rescue [Encore Publication]: Converting a noisy or strangely colored image to monochrome can save the day

In a recent post (Post on Circus Automatic), I shared several practical tips for shooting fast-moving indoor performances, using a circus performance as an example.  While I was happy with many of my images from that evening’s shoot, I discussed how the single-colored LED lights now used at many indoor performances can impart an unnatural color cast to photos that can be hard to correct in post-processing.  In today’s post, I show how converting these images to black-and-white can overcome some of the limitations of shooting under these adverse lighting conditions, with the added bonus that the noise imparted to the images (from having to shoot at a very high ISO setting) can also be less noticeable in black-and-white conversions.

First, a little background explanation on why these LED lights are so troublesome for the photographer to work with.  When we refer to the resolution, or number of pixels, in our camera’s sensor, that number is actually the total count of three different kinds of pixels, each kind sensitive to only one of the three primary colors (red, blue, and green).  Without going into the nitty-gritty technical details, suffice it to say that in most camera sensors, about 50% of the pixels record only green data, about 25% only red data, and about 25% only blue data.  My camera (the Nikon D810) is said to have a resolution of 36.3 megapixels (MP), but if my subject is lit by a single-colored red LED, in reality only about 9 MP of resolution is recorded.  The other two color channels will essentially contain no data.  This is bad for several reasons, most notably because the image will be cast unnaturally toward the red color channel and because its effective resolution will be low.

There’s very little we can do in post-processing to recover from the loss of resolution during capture, but we can adjust the color temperature to try to correct a little bit of the strange color cast.  Converting the image to black-and-white, though, can restore the image to a more natural appearance by masking the color cast.  This can be aided by using Lightroom’s contrast and color control sliders to adjust the balance of the black-and-white version until it appears closest to a normal tone.

Consider the following two versions of the same shot.  The first version is in color, and even after adjusting the color temperature and contrast, there is still a distracting red color cast.  There is also some noise apparent in the image as a result of the high ISO setting required to freeze the acrobats’ motion.

The color version of this image appears unnatural even after adjusting color temperature, due to the lighting which consisted of a red-colored LED array.

Now, take a look at the black-and-white version of the same image.  Creating this version required careful attention to the balance of each color and contrast setting to make the final image.  The good news: the monochrome image appears much more natural to the eye than does the color version.  The skin tones seem less artificial, and the curtain in the background does not distract as much.  Furthermore, there is less noise apparent in the black-and-white version.
The same shot appears more natural and less noisy when converted to a black-and-white photo.  Buy this photo

This next shot appears much more acceptable in its color version.  During a live performance, the lighting often changes drastically from one moment to the next, and in this image the LED lights didn’t impart as harsh a red cast as in the previous image.  Furthermore, the aerialist was dressed entirely in red and was working with red ropes, so what red color cast was present does not appear as unnatural.

This image is highly effective when presented in full color.  Buy this photo

While I like this image for its dramatic power and strikingly vibrant red colors, let’s take a look at a black-and-white conversion for comparison.  The monochrome version lacks the visceral impact of the strident red color, but it benefits from a more natural tone, a quasi-documentary look and feel, and a nice clean black background.  In this case, the black-and-white conversion doesn’t so much rescue the image as change the kind of feeling it elicits.  I like both versions.
The black-and-white version is cleaner and evokes a very different set of emotions than does the color version.  Buy this photo

When you are forced to shoot under very difficult lighting conditions, try converting to black-and-white during post-processing.  It just might rescue some of your images and can evoke a very different feel in other images.

For a refresher on the black-and-white conversion process and when you may want to use it, read this post: Post on B&W Conversion.

During post-processing, have you been able to rescue or improve images shot under challenging lighting conditions?  Did you convert to black-and-white, or use different techniques?  Please share your experiences here.

In the Nik of Time [Encore Publication]: Google’s Nik Collection offers leading-edge image editing tools for free

In 2012, Nik Software, a small company known for their image processing tools that emulated the look and feel of using old film, was quietly acquired by a somewhat larger company known as Google.  This past spring, Google announced they were making the entire suite of Nik tools available for free to all users.  I’m just getting around to testing this suite of image editing software now, and from what I’ve seen so far its capabilities are leading-edge and would be well worth spending hundreds of dollars to obtain.  It doesn’t do everything, but what it does, it does better than tools such as Photoshop and Lightroom, each of which costs a good deal of money.  That Nik’s great capabilities are available for download completely gratis is a wonderful gift from the folks at Google, and I strongly recommend you give them a try.

It’s important to note that the Nik Collection of software tools is not intended to be standalone image processing software.  It consists of a set of plugins, each specialized for a different specific purpose, that must be accessed by a general-purpose image editing application such as Photoshop, Lightroom, or Aperture.  I use Lightroom for nearly all of my post-processing, so I used that application to access the Nik Collection.

Once you have your general image editing application installed, then you can download the Nik Collection modules for free at this site: https://www.google.com/nikcollection/.  When you are working in your application of choice, you will then the various Nik Collection tools in the editing menus.  For example, when I select an image in Lightroom, I can access six of the seven Nik modules by pulling down the “Photo” menu and then pulling down the “Edit In” sub-menu.  One of the Nik modules, the HDR Efex tool, is accessed instead under the “File” and “Export with Preset” menu choices.

These are the seven Nik Collection modules included in the free download:

Analog Efex Pro

Explore the look and feel of classic cameras, films, and lenses.

Color Efex Pro

A comprehensive set of filters for color correction, retouching, and creative effects.

Silver Efex Pro

Master the art of black-and-white photography with darkroom-inspired controls.

Viveza

Selectively adjust the color and tonality of your images without complicated masks or selections.

HDR Efex Pro

From natural to artistic, explore the full potential of HDR photography.

Sharpener Pro

Bring out hidden details consistently with the professional’s choice for image sharpening.

Dfine

Improve your images with noise reduction tailored to your camera.

So far, I’ve played around with just three of these tools.
Silver Efex Pro did a very good job of converting my test images to monochrome.  I’m pretty good at using Lightroom’s tools to convert color images to black-and-white, but they take a lot of practice to master.  In Nik’s Silver Efex module I was able to make some good choices very quickly.  For those who want to fine-tune their black-and-white conversions, there are very good tools for detailed control over the process.
I used Nik’s Dfine module to attempt to reduce noise in a favorite shot of the Milky Way over Yosemite Valley’s Half Dome.  The results of my quick trial looked comparable to what I had done in Lightroom, but I suspect if I took the time to learn the Nik tool more thoroughly, I could end up with even better results.
Finally, I tested Nik’s HDR Efex Pro tool.  This little gem is a joy to use.  Just select the series of shots from which you want to build an HDR (High Dynamic Range) image, export them to HDR Efex, and click a couple of buttons to generate the base HRD image there.  My default image looked pretty good, but the Nik tool has a wide range of presets that allow you to generate different HDR effects with the click of a button.  I tried several of these presets until I found one that perfectly suited the scene.  A few more small tweaks using the detailed adjustment sliders, and I was ready to save the HDR image back into Lightroom.  In the past I have been very disappointed with Lightroom’s built-in HDR tools, and only slightly more satisfied with Photoshop’s HDR module, but the Nik HDR Efex Pro plugin does an amazing job.  It’s both easier to use and generates better results than the other HDR software I’ve used.  Specifically, the Nik tool does a much better job than the other tools at producing natural-looking colors and at removing the “ghosting” effects from when the underlying images are just a little bit different from one another.  Now I’m eager to find the time to go back to some of my favorite HDR images and rebuild them using the Nik software!
For comparison, here is a favorite HDR image of mine, first shown after processing in Photoshop’s HDR tools and then shown after processing in Nik’s HDR Efex Pro tools.
lrwm-lowres-5884This HDR image of Lago Grey with its glacier and the peaks of Torres del Paine National Park in Chile was processed using Photoshop’s HDR tools.  The colors appear unnaturally saturated and parts of the image (especially the tops of the mountains and the brush in the foreground) show some ghosting effects.
lrwm-lowres-5880-5884-hdrnikThis version was processed using the Nik Collection’s HDR Efex Pro tools.  The colors look much more natural and all parts of the image appear sharp and free from ghosting.
I am looking forward to revisiting many of my favorite images and reprocessing them using the Nik Collection’s tools.  I highly recommend this versatile, easy-to-use, and powerful suite of image editing modules.  And the price can’t be beat.
Have you used the Nik Collection for your own photography?  What do you like and dislike?  Please share your thoughts here.
Want to read more posts about post-processing your images?  Find them all here: Posts on Post-Processing.

Black-and-White to the Rescue [Encore Publication]: Converting a noisy or strangely colored image to monochrome can save the day

In a recent post (Post on Circus Automatic), I shared several practical tips for shooting fast-moving indoor performances, using a circus performance as an example.  While I was happy with many of my images from that evening’s shoot, I discussed how the single-colored LED lights now used at many indoor performances can impart an unnatural color cast to photos that can be hard to correct in post-processing.  In today’s post, I show how converting these images to black-and-white can overcome some of the limitations of shooting under these adverse lighting conditions, with the added bonus that the noise imparted to the images (from having to shoot at a very high ISO setting) can also be less noticeable in black-and-white conversions.

First, a little background explanation on why these LED lights are so troublesome for the photographer to work with.  When we refer to the resolution, or number of pixels, in our camera’s sensor, that number is actually the total count of three different kinds of pixels, each kind sensitive to only one of the three primary colors (red, blue, and green).  Without going into the nitty-gritty technical details, suffice it to say that in most camera sensors, about 50% of the pixels record only green data, about 25% only red data, and about 25% only blue data.  My camera (the Nikon D810) is said to have a resolution of 36.3 megapixels (MP), but if my subject is lit by a single-colored red LED, in reality only about 9 MP of resolution is recorded.  The other two color channels will essentially contain no data.  This is bad for several reasons, most notably because the image will be cast unnaturally toward the red color channel and because its effective resolution will be low.

There’s very little we can do in post-processing to recover from the loss of resolution during capture, but we can adjust the color temperature to try to correct a little bit of the strange color cast.  Converting the image to black-and-white, though, can restore the image to a more natural appearance by masking the color cast.  This can be aided by using Lightroom’s contrast and color control sliders to adjust the balance of the black-and-white version until it appears closest to a normal tone.

Consider the following two versions of the same shot.  The first version is in color, and even after adjusting the color temperature and contrast, there is still a distracting red color cast.  There is also some noise apparent in the image as a result of the high ISO setting required to freeze the acrobats’ motion.

The color version of this image appears unnatural even after adjusting color temperature, due to the lighting which consisted of a red-colored LED array.

Now, take a look at the black-and-white version of the same image.  Creating this version required careful attention to the balance of each color and contrast setting to make the final image.  The good news: the monochrome image appears much more natural to the eye than does the color version.  The skin tones seem less artificial, and the curtain in the background does not distract as much.  Furthermore, there is less noise apparent in the black-and-white version.
The same shot appears more natural and less noisy when converted to a black-and-white photo.  Buy this photo

This next shot appears much more acceptable in its color version.  During a live performance, the lighting often changes drastically from one moment to the next, and in this image the LED lights didn’t impart as harsh a red cast as in the previous image.  Furthermore, the aerialist was dressed entirely in red and was working with red ropes, so what red color cast was present does not appear as unnatural.

This image is highly effective when presented in full color.  Buy this photo

While I like this image for its dramatic power and strikingly vibrant red colors, let’s take a look at a black-and-white conversion for comparison.  The monochrome version lacks the visceral impact of the strident red color, but it benefits from a more natural tone, a quasi-documentary look and feel, and a nice clean black background.  In this case, the black-and-white conversion doesn’t so much rescue the image as change the kind of feeling it elicits.  I like both versions.
The black-and-white version is cleaner and evokes a very different set of emotions than does the color version.  Buy this photo

When you are forced to shoot under very difficult lighting conditions, try converting to black-and-white during post-processing.  It just might rescue some of your images and can evoke a very different feel in other images.

For a refresher on the black-and-white conversion process and when you may want to use it, read this post: Post on B&W Conversion.

During post-processing, have you been able to rescue or improve images shot under challenging lighting conditions?  Did you convert to black-and-white, or use different techniques?  Please share your experiences here.

In the Nik of Time: Google’s Nik Collection offers leading-edge image editing tools for free

In 2012, Nik Software, a small company known for their image processing tools that emulated the look and feel of using old film, was quietly acquired by a somewhat larger company known as Google.  This past spring, Google announced they were making the entire suite of Nik tools available for free to all users.  I’m just getting around to testing this suite of image editing software now, and from what I’ve seen so far its capabilities are leading-edge and would be well worth spending hundreds of dollars to obtain.  It doesn’t do everything, but what it does, it does better than tools such as Photoshop and Lightroom, each of which costs a good deal of money.  That Nik’s great capabilities are available for download completely gratis is a wonderful gift from the folks at Google, and I strongly recommend you give them a try.

It’s important to note that the Nik Collection of software tools is not intended to be standalone image processing software.  It consists of a set of plugins, each specialized for a different specific purpose, that must be accessed by a general-purpose image editing application such as Photoshop, Lightroom, or Aperture.  I use Lightroom for nearly all of my post-processing, so I used that application to access the Nik Collection.

Once you have your general image editing application installed, then you can download the Nik Collection modules for free at this site: https://www.google.com/nikcollection/.  When you are working in your application of choice, you will then the various Nik Collection tools in the editing menus.  For example, when I select an image in Lightroom, I can access six of the seven Nik modules by pulling down the “Photo” menu and then pulling down the “Edit In” sub-menu.  One of the Nik modules, the HDR Efex tool, is accessed instead under the “File” and “Export with Preset” menu choices.

These are the seven Nik Collection modules included in the free download:

Analog Efex Pro

Explore the look and feel of classic cameras, films, and lenses.

Color Efex Pro

A comprehensive set of filters for color correction, retouching, and creative effects.

Silver Efex Pro

Master the art of black-and-white photography with darkroom-inspired controls.

Viveza

Selectively adjust the color and tonality of your images without complicated masks or selections.

HDR Efex Pro

From natural to artistic, explore the full potential of HDR photography.

Sharpener Pro

Bring out hidden details consistently with the professional’s choice for image sharpening.

Dfine

Improve your images with noise reduction tailored to your camera.

So far, I’ve played around with just three of these tools.
Silver Efex Pro did a very good job of converting my test images to monochrome.  I’m pretty good at using Lightroom’s tools to convert color images to black-and-white, but they take a lot of practice to master.  In Nik’s Silver Efex module I was able to make some good choices very quickly.  For those who want to fine-tune their black-and-white conversions, there are very good tools for detailed control over the process.
I used Nik’s Dfine module to attempt to reduce noise in a favorite shot of the Milky Way over Yosemite Valley’s Half Dome.  The results of my quick trial looked comparable to what I had done in Lightroom, but I suspect if I took the time to learn the Nik tool more thoroughly, I could end up with even better results.
Finally, I tested Nik’s HDR Efex Pro tool.  This little gem is a joy to use.  Just select the series of shots from which you want to build an HDR (High Dynamic Range) image, export them to HDR Efex, and click a couple of buttons to generate the base HRD image there.  My default image looked pretty good, but the Nik tool has a wide range of presets that allow you to generate different HDR effects with the click of a button.  I tried several of these presets until I found one that perfectly suited the scene.  A few more small tweaks using the detailed adjustment sliders, and I was ready to save the HDR image back into Lightroom.  In the past I have been very disappointed with Lightroom’s built-in HDR tools, and only slightly more satisfied with Photoshop’s HDR module, but the Nik HDR Efex Pro plugin does an amazing job.  It’s both easier to use and generates better results than the other HDR software I’ve used.  Specifically, the Nik tool does a much better job than the other tools at producing natural-looking colors and at removing the “ghosting” effects from when the underlying images are just a little bit different from one another.  Now I’m eager to find the time to go back to some of my favorite HDR images and rebuild them using the Nik software!
For comparison, here is a favorite HDR image of mine, first shown after processing in Photoshop’s HDR tools and then shown after processing in Nik’s HDR Efex Pro tools.
lrwm-lowres-5884This HDR image of Lago Grey with its glacier and the peaks of Torres del Paine National Park in Chile was processed using Photoshop’s HDR tools.  The colors appear unnaturally saturated and parts of the image (especially the tops of the mountains and the brush in the foreground) show some ghosting effects.
lrwm-lowres-5880-5884-hdrnikThis version was processed using the Nik Collection’s HDR Efex Pro tools.  The colors look much more natural and all parts of the image appear sharp and free from ghosting.
I am looking forward to revisiting many of my favorite images and reprocessing them using the Nik Collection’s tools.  I highly recommend this versatile, easy-to-use, and powerful suite of image editing modules.  And the price can’t be beat.
Have you used the Nik Collection for your own photography?  What do you like and dislike?  Please share your thoughts here.

Black-and-White to the Rescue: Converting a noisy or strangely colored image to monochrome can save the day

In yesterday’s post (Post on Circus Automatic), I shared several practical tips for shooting fast-moving indoor performances, using a recent circus performance as an example.  While I was happy with many of my images from that evening’s shoot, I discussed how the single-colored LED lights now used at many indoor performances can impart an unnatural color cast to photos that can be hard to correct in post-processing.  In today’s post, I show how converting these images to black-and-white can overcome some of the limitations of shooting under these adverse lighting conditions, with the added bonus that the noise imparted to the images (from having to shoot at a very high ISO setting) can also be less noticeable in black-and-white conversions.

First, a little background explanation on why these LED lights are so troublesome for the photographer to work with.  When we refer to the resolution, or number of pixels, in our camera’s sensor, that number is actually the total count of three different kinds of pixels, each kind sensitive to only one of the three primary colors (red, blue, and green).  Without going into the nitty-gritty technical details, suffice it to say that in most camera sensors, about 50% of the pixels record only green data, about 25% only red data, and about 25% only blue data.  My camera (the Nikon D810) is said to have a resolution of 36.3 megapixels (MP), but if my subject is lit by a single-colored red LED, in reality only about 9 MP of resolution is recorded.  The other two color channels will essentially contain no data.  This is bad for several reasons, most notably because the image will be cast unnaturally toward the red color channel and because its effective resolution will be low.

There’s very little we can do in post-processing to recover from the loss of resolution during capture, but we can adjust the color temperature to try to correct a little bit of the strange color cast.  Converting the image to black-and-white, though, can restore the image to a more natural appearance by masking the color cast.  This can be aided by using Lightroom’s contrast and color control sliders to adjust the balance of the black-and-white version until it appears closest to a normal tone.

Consider the following two versions of the same shot.  The first version is in color, and even after adjusting the color temperature and contrast, there is still a distracting red color cast.  There is also some noise apparent in the image as a result of the high ISO setting required to freeze the acrobats’ motion.

The color version of this image appears unnatural even after adjusting color temperature, due to the lighting which consisted of a red-colored LED array.

Now, take a look at the black-and-white version of the same image.  Creating this version required careful attention to the balance of each color and contrast setting to make the final image.  The good news: the monochrome image appears much more natural to the eye than does the color version.  The skin tones seem less artificial, and the curtain in the background does not distract as much.  Furthermore, there is less noise apparent in the black-and-white version.
The same shot appears more natural and less noisy when converted to a black-and-white photo.  Buy this photo

This next shot appears much more acceptable in its color version.  During a live performance, the lighting often changes drastically from one moment to the next, and in this image the LED lights didn’t impart as harsh a red cast as in the previous image.  Furthermore, the aerialist was dressed entirely in red and was working with red ropes, so what red color cast was present does not appear as unnatural.

This image is highly effective when presented in full color.  Buy this photo

While I like this image for its dramatic power and strikingly vibrant red colors, let’s take a look at a black-and-white conversion for comparison.  The monochrome version lacks the visceral impact of the strident red color, but it benefits from a more natural tone, a quasi-documentary look and feel, and a nice clean black background.  In this case, the black-and-white conversion doesn’t so much rescue the image as change the kind of feeling it elicits.  I like both versions.
The black-and-white version is cleaner and evokes a very different set of emotions than does the color version.  Buy this photo

When you are forced to shoot under very difficult lighting conditions, try converting to black-and-white during post-processing.  It just might rescue some of your images and can evoke a very different feel in other images.

For a refresher on the black-and-white conversion process and when you may want to use it, read this post: Post on B&W Conversion.

During post-processing, have you been able to rescue or improve images shot under challenging lighting conditions?  Did you convert to black-and-white, or use different techniques?  Please share your experiences here.